FortiGate VDOM
FortiGate VDOM or Virtual Domain split FortiGate device into multiple virtual devices. Each VDOM has independent security policies, routing table and by-default traffic from VDOM can not move to different VDOM which means two interfaces of different VDOM can share the same IP Address without any overlapping IP/subnet problem.
When VDOM is used in a firewall, a single FortiGate device becomes a virtual data centre of network security, UTM and secure network communication devices. By-default a FortiGate Firewall can support up to 10 VDOMs. However, anyone can customize and add further 10 more VDOMs in FortiGate High end firewall.
- Independent VDOMs: Some VDOMS are completely separated. There is no communication between them. Each VDOM has its own physical interface link to the internet. Such kind of set-up is used where multiple ISPs have been deployed in the network topology.
- Routing through the VDOM: Traffic destined to the Internet will always be routed through the designated/assigned VDOM. Single routing VDOM will be used to route the traffic towards the internet. For example, if there are three VDOM in the firewall but they all will use the same routing VDOM to forward the traffic towards the outside world.
- Meshed VDOMs: VDOMs connect to the other VDOMs through inter-VDOM links. We can specify what kind of traffic goes to which VDOM.
- Management VDOM: It is used to forward system/Fortigate generated traffic such as system daemons, NTP traffic . It is the VDOM from where all management traffic for FortiGate firewall originates. Management VDOM must have access to all the global services like
- NTP
- FortiGuard Update Queries
- SNMP
- DNS Filtering
- Logs – Syslog and FortiAnalyzer
- Management related services
FortiGate VDOM Administrators
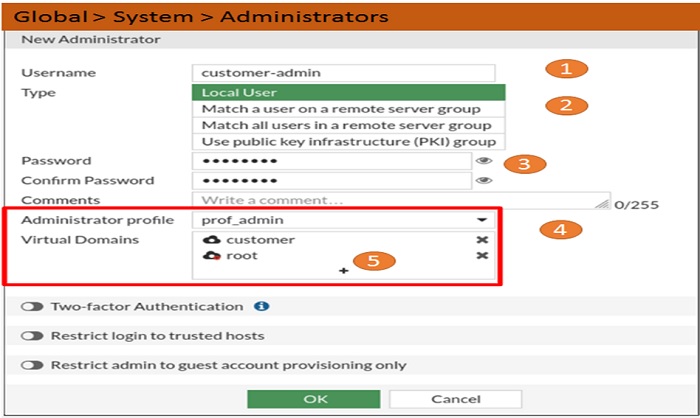
Super_user OR admin account can configure and backup the VDOM. Select super_admin access profile when configuring the admin account similar to the account name Admin this account can configure all VDOMs.
- Per-VDOM Administrator: In most cases, creation of admin account per VDOM account is considered. Per-VDOM admin is solely responsible for its domain including the configuration backup of that VDOM. In larger organisations you may need to make multiple VDOM administrators. You can assign multiple administrators to each VDOM.
*Per-VDOM admin can not access global settings of FortiGate Firewall*
- Create VDOM Administrator Account : Follow step 1 to step 5 to create VDOM admin Account in FortiGate Firewall
FortiGate VDOM Modes
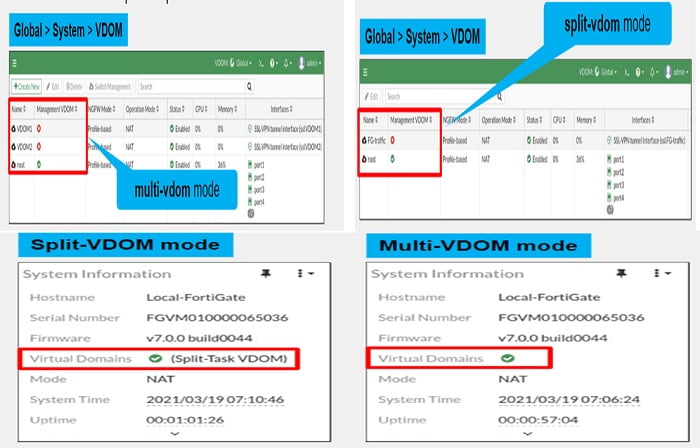
There are two types of VDOMs modes in FortiGate – Split VDOM and Multi-VDOM.
- Split VDOM: In Split VDOM FortiGate has two VDOMs in total which includes root and FG-Traffic VDOM. You cannot add VDOM in Split VDOM mode. It keeps management and network traffic separate
- Root :: management work can only allowed and has separate entries
- FG-Traffic :: can provide separate security policies and allow traffic through FortiGate. It is only for network traffic.
- Multi-VDOM : Can create multiple VDOMs that function as multiple independent units. We use multiple VDOM when we want to create multiple logical firewall features by using a single hardware device, each VDOM acts as an independent FortiGate Firewall. Such kind of configuration works for a setup for managed service provider leveraging multi tenant configuration or large enterprise organisation that desire departmental segmentation . You can give each individual tenant or department visibility and managed control independently.
Configure & Enable VDOM in FortiGate Firewall
Login into the command line to enable VDOM property in FortiGate firewall.
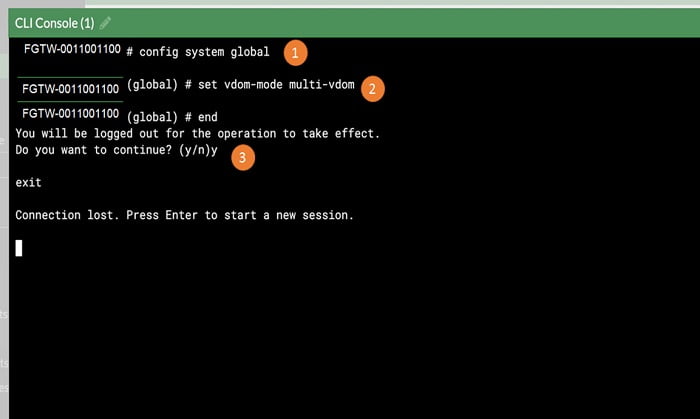
1. Type command # config global system-> to enter global mode of firewall
2. Select VDOM mode by # set vdom-mode split-vdom OR set vdom-mode multi-vdom
3. Here we have selected multi-vdom mode
3.1 Let’s End the session
4. It will NOT Reboot the device to enable vdom mode, it just logs you out
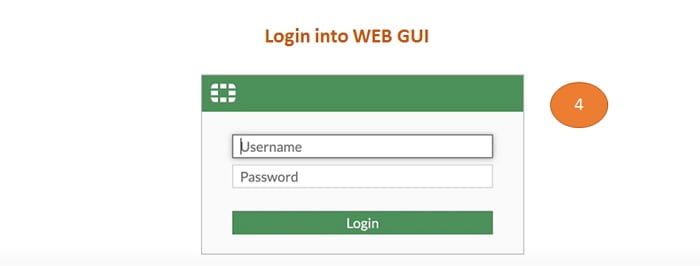
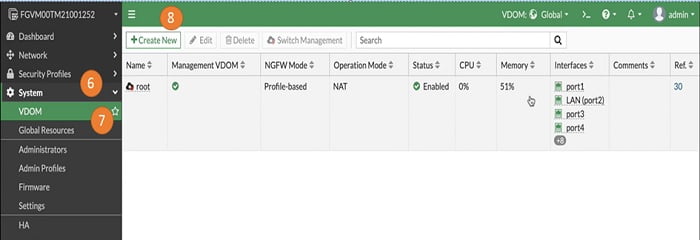
5. Select Global VDOM from FortiGate WEB GUI
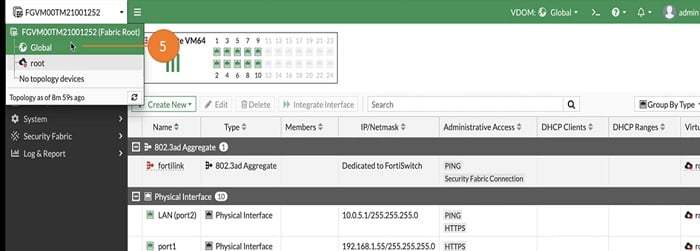
6. We can go to System
7. Select VDOM. By default root VDOM is available in the config
8. Lets create New VDOM
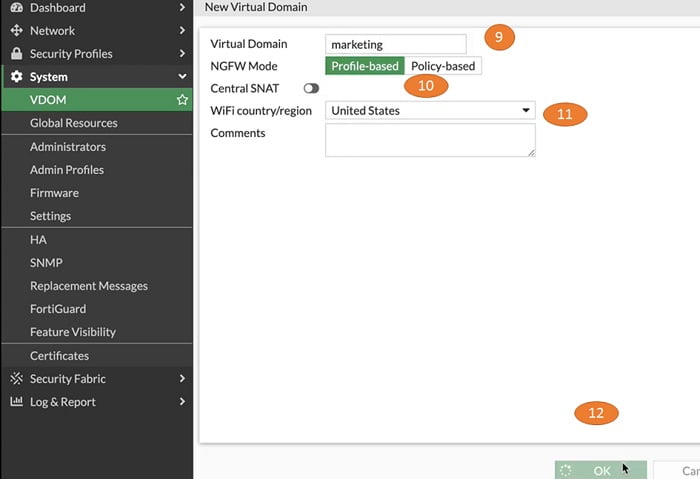
9. Name new VDOM – marketing
10. NGFW Firewall mode->Profile based
11. WifiCountry-> select as per your available data in FortiGate Firewall
12. Select OK
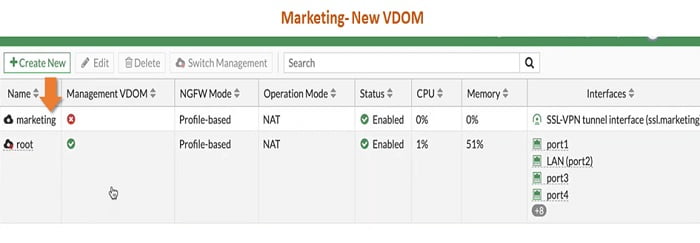
Next step to add interfaces in new VDOM-> marketing
13. Go to Global VDOM-> Select Network-> move to Interfaces
14. Select Physical/logical interface which you want to add in VDOM-marketing
15. Choose Edit
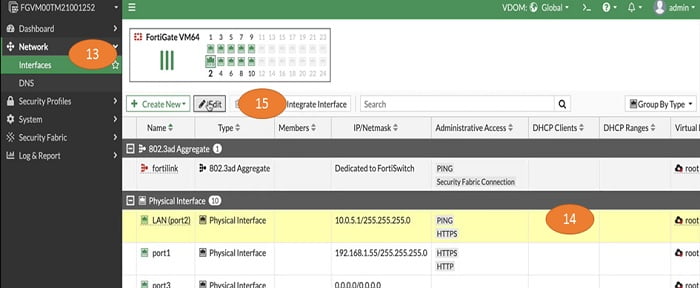
16. Select marketing in Virtual domain field of interface LAN(port2)
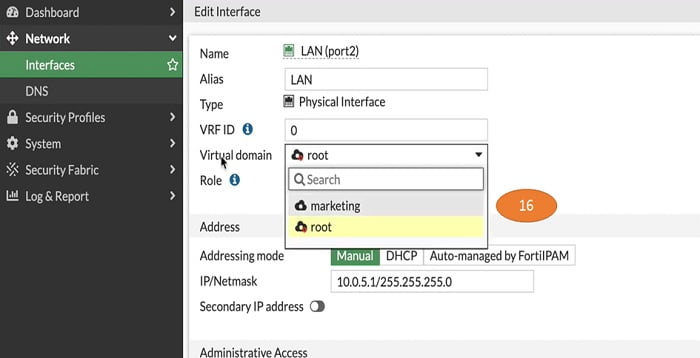
17. Lets allocate another interface port 3 in VDOM-marketing
18. Go to Edit button
19. Select marketing Virtual Domain in port 3 interface
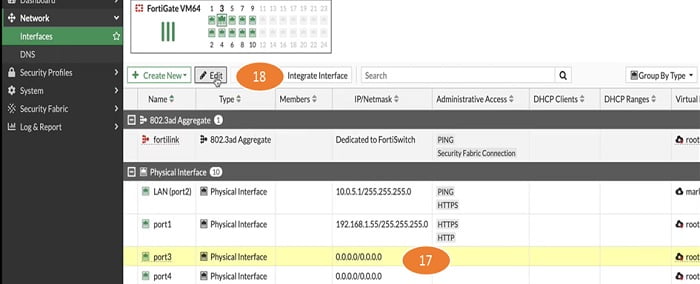
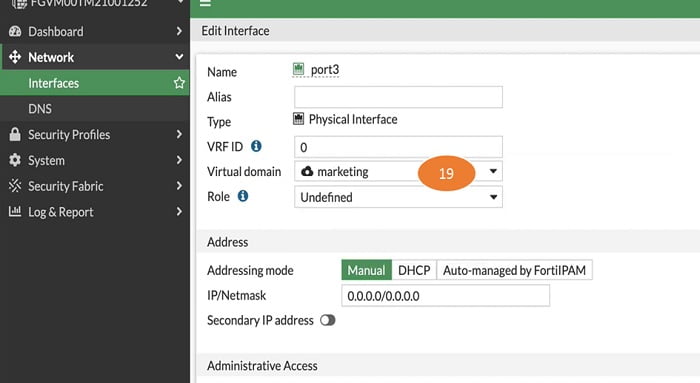
20. Select marketing VDOM from FortiGate Firewall
21. Move to the interfaces button and check if all the interfaces which are allocated to marketing domain are present in the interface TAB
22. Both port 2 and port 3 interfaces now available to marketing VDOM
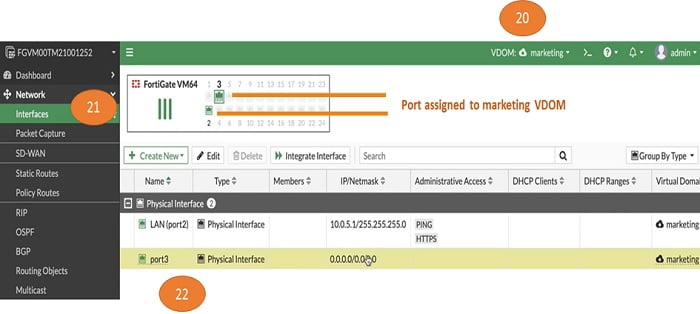
This is how anyone can associate interfaces to virtual domains in FortiGate Firewall. Admin can configure each setting differently in VDOM. Examples are
- Firewall Policies
- Firewall Objects
- Security Profiles , routes, network interfaces
- Operating mode- NAT/route
Inter-VDOM Links
Inter-VDOM links route traffic between VDOMs.
Each VDOM behaves like a separate FortiGate Firewall , with a separate FortiGate device we normally connect cables and configure routing and policies between them. Apparently VDOMs are on the same device/ FortiGate Firewall, then how should admin route traffic between them.
The solution to the above requirement is Inter-VDOM-Link. Inter-VDOM-Link is a type of virtual interface that routes traffic between VDOMs. It removes the loop of physical cable requirement.
Limitation -> Layer 3 interfaces are required, admin cannot interlink layer 2 or transparent mode interfaces in FortiGate.
Pre-requisites to configure Inter-VDOM links:
- Routes are required to forward the traffic from one VDOM to another
- Firewall policies are also required to allow traffic from other VDOMs , the same as the traffic coming from physical interface
- When creating inter-VDOM-link admin must create virtual interfaces
Steps to Create Inter-VDOM-Link
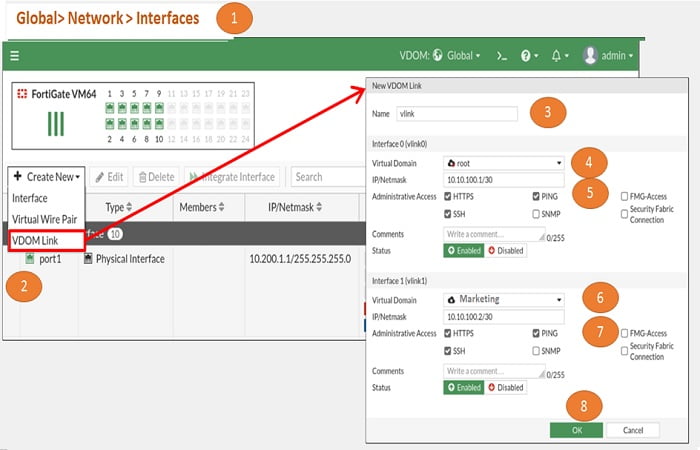
1. Go to Global> Network >Interfaces
2. Select Create New> VDOM Link
3. Provide name to the link
4. Select the first FortiGate VDOM through which another VDOM link will be connected. Here first VDOM link is root and second VDOM link is marketing
5. We are creating point-to-point link hence we have give two IP addresses in IP/Netmask 10.10.100.1/30 in NAT mode
6. Select another V-link which is marketing
7. Provide IP address 10.10.100.2/30
8. Select OK to make the configuration changes
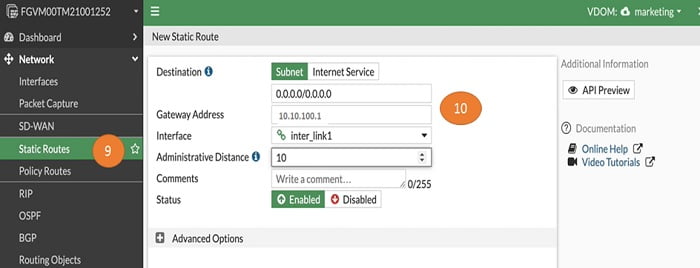
Now add static routing in marketing-VDOM to provide communication between root VDOM and Marketing VDOM.
9. Go to static routes
10. Add static route for marketing VDOM along with Gateway address and add vlink interface
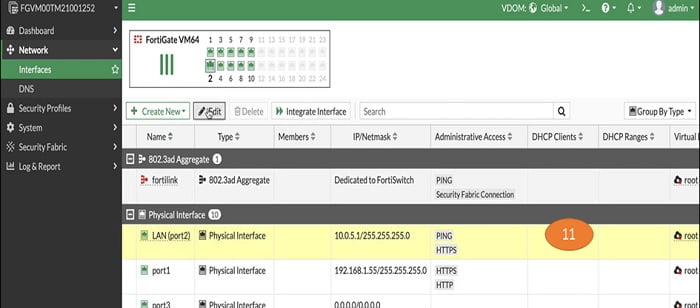
Enable static routing in root VDOM as well
11. Assign marketing physical interface IP address as a destination. Here, we have taken port 2 whose IP address is 10.0.5.1/24
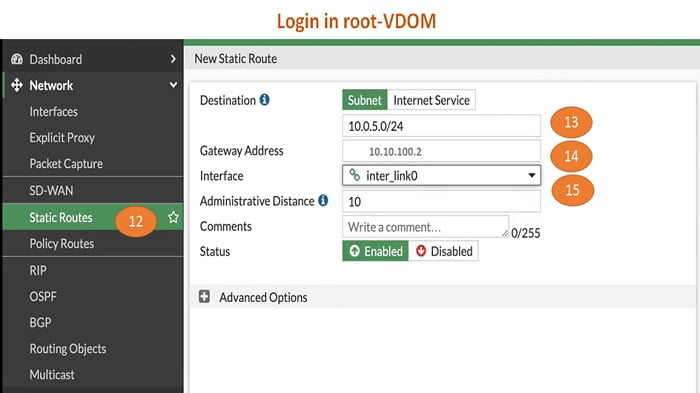
12. After login in root VDOM, go to static routes
13. Enter Destination IP address which is port 2 interface IP address of marketing VDOM
14. Gateway address
15. Interface of Marketing vlink
Enable Firewall Policy between FortiGate VDOMs
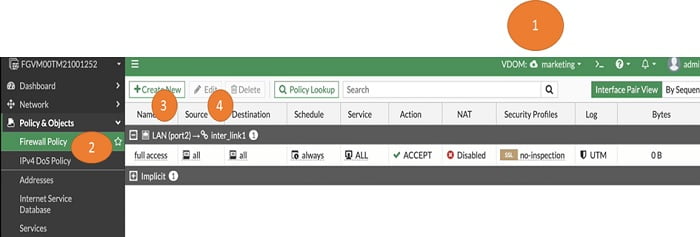
Now create firewall policy to allow traffic between two FortiGate VDOMs
1. Login in Marketing VDOM
2. Go to Security Policy and create policy between root and marketing VDOMs
3. Source Interface LAN Port 2
4. Destination interface interlink 1
5. Disable NAT>> NAT is not required between these VDOMs
Create same policy in root VDOM
1. Login in root VDOM
2. Go to Security Policy and create policy between root and marketing VDOMs
3. Source Interface inter_link0 (root interlink)
4. Destination interface port1 > WAN interface to internet
5. Enable NAT>> NAT is required to reach internet from FortiGate Firewall

After configuring firewall policies login in marketing VDOM and try to ping google.com. Policies are working fine if you get a ping response from google.com.
No comments:
Post a Comment