NAT is a process that enables a single device such as a firewall or router to act as an agent between the internet or public network to LAN or private segment.
NAT is usually use for below reasons
- It proves security, addresses behind the NAT device is virtually hidden
- It provides Public IP address for private IP addresses to make traffic routable
**In the FortiGate firewall we can apply NAT directly to the policy without creating a separate NAT policy.
FortiGate NAT
FortiGate provides below NAT features in the Firewall:
- SNAT
- DNAT
- PAT
FortiGate NAT Modes
Firewall Policy NAT – SNAT and DNAT must be configured for Firewall policies. SNAT takes the outgoing interface IP address of the firewall as a source address. DNAT uses configured VIP.
Central NAT – SNAT and DNAT are configured as per the VDOM (virtual Domain)
- SNAT rule is implemented from central SNAT Policy
- DNAT is configured from DNAT and VIPs
Firewall Policy NAT
We can configure Firewall policy NAT by applying two different ways
- Use outgoing interface as a NAT IP address
- Use predefined pool (dynamic pool)
Firewall policies can be configured by using below types of NAT
- Static SNAT
- Dynamic SNAT
Static SNAT
In Static SNAT all internal IP addresses will be translated to a single Public IP address by using multiple source ports.
E.g.
10.10.10.1-> source port 1110-> NAT IP address 172.16.100.1:5001
10.10.10.2-> source port 1111-> NAT IP address 172.16.100.1:5002
10.10.10.3->source port 1112->NAT IP address 172.16.100.1:5003
How to configure Static SNAT
1. Create Security Policy -> IPV4 Policy
2. Give the details in the policy TAB, add source address/subnet
3. Add Destination address/subnet
4. Add Service/port
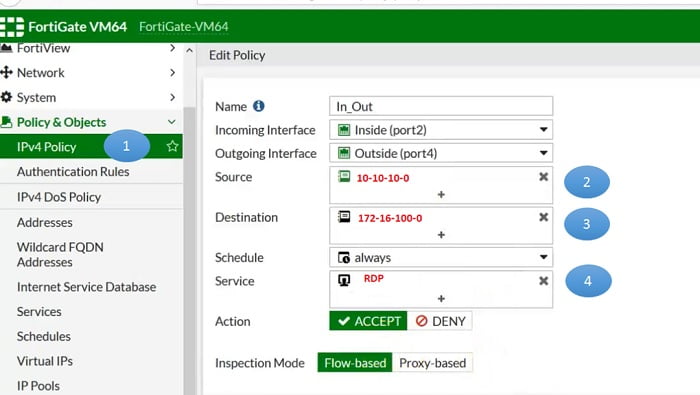
5. Accept the policy
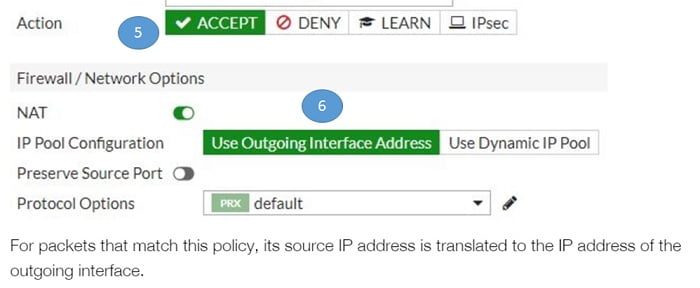
6. Select NAT-ON, Select Outgoing Interface Address
Dynamic SNAT
Dynamic SNAT maps private IP addresses with the IP pool of Public IP.
4-types of IP Pool are available in FortiGate Firewall
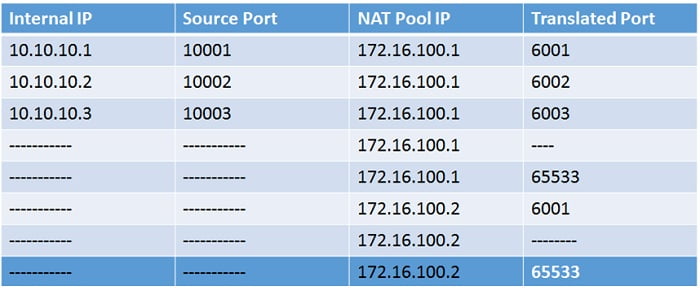
Overload
It contains more than one Public IP addresses. Internal IP addresses can use available IP addresses from public pools to exit the firewall. Source and destination ports are mapped from 1024 to 65533.
Configure Overload Dynamic SNAT
1. Create IP Pool for Public IP address>> Go to Policy & Objects
2. Name the pool and select type>> Overload
3. Select Pool Subnet IP or range
4. Apply the pool in the security policy
5. Select NAT-ON>> IP Pool Configuration Use Dynamic IP Pool
6. Choose Overload Pool>> NAT_POOL
One-to-One Dynamic SNAT
It means there is one-to-one IP match of internal IP address with external IP address, example
10.10.1.1>>>172.168.1.1
10.10.1.2>>>172.168.1.2
10.10.1.3>>>172.168.1.3
If there are 100 users in a LAN network for which one-to-one SNAT is used, then we would require 100 Public IP range.
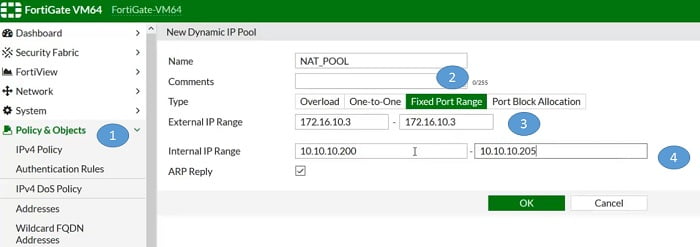
Fixed Port Range
In Fixed Port Range we need to mention Internal/LAN IP address range. Here, we can define internal and external public IP ranges both.
Further FortiGate devices can calculate port range for each combination from source IP address range to translated IP address range.
- Create NAT_POOL for Fixed Port Range
- Select type Fixed Port Range
- Add External IP Range
- Add Internal IP range detail
Apply the Pool in Security policy
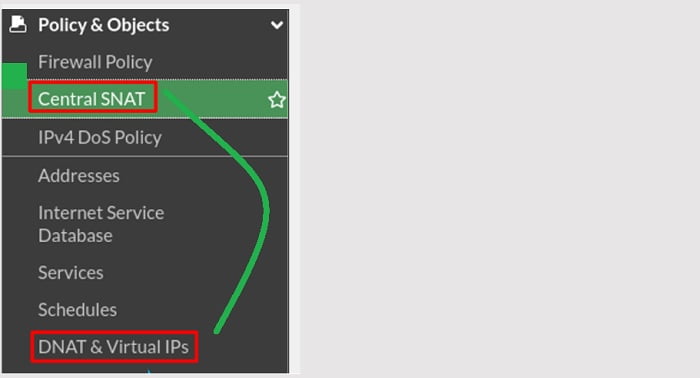
Central NAT
Before discussing Central NAT, we should know about VIP objects.
VIP is DNAT objects, for session mapping. VIP means destination address is translated which means public IP address translated to local server IP address.
Default VIP type is static NAT. Static NAT is one-to-one mapping which applies to incoming and outgoing connections(bi-directional).
** VIP address must be routable towards external facing traffic for return connection/traffic.
By default, Central NTA is disabled in the firewall. Two types of options are provided by using central NAT.
- Central SNAT
- DNAT and Virtual IP
Central NAT can only be configured in policy-based Firewall mode.
Central SNAT
Central SNAT provides us more granular control to customise the policy like, we can select exit interface, ingress IP or specify source port or destination port as per our requirement. Once policy matches happen, then source address / destination address is parsed as per the configured NAT criteria in Central SNAT policy.
Prerequisites to define Central SNAT policy
- Configure IP Pool/interface IP address (outgoing IP)
- Configure NAT policy
First, enable central NAT in Firewall from cli

Policy will be matched by using below criteria
- Source Interface -> Inside
- Destination outgoing Interface-> Outside
- Source address-> 192.168.2.0/24
- Destination address-> wildcarddropbox.com
- Protocol/application port-> any
- Source port-> any
- Outgoing IP address/translated IP address -> 172.16.100.100/32

Central DNAT & VIP
Additionally in firewall VIPs are created as a destination address in security policy. On FortiGate you can configure DNAT and VIPs for Destination NAT. As soon as you configure VIP it automatically creates a rule in the kernel to allow DNAT.
As we all know destination NAT means traffic comes from the outside world to access internal servers or services by using Public IP address of the server.
Prerequisites to configure DNAT with VIP
- External IP address (external user)-> 1.2.3.1
- Internal Local server IP which is mapped to external IP -> 192.168.1.50
- Forwarding port-> 25 (source side)
- Translated port-> 25
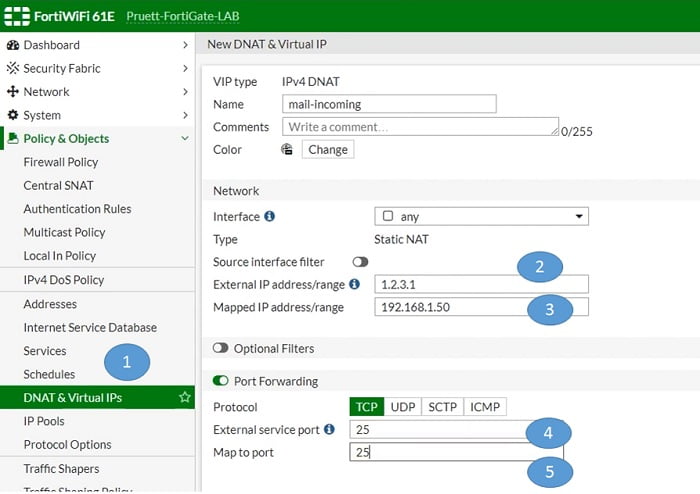
After creating DNAT and Virtual IP you only need to create a policy as per your requirement.
No comments:
Post a Comment