What is NAT (Network Address Translation)?
Many firewalls include network address translation, a procedure that translates between internal and external IP addresses. NAT enables a private network to use non-routable internal IP addresses that are mapped to one or more external IP addresses. Furthermore, a single IP address may represent multiple computers on a network. Check Point NGFWs offer both high-performance NAT functionality and enterprise-level threat prevention.
In this article, we will discuss the Checkpoint NAT Policy, NAT types and its configuration.
Types of NAT
The different types of network address translation are:
- Static NAT – One to one translation
- Hide/Dynamic NAT – It can translate multiple IP address with single outgoing IP address
- Automatic NAT – It can translate Complete LAN/Network Segment with single gateway / Firewall interface IP address
- Manual NAT – Conditional NAT in which we can use multiple combinations to achieve the NAT result.
Static NAT
Static NAT with Automatic NAT
In static NAT we can convert one Public IP address with one (One to One Translation) Private IP address. We can create Static NAT in Checkpoint firewall by following below steps
Criteria is:
| Internal Server IP Address | Public IP Address |
| 192.168.1.11/32 | 172.18.72.3/32 |
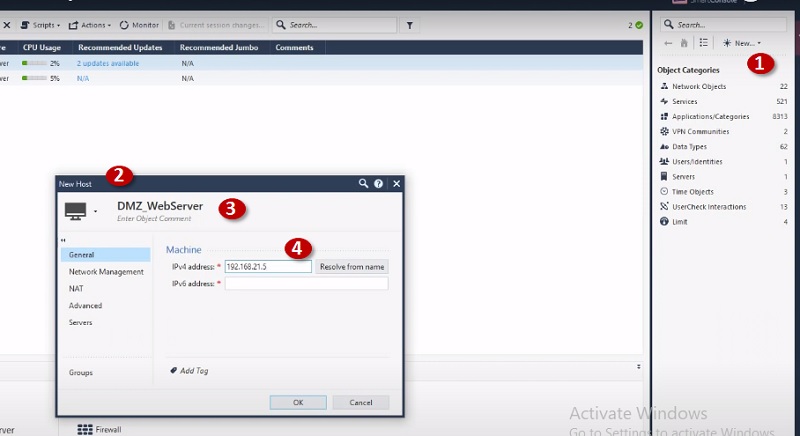
Step 1 Go to Left corner of Checkpoint and Select New -> Host
Step 2 Select Host name and
Step 3 Add Hostname of the internal server
Step 4 Give IP address 192.168.1.11
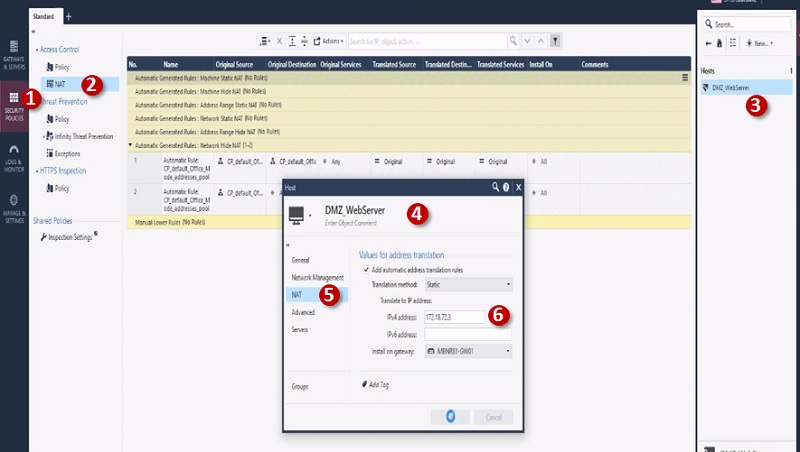
Now Create NAT Policy on Firewall
Step 1 Go to Security Policies
Step 2 Select NAT
Step 3 Go to Left most corner and search host DMZ_WebServer
Step 4 Edit host DMZ_WebServer
Step 5 Edit NAT Config
Step 6 Give Public IP address 172.18.72.3 to Server and Security Gateway
Save Config
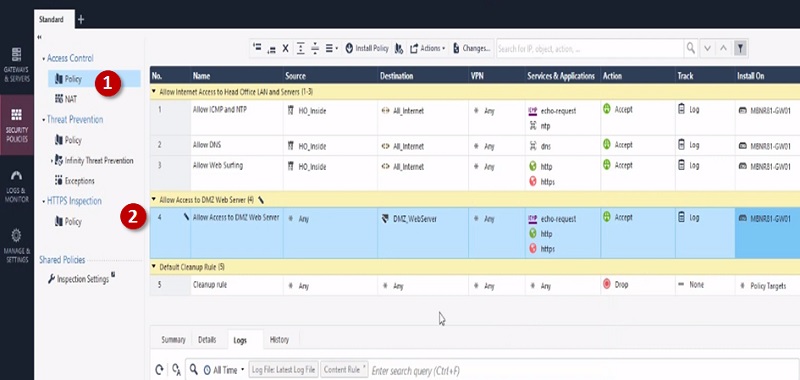
Next Create Policy to allow access to internal server from outside.
Step 1 Create Policy
Step 2 Add below values in Security Access Policy
| Name | Source | Destination | VPN | Service & Application | Action | Track | Install On |
| Allow Access to DMZ Web Server | Any | DMZ_WebServer | Any | Http Https | Accept | Log | Gateway |
Hide NAT
Hide NAT allows you to configure NAT in which multiple IP addresses can be NAT through Single IP address or Gateway Interface IP address.
First, Create Network Object for LAN network 192.168.22.0/24
- Go to left most corner in Security Policies Tab
- Select New -> Network Object
- Name Network Object and provide IP address 192.168.22.0/24

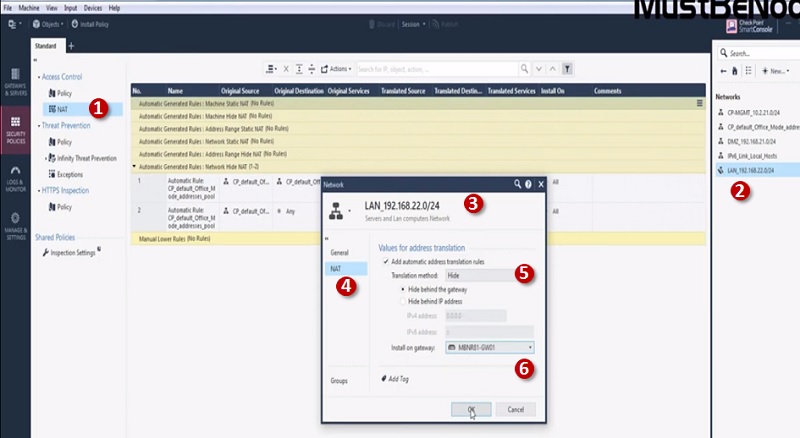
Step 1 Go to NAT tab in Checkpoint Security Policies
Step 2 Go to Left most corner and search LAN_192.168.22.0/24 Network Object
Step 3 Edit Object LAN_192.168.22.0/24
Step 4 Select NAT
Step 5 Select Translation Method “Hide” and choose Hide behind Gateway
Step 6 Install on -> Gateway
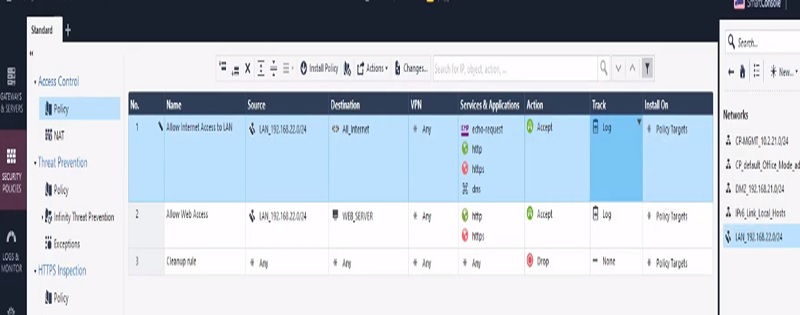
Next Create Policy to allow access to internal servers from outside
Step 1 Create Policy
Step 2 Add below values in Security Access Policy
| Name | Source | Destination | VPN | Service & Application | Action | Track | Install On |
| Allow Internet Access to LAN | LAN-192.168.22.0/24 | All | Any | Http Https | Accept | Log | Gateway |
Hide NAT vs Static NAT
Hide-NAT is a technique for hiding LAN or any network segment traffic (network, etc.) behind single IP address.
Static-NAT is a one-to-one NAT. Single source IP can be translated to single WAN/outside WAN IP.
Manual NAT
Manual NAT is often called Conditional NAT which means we are using single source Private IP address and using single Public IP address and using different ports to connect with source to destination.
Here condition is, when initiator uses Public IP address 63.8.0.111 and Port 25 –> It redirects to server private IP address 192.168.1.10
| Public IP | Port | Translated Private Server | Translated Port |
| 63.8.0.111 | 22 | 192.168.1.10 | 22 |
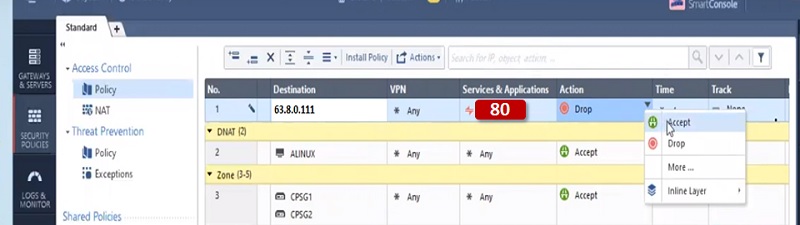
Now if same Public IP address 63.8.0.111 access by initiator with port 80, it will redirect to private IP address 192.168.1.20
| Public IP | Port | Translated Private Server | Translated Port |
| 63.8.0.111 | 80 | 192.168.1.20 | 80 |
Step by step configuration of Manual NAT
- Create NAT Policy NAT-> Original Destination->63.8.0.111(Create Object of this IP address already)
- Original Service/Port-> ssh or 22
- Translated Destination IP-> 192.168.1.10
- Translated Services -> ssh
- Apply Gateway

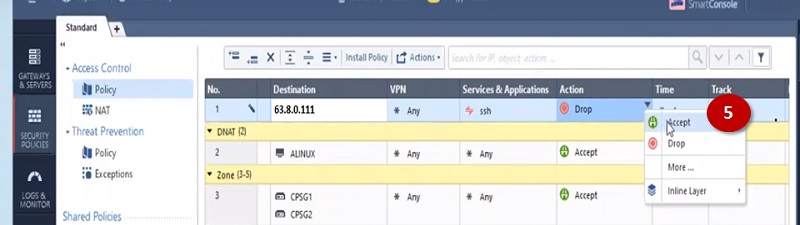
Create a Security policy to allow access to servers from outside.
- Name policy-> Policy_SSH
- Source -> Internet-> Any
- Destination-> 63.8.0.111(NAT Public IP address)
- Services SSH
- Action – Accept

In a similar way you can create NAT rules and Policy for Port 80. Only change server to 80 and backend Private server IP to 192.168.1.20
Here is NAT policy

And Security Policy is

Manual NAT vs Automatic NAT
Automatic NAT – It is for Network objects OR static IP address however outgoing IP will be one (Gateway IP address. You can hide the complete Network/subnet behind one IP address. Proxy arp is by default allowed by firewall.
Manual NAT is configured using the NAT condition and apply rules according to the requirement. You need to configure proxy NAT.
You can further apply multiple combinations to get the desired result from Hide NAT, Static NAT, Automatic NAT and Manual NAT.
No comments:
Post a Comment