UTM-Unified Threat Management
UTM (Unified Threat Management) is a feature of a firewall in which multiple security profiles combine and provide protection from threats and attacks. These features are antivirus, web filtering, IPS, anti-spam etc.
UTM is the consolidated solution for an organisation against attacks and malicious traffic. In other words, UTM is a capsule of multiple security features.
FortiGate UTM Profiles
Let’s discuss FortiGate UTM profiles one by one.
Anti-Virus Profile
Antivirus Scanning Modes
FortiGate Antivirus is used to detect viruses in the traffic or files. FortiGate uses many techniques to detect viruses. This detection technique includes:
- Anti-Virus Scan: This is the simplest and fastest way to detect malware. It detects viruses that are an exact match for a signature in the anti-virus database.
- Grayware Scan: This scan detects unsolicited program known as Grayware that have been installed without the knowledge of user or consent. Grayware is not technically a virus, it is a bundle of a software which produces unwanted side-effects in the network or system.
- Machine Learning AI Scan: It tests the possibility of attack like Zero-Day Attacks. Zero-Day Attacks are the malwares that are new and known hence have no existing associated signatures. If your network has a frequent target, enabling an AI scan may be worth it for performance cause because it helps you to detect performance issues and attack in the network.
Anti-virus can operate by using flow-based or Proxy-based inspection mode. Both inspection modes use a full AV database.
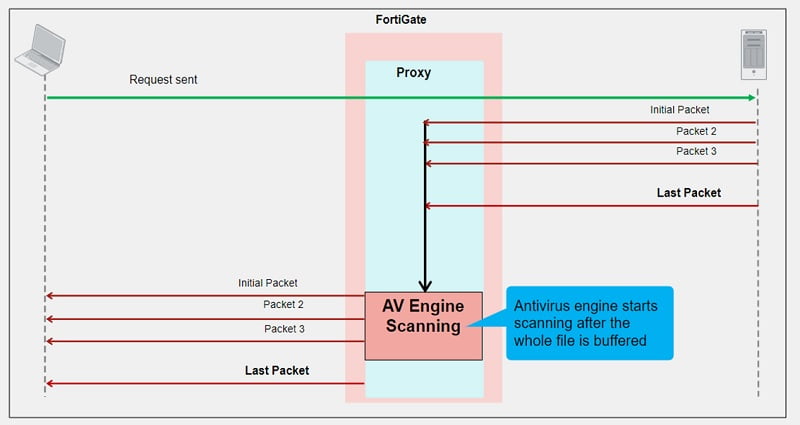
Flow-based Scanning Mode
In this mode anti-virus engines reaches to the payload of packet and caches the real packet. Further it forwards the packet to the receiver. It consumes more CPU than other modes.
If a virus is detected in a TCP session, some packets are already forwarded to the receiver, FortiGate resets the connection and does not send the last piece of file. However, the receiver has received almost part of the file, but the file is truncated and not able to open.
If an attacker tries to re-send the file to user, FortiGate firewall blocks the connection.
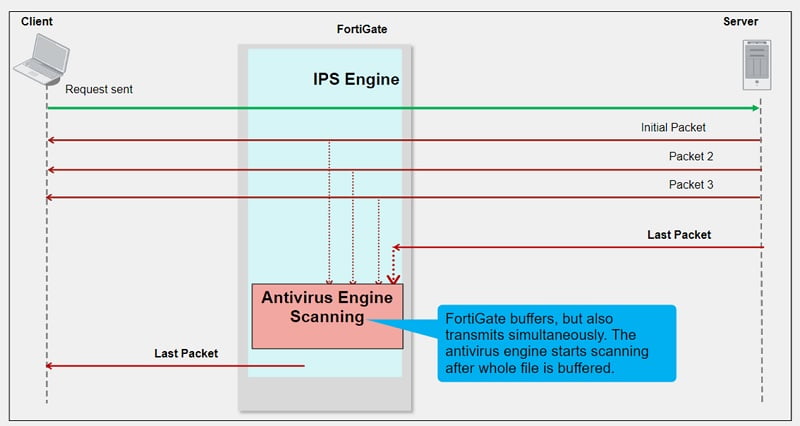
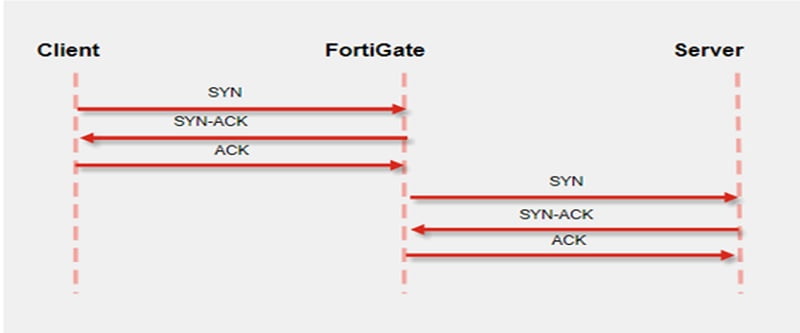
Proxy-based Inspection Mode
In this mode each protocol proxy picks up a connection and buffers the entire file first. Clients must wait for the scanning to be finished.
If a virus is detected, a block replacement page will be displayed. Because FortiGate must buffer the whole file, the firewall does the scanning which takes a long time to scan the data. Using a proxy-based scan process allows you to stream-based scanning which is enabled by default. Stream-based scanning scans large archive files by decompressing the files and scanning and extracting the files at the same time. This process optimises the memory process. Viruses can be detected in the middle of scan or at the end of scan.
Configuring Anti-Virus Profile and Policy
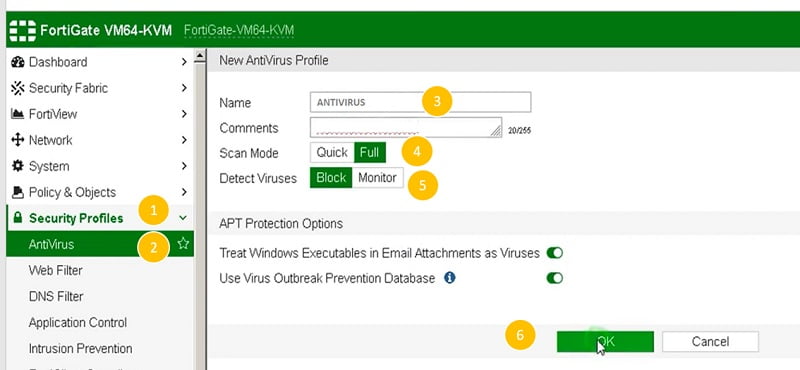
- Create Anti-virus Profile
- Got to Security Profile TAB
- Select Antivirus Profile
- Create new Profile, name as ANTIVIRUS
- Select Scan Mode (proxy/Full or flow/Quick)
- Selection action if virus detected, Block—block the file. Monitor—generate alert of virus file.
- Select OK
- Apply Anti-Virus Profile to Security Policy
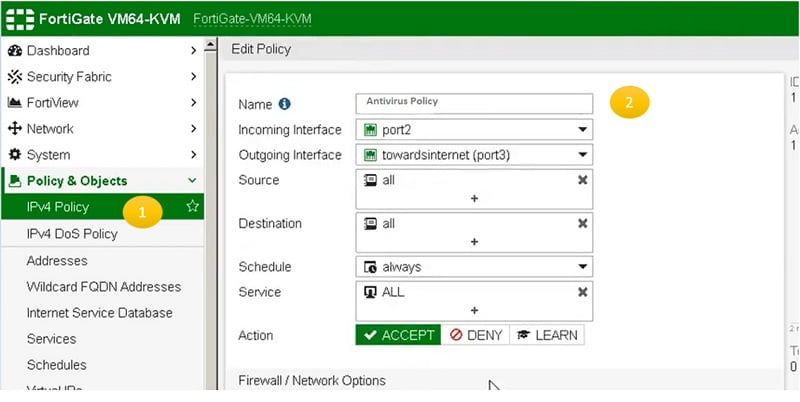
- Create Internet Policy, Go to IPV4 Policy TAB
- Add Policy NAME- Antivirus Policy
- Go to the Security Profile section in Internet Policy and add ANTIVIRUS profile which is created above.
- Select OK.
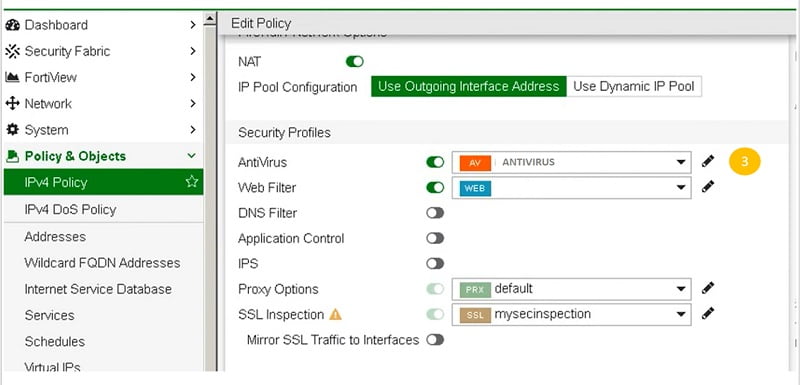
Now traffic going to the internet will parse every file from anti-virus engine and take necessary action accordingly.
Web-Filter Profile
Web-filtering is the feature in FortiGate to control web traffic of firewalls by using block or allow action.
It uses two types of inspection mode for URL traffic
- Flow Based: Default inspection mode and faster than other modes.
- Proxy Based: FortiGate buffers the traffic and examine it whole. It works as a mediator between client and web server.
Further NGFW modes are also used in Web-filtering configuration. These modes are:
Profile-based Mode:
It requires application control and web-filter profiles and applies them to firewall policy. It uses flow-based OR proxy-based inspection.
Policy-based Mode:
Application control and web-filtering can directly apply to the firewall policy. It does not require profiles to be Application Control OR Web Filtering profiles.

Web-filtering has to control and manage the sites which people visited. It includes preserving employee productivity. It prevents network congestion by blocking malicious and un-authorised URLs. It prevents exposure of confidential data by scanning the web-URLs.
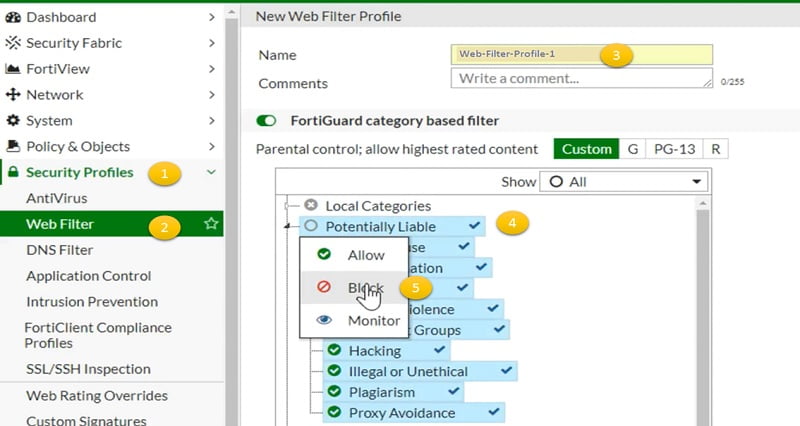
Configure Web-Filtering Profile
- Go to Security Profile
- Select Web Filter
- Create new Web Filter with name Web-Filter-Profile-1
- Create a FortiGuard category-based filter and select customer categories.
- Select any category which you wish to block/allow/monitor. Here the Potentially Liable category is blocked manually.
- Select ok
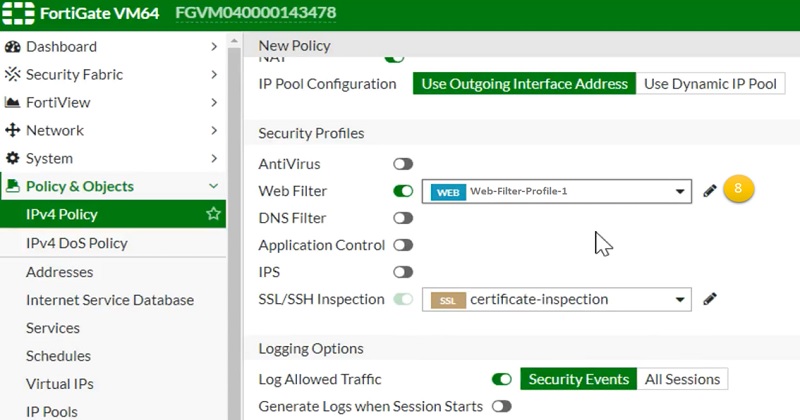
Apply Web-Filter Profile in Security Policy
- Create Security policy to apply web-filtering. Go to IPV4 Policy.
- Create New policy name Internet-Policy-With-Webfilter
- Assign incoming and outgoing interfaces.
- Add source address
- Add destination address
- Add services
- Select action as Accept
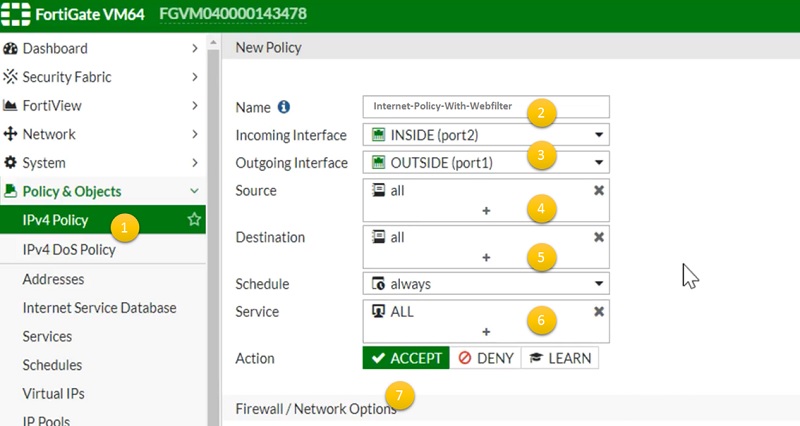
- Go to Security Profiles and select Web Filter TAB. Select the web filtering profile which we have created above. And select OK. That’s it
IPS – Intrusion Prevention System Profile
We should implement IPS in our network to protect it from intrusion. IPS in FortiGate uses signature databases to detect anomalies and attacks. The purpose of the IPS filter is to protect the inside network from outside threats. Protocol decoders can also detect network errors and protocol anomalies. IPS engine can cover
- Antivirus
- Web Filter
- Email Filter
- Application Control
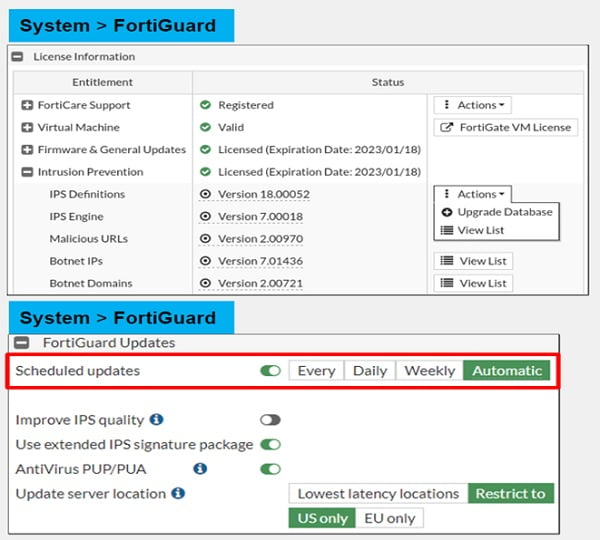
IPS Signature Updates
FortiGuard updates the IPS signatures and decoders with new signatures. That way IPS engines become effective against the new exploits. Regular updates or customised updates are configured in the FortiGate to fetch IPS signatures periodically.
The default setting of updates is Automatic. Please refer to the image below to check the settings of IPS updates in FortiGate firewall.
After FortiGate downloads the FortiGuard package, new signatures will appear in the signature list. When configuring FortiGate you can change the action setting for each signature. However, the default action setting is often correct except in a few cases. We can create custom signatures with the help of the FortiGate DevOps team to parse custom applications. Sometimes false/positive alert triggers in the FortiGate IPS, you can enable/disable it as per the requirement. Moreover, FortiGate Support team can modify the false positive signature once you report the error on the support portal.
IPS Sensors
IPS Sensors contain a list of signatures in the profile which will later call-in security policy. There are two ways to configure IPS sensors
- Select the signatures individually, once you select sensors in the list, it automatically calls into the sensors database.
- You can add a sensor in IPS Profile by applying a filter in it. FortiGate adds all the sensors in profile which match the filters.
Configure IPS Profile in FortiGate Firewall
- Go to Security Profiles
- Select Intrusion Prevention
- Create a new profile. Here we have created IPS Profile-1
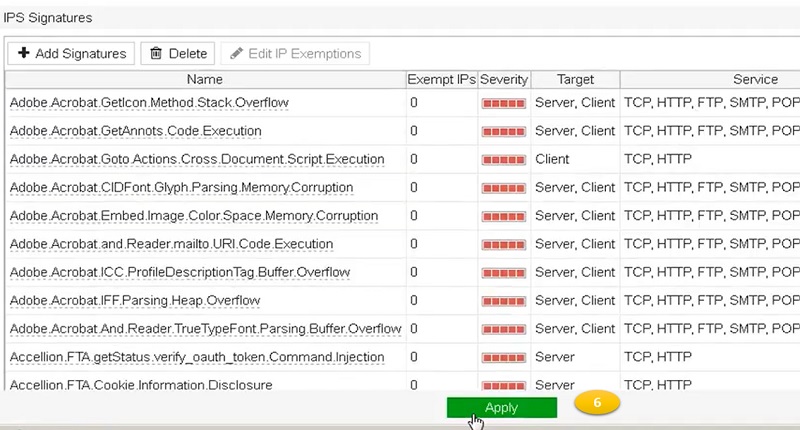
- Add Signature based IPS profile. Signature base means we can select signature from database of FortiGate IPS and add it into a single profile
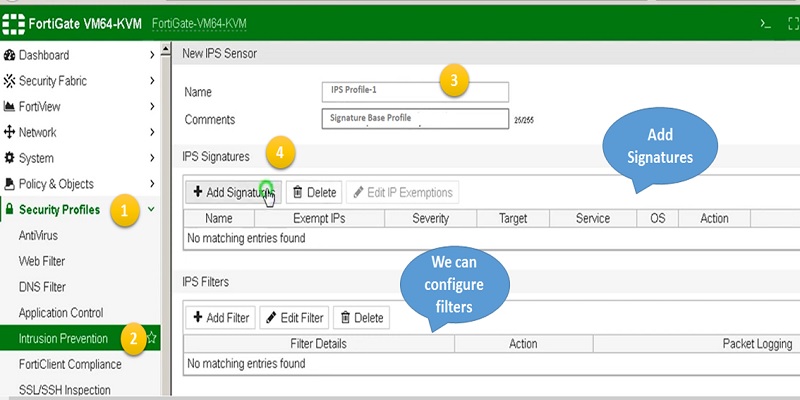
- Add filters in the profile and select a list of signatures from database.
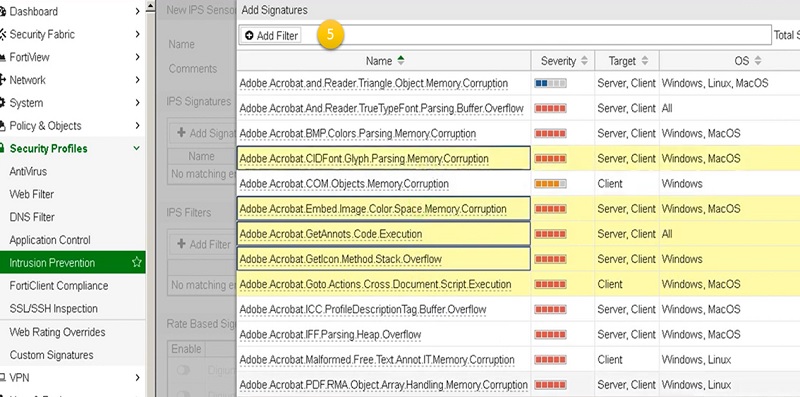
- Add signatures in the profile and apply it to the newly created Profile.
Apply IPS-Profile in Firewall Policy
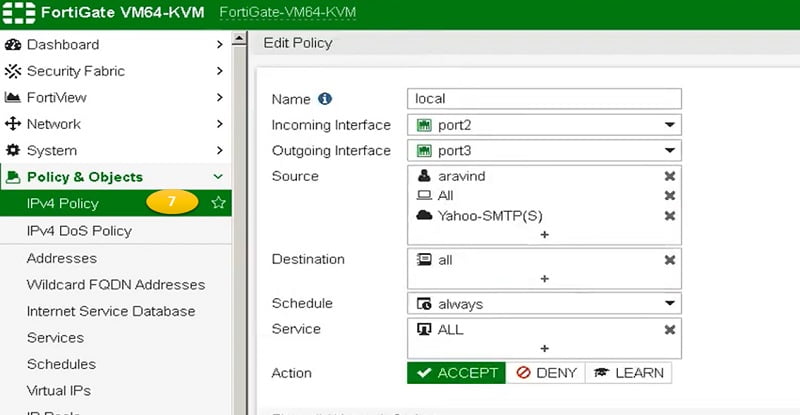
7. Now it’s turn to apply the IPS profile in firewall Policy. Go to IPV4 Firewall policy TAB. Add policy parameters to which IPS profile is enabled, like source IP address, destination IP address and services or port.
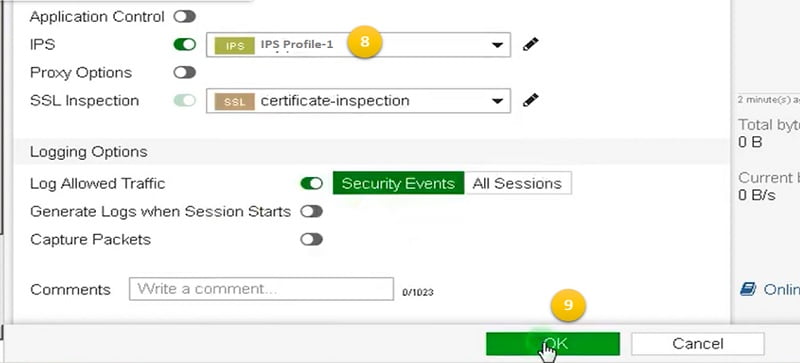
8. Go to Security Profiles section in Firewall policy and add IPS Profile-1
9. Select OK to apply the parameters in policy.
DOS Policy Configuration in FortiGate
DOS- Denial of Service is a packet-based attack which consumes resources of infrastructure and makes it unavailable to legitimate traffic/users.
To block DOS attacks we can apply DOS-Policy on FortiGate that is located between the attacker and all the resources that you want to protect. DOS filtering is done early in the packet handling process which is handled by the kernel.
Let’s discuss type of DOS attack before implementing DOS policy in FortiGate firewall:
- TCP SYN Flood: Incomplete TCP/IP connections are flooded to the victim which occupy the connection table of device and make it unavailable for legitimated users.
- ICMP Sweep: ICMP traffic flood sent to the target device. Victim’s all sources become busy in responding to ICMP traffic which makes it unavailable for genuine users.
- TCP Port Scan: Attacker sends TCP/IP connection to identify open ports in the network. Further the attacker exploits those ports and hampers network services.
Apply DOS Policy in FortiGate
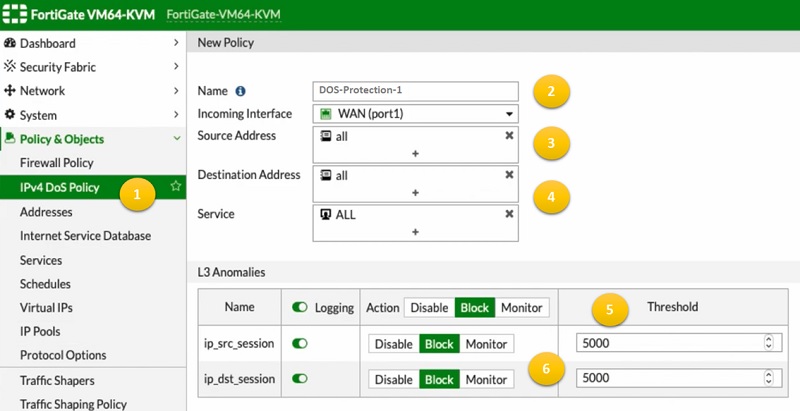
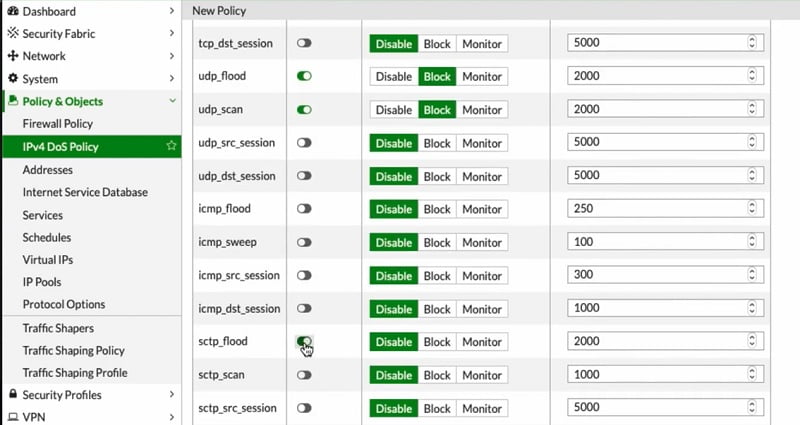
- Go to IPV4 DoS Policy
- Create new policy, here we have named it DOS-Protection-1
- Specify source and destination address and incoming interface
- Specify service or port
- Block/disable L3 anomalies
- Select the source/destination session
- Enable or disable DoS sessions and apply it to the incoming interface.

Application Control in FortiGate
- Application control detects applications that transfer over the network by using any port. Application control takes appropriate action on the application traffic to stop any malicious attack.
- Application controls detect application traffic like google talk, Facebook chat, Gmail hangout etc.
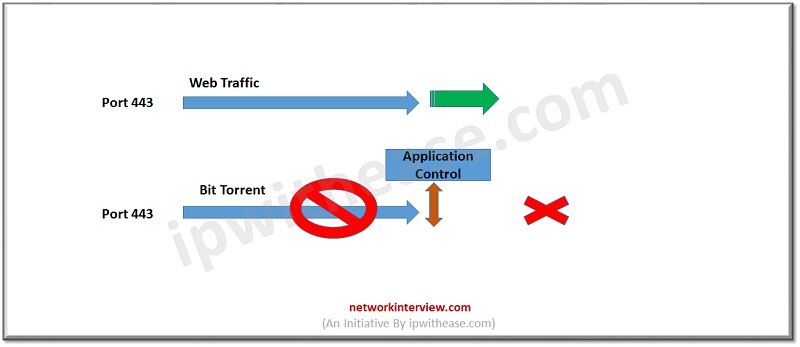
- This application works on port 443 or Web-browsing port. So, a firewall as a L4 device is not able to check if traffic is legitimated or there is any malicious content in the traffic.
- As we all know that port 443 carries normal browsing traffic and it also transfers application traffic like BitTorrent etc. Application control can differentiate the traffic based on the application used by it and block the site as per the policy configured in the firewall.
- Application control can be configured flow-based or Policy-based in the firewall. It performs a traffic scan which compares traffic to the known application patterns.
- It detects Peer-to-Peer applications. P2P traffic uses distributed architecture to forward traffic in the network.
- Traditional Client to Server Architecture uses client to server communication by using a simple port number which can easily be blocked by firewall policy.
- Peer to Peer download divides each file among the multiple peers and uses dynamic ports to transfer the data. Hence it is very difficult to identify the traffic and block it from firewall level based on port only.
Application Control Signatures
FortiGuard subscription is required to download and enable application control signatures in the firewall. These signatures parse the traffic and scan dynamic application ports in the content.
Configure Application Control Policy
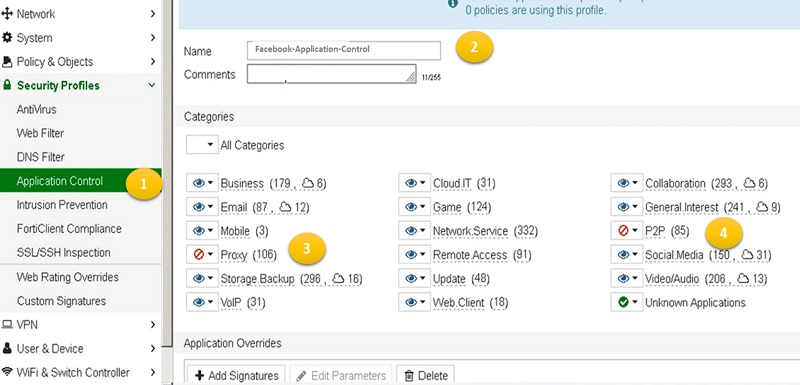
- Go to Application Control
- Create new Application control profile
- Select category or application which you want to block, for example Proxy and P2P application is blocked in below image.
- Select ok
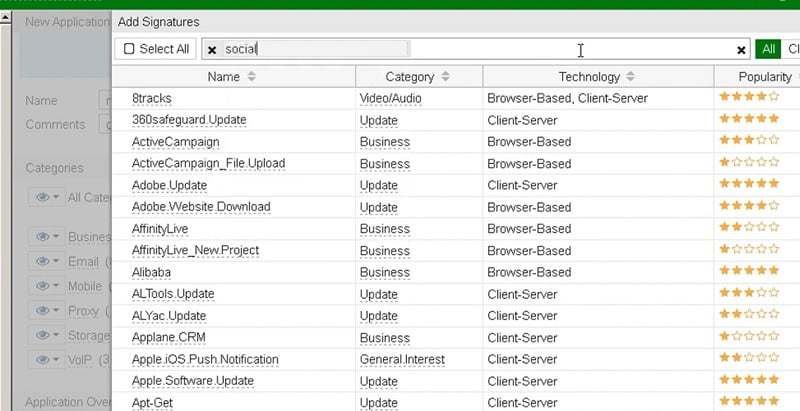
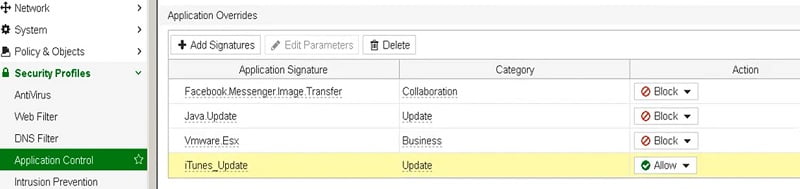
You can add application signature by selecting Add Signatures Tab in Application Overrides
Apply Application Control Profile in the Policy
- Go to IPV4 Policy
- Enable Application Control and select the above created profile.

No comments:
Post a Comment