Checkpoint 3-Tier Architecture

 Before starting to explore Checkpoint NGX Firewall technologies, it is critical to comprehend Checkpoint 3-Tier architecture. This architecture describes the relationships between the components of Checkpoint, as well as how they work together as a harmonious unit. Each element has its own specific responsibilities.

Checkpoint 3-Tier Architecture

Checkpoint is a Next Generation Firewall which has three basic pillars 

  • Security Management Server
  • Security Gateway (Enforcement Module)
  • SmartConsole 

Let’s understand, how these components work together as a harmonious unit:

  • Security Admin access SmartConsole and initiate communication with Security Management Gateway.
  • Security Admin makes the changes in firewall policy and install policy.
  • Security Management Server validate and verify the changes and confirms if change is error free and forward change policy package to Security Gateway
  • Security Gateway fetch the changes and apply it to firewall packet flow which is passing through the gateway.

Security Management Server  (SMS)

As its name implies, Security Management Server is a server component. As being a server component its work is to store firewall policies, repository of policies, rules, NAT policies, VPN configuration, user-database, user-groups, user permissions, authentications, storage of certificates.

SMS distributes policies and rules to multiple or single gateway. Single Smart Center Server can manage multiple gateways.

SMS can act like a log server which means it can store logs, those are generated by firewall.

Installation Platform -> SMS can be deployed on below platforms.


Key job performs by Security Management Gateway

  • Store policies, act as a database
  • Store log and log files
  • Maintain and store Firewall database
  • Deployed on Linux, Windows, and Gaia OS
  • Single Security Management Gateway can manage multiple Gateways.

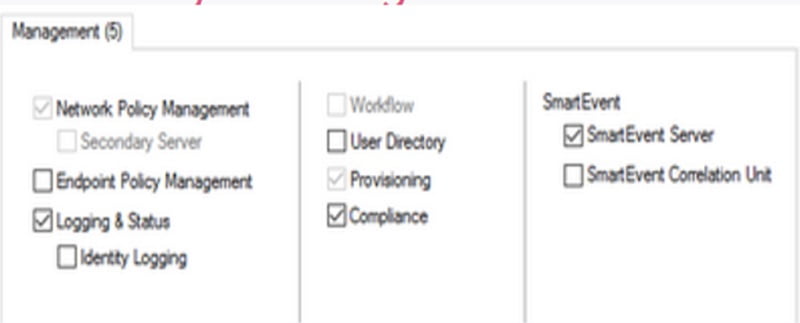
Management Gateway has below featured blades

  • Network Policy Management — Security Gateway policies are created and managed by Network Policy Management
  • Endpoint Policy Management — Endpoint Policies are created and managed by it
  • Logging & Status – Logs are managed by Logging and Status
  • Workflow — Audit and approval of management policy
  • User Directory — Authentication and user database manages by it
  • Provisioning — Maintenance tool
  • Compliance — Audit and apply compliance as per rules and regulations
  • SmartEvent — Logs and Events management 

Security Gateway

Security Gateway is also known as Enforcement Module. You will see it very commonly when people call it an Enforcement Module.

Its work is to regulate the policy, Security Gateway receives policies from Smart Center Server and applies policies in order of top-to-bottom against every packet that the firewall receives in inbound/outbound direction.

Once a rule is defined in the firewall, the gateway acts as a decision maker which can protect the traffic as per defined rule.

Key Jobs perform by Security Gateway

  1. All inbound and outbound traffic of Next Generation firewalls are inspected on Gateway.
  2. Gateway verifies the packet and compares it with security policy and then applies security policy accordingly.
  3. Network defence is done by Security Gateway.
  4. Gateway protects the traffic by applying 3-way handshake OR stateful inspection.
  5. Installation can be done -> Linux, Windows, and Gaia OS

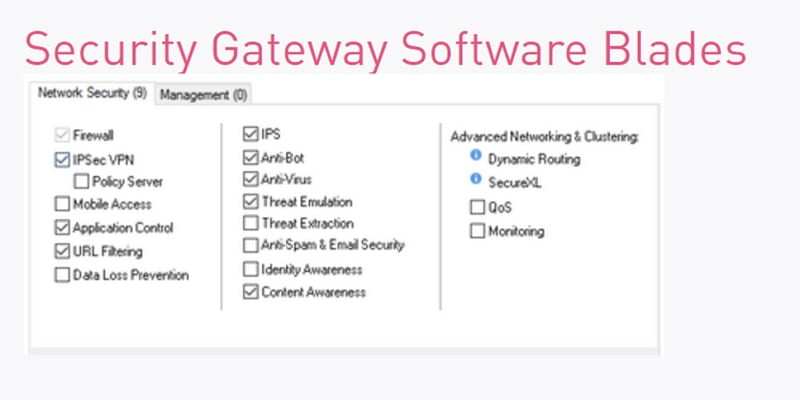
Below is the list of Security Blades which are available in Security Gateway. Security Blades are the feature of the firewall. For example, URL filtering, IPS, Anti-virus etc.

Smart Console

To manage Smart Center Server, the admin needs GUI to access the application or features. Smart Console is the platform which is used to access the features of Next Generation Firewall.

Smart Console can only be accessible from Windows, it does not support Gaia OS.

First policies are configured by using SmartDashboard and further saved in the Smart Management Server.

Below packages are downloaded as a SmartConsole package:

  1. Smart Dashboard
  2. Smart View Tracker
  3. Smart View Monitor
  4. Smart Update
  5. Smart Log
  6. Smart Event
  7. Smart Provisioning 
  8. Smart Reporter 
  9. Smart Endpoint 
  10. Smart Domain Manager
  11. Smart Event Intro
  12. Secure Client Packaging Tool

Deployment Option

Based on Checkpoint product we can choose deployment options 

  1. Check Point Security Appliance. Hardware and software options are required to run Check Point Network Security System.
  2. Open Server. Gaia OS can be installed on any of the compatible server 
  3. A Virtual Machine. Gaia can be configured on virtual machines, cloud-based platforms like VMware, cloud platforms: AWS, Azure, Google Cloud, Alibaba, and Oracle.

Another method to deploy the device in network

  1. Standalone -> Single device in which Security Gateway and SMS are installed on same machine.
  2. Distributed -> Console and Security Gateway are using different machines or server.

Distributed Deployment is the commonly used approach in the network.

You may further need to explore SmartConsole deployment, Smart Management Server features and deployment and Security Gateway components. These topics will help you to understand the Checkpoint 3-Tier architecture.

VPN Setup and Configuration: Checkpoint Firewall

 A remote access VPN (virtual private network)  allows clients who are working remotely to firmly access and utilize applications and servers that deploys in the office Data Centre and head office, encrypting all VPN traffic  the users send and receive during the communication over Secure network.

Remote Access VPN Setup

Below is the setup which we will be using to configure the SSL VPN in Checkpoint firewall

Local PC – 192.168.1.17 (from where user will access the applications of office server AND user is sitting in any remote location like HOME, Cafe)

Checkpoint Firewall – 192.168.1.18 (Will provide secure communication between user and LAN server over internet)

LAN SERVER  – 10.1.1.10 (WHERE APPLICATION IS HOSTED AND SERVER IS LOCATED IN OFFICE NETWORK)

VPN Setup and Configuration: Checkpoint Firewall

Here the interface configuration in the Checkpoint Firewall. Go to Smart Console -> Network Management -> Interfaces

Eth0 -> 192.168.70.12/24

Eth1 ->10.1.1.1/24

Eth3 ->192.168.1.18/24

Create User

First step to create a user in the checkpoint firewall.

1.Go to Right Most corner in Smart Console “*” and select More

2.Select “User” in the next Tab

3.Choose “User..” in next available options

4.Select “Default” Mode from the next option

5.User name -> Admin

6.Give password for Local Authentication -> ipwithease&1131

7.Similarly create another user with name Admin2 and repeat steps 5 and 6 to execute the same.

8.Next step to create User Group 

9.Name User Group Admin-Users and add above created users into it.

10.Add Admin and Admin1 users to the Admin-Users group.

Create VPN Communities

After creating user Group we need to create VPN communities from Security Policies TAB

1.Go to the Security Policies -> VPN Communities -> Select RemoteAccess VPN communities 

2.RemoteAccess -> Select Participating Gateways -> Select already created Gateways from the option SGCM (already Created VPN Gateway)

3.Now add Participating Users -> Go to the Participating Users Tab

4.Add already created User Group and call it here

5.We are adding Admin-Users and Sales-User group 

IP SSL configuration

Now we will move to the IP SSL configuration in the Checkpoint firewall.

1.G to the Gateways & Services -> Edit SGCM Gateway

2.Select VPN Clients -> Office Mode


3.Select Office Mode -> Allow User Group here. You can select specific user group -> Admin-Users OR Sales-User

4.OR you can select Allow Client Mode to All Users.

5.Further create Portal Setting which is used to connect with Firewall interface when trying to fetch the SSL VPN settings.

6.Select Portal Settings -> in VPN Clients and Check SSL VPN URL to download the application in User’s system

7.Here, URL is https://192.168.1.18/sslvpn—https://<firewall external interface IP Address>/sslvpn

8.All connections through the entire interface.

Create VPN Security Policies

Here we will create a Security Policy to allow communication over VPN networks. Moreover you can modify the Security rule as per your requirement. Let’s suppose if Destination server is accessible over a specific port the same port needs to be allowed in the firewall policy.

1.Go to Security Policies tab -> Policy

2.Create New

3.Policy Name -> RA-VPN

4.Source Address -> Admin-Users (user profile)

5.Destination -> here you will allow the segment which users can access over SSL VPN. 

6.MY server is placed in LAN Segment hence I am going to allow LAN subnet 10.1.1.0/24 as Destination Address

7.Allow Application Any or specific ports on which servers are running in the network

8.And put Action -> Allow

9.Install firewall policy and publish it.

VPN Client Installation on User’s PC

Now login to User’s PC -> 192.168.1.17 and install Checkpoint VPN Client in User’s PC.

1.Go to up arrow in right bottom corner of the user’s PC “^”

2.Select VPN Client from the options. (VPN Client software needs to be download from https://192.168.1.18/sslvpn url from user’s browser)

3.Select VPN Options and open it.

4.Add New Option -> New VPN profile

5.Select Site Wizard

6.Add Server Details with IP Address of Firewall Gateway which is 192.168.1.18

7.Add Display Name -> PC-Gateway -> which is optional here.

8.Click “Next

9.Now Checkpoint Endpoint Client will try to resolve the IP address of CP-GW

10.Select Login Option is “ Standard

11.Click on Next and Select Authentication Method “ Username and Password”

12.Click Next for further action

13.Installation Finished for VPN 192.168.1.18

14.Now Press “Yes” to connect with Endpoint Security client 

15.A prompt will be appeared on the screen to provide username and password which was created before in firewall (see steps 7 in “ user creation” tab above)

Now try to ping LAN –Server from User’s PC after connecting to SSL VPN. It should be responding over ping from the user’s cmd.

>ping 10.1.1.10

Moreover check ipconfig /all from the user’s system and you can see the VPN segment IP address which is assigned to the Ethernet Adapter of the system. Here we can see IP address 172.16.10.1 is assigned to user VPN machine.

You can also perform other actions to validate the server access over Client VPN from user’s machine like

  • Ping
  • telnet
  • Web access
  • Tracert 

Thanks for reading!!!

Checkpoint NAT Policy


What is NAT (Network Address Translation)?

Many firewalls include network address translation, a procedure that translates between internal and external IP addresses. NAT enables a private network to use non-routable internal IP addresses that are mapped to one or more external IP addresses. Furthermore, a single IP address may represent multiple computers on a network. Check Point NGFWs offer both high-performance NAT functionality and enterprise-level threat prevention.

In this article, we will discuss the Checkpoint NAT Policy, NAT types and its configuration. 

Types of NAT

The different types of network address translation are:

  • Static NAT – One to one translation
  • Hide/Dynamic NAT – It can translate multiple IP address with single outgoing IP address
  • Automatic NAT – It can translate Complete LAN/Network Segment with single gateway / Firewall interface IP address
  • Manual NAT – Conditional NAT in which we can use multiple combinations to achieve the NAT result.

Static NAT

Static NAT with Automatic NAT

In static NAT we can convert one Public IP address with one (One to One Translation) Private IP address. We can create Static NAT in Checkpoint firewall by following below steps

Criteria is:

Internal Server IP AddressPublic IP Address
192.168.1.11/32172.18.72.3/32


Step 1 Go to Left corner of Checkpoint and Select New -> Host

Step 2 Select Host name and 

Step 3 Add Hostname of the internal server

Step 4 Give IP address 192.168.1.11

Now Create NAT Policy on Firewall

Step 1 Go to Security Policies

Step 2 Select NAT

Step 3 Go to Left most corner and search host DMZ_WebServer

Step 4 Edit host DMZ_WebServer

Step 5 Edit NAT Config 

Step 6 Give Public IP address 172.18.72.3 to Server and Security Gateway

Save Config

Next Create Policy to allow access to internal server from outside.

Step 1 Create Policy

Step 2 Add below values in Security Access Policy

NameSourceDestinationVPNService & ApplicationActionTrackInstall On
Allow Access to DMZ Web ServerAnyDMZ_WebServerAnyHttp

Https

AcceptLogGateway

Hide NAT

Hide NAT allows you to configure NAT in which multiple IP addresses can be NAT through Single IP address or Gateway Interface IP address.

First, Create Network Object for LAN network 192.168.22.0/24

  1. Go to left most corner in Security Policies Tab
  2. Select New -> Network Object 
  3. Name Network Object and provide IP address 192.168.22.0/24

Step 1 Go to NAT tab in Checkpoint Security Policies 

Step 2 Go to Left most corner and search LAN_192.168.22.0/24 Network Object

Step 3 Edit Object LAN_192.168.22.0/24

Step 4 Select NAT

Step 5 Select Translation Method “Hide” and choose Hide behind Gateway

Step 6 Install on -> Gateway

Next Create Policy to allow access to internal servers from outside

Step 1 Create Policy

Step 2 Add below values in Security Access Policy

NameSourceDestinationVPNService & ApplicationActionTrackInstall On
Allow Internet Access to LANLAN-192.168.22.0/24AllAnyHttp

Https

AcceptLogGateway

Hide NAT vs Static NAT

Hide-NAT is a technique for hiding LAN or any network segment traffic (network, etc.) behind single IP address.

Static-NAT is a one-to-one NAT. Single source IP can be translated to single WAN/outside WAN IP.

Manual NAT

Manual NAT is often called Conditional NAT which means we are using single source Private IP address and using single Public IP address and using different ports to connect with source to destination.

Here condition is, when initiator uses Public IP address 63.8.0.111 and Port 25 –> It redirects to server private IP address 192.168.1.10

Public IPPortTranslated Private ServerTranslated Port
63.8.0.11122192.168.1.1022

Now if same Public IP address 63.8.0.111 access by initiator with port 80, it will redirect to private IP address 192.168.1.20

Public IPPortTranslated Private ServerTranslated Port
63.8.0.11180192.168.1.2080


Step by step configuration of Manual NAT

  1. Create NAT Policy NAT-> Original Destination->63.8.0.111(Create Object of this IP address already)
  2. Original Service/Port-> ssh or 22
  3. Translated Destination IP-> 192.168.1.10
  4. Translated Services -> ssh
  5. Apply Gateway

Create a Security policy to allow access to servers from outside.

  1. Name policy-> Policy_SSH
  2. Source -> Internet-> Any
  3. Destination-> 63.8.0.111(NAT Public IP address)
  4. Services SSH
  5. Action – Accept

In a similar way you can create NAT rules and Policy for Port 80. Only change server to 80 and backend Private server IP to 192.168.1.20

Here is NAT policy 

And Security Policy is

Manual NAT vs Automatic NAT

Automatic NAT – It is for Network objects OR static IP address however outgoing IP will be one (Gateway IP address. You can hide the complete Network/subnet behind one IP address. Proxy arp is by default allowed by firewall.

Manual NAT is configured using the NAT condition and apply rules according to the requirement. You need to configure proxy NAT.

You can further apply multiple combinations to get the desired result from Hide NAT, Static NAT, Automatic NAT and Manual NAT.