Windows Server DirectAccess is an awesome and exciting feature. It’s a Windows Server role service that enables windows domain-joined machines to have always on and seamless connection to the corporate infrastructure securely over the internet without the need for traditional Virtual Private Network (VPN). The DirectAccess infrastructure has a lot of moving parts. Any dysfunction or misconfiguration in one of its components can halt and disrupt the entire DirectAccess deployment. Some key points:
a) It hugely facilitates the process of implementing the Password expiration and changes Group Policy for telecommuter users.
b) It eliminates the need for end user initiated VPN (or other) connections. (Making the end user’s experience even simpler)
c) Help desk administrators can more easily administer telecommuter end user ticket issues(Manage out capabilities).
d) Securely and seamlessly extending my I.T. infrastructure environment over the internet.IPSec and HTTPS(SSL certificate) encrypt the traffic between client and DirectAccess server to prevent interception. In addition, Windows Firewall must be enabled end-to-end before a successful DirectAccess connection can be made.
e) DirectAccess utilizes IPv6. Since Windows Server 2012 DirectAccess can now be configured behind a firewall using NAT (Network Address Translation) with a single NIC. This deployment model requires the IP-HTTPS transition technology.
The following sections outline my Configuration and deployment steps.
1) Build a Windows Server 2012 R2 Virtual Machine :
Start by provisioning a Server 2012 R2 virtual machine on a Hyper-V host (any hypervisor host will do) . The Virtual Machine is configured with the option of a single network adapter. Join the server to the domain and configure it with a static IP Address matching your internal subnet. Download and install the operating system updates. This machine will be configured later as the Direct Access Server.
Start by provisioning a Server 2012 R2 virtual machine on a Hyper-V host (any hypervisor host will do) . The Virtual Machine is configured with the option of a single network adapter. Join the server to the domain and configure it with a static IP Address matching your internal subnet. Download and install the operating system updates. This machine will be configured later as the Direct Access Server.
2) Setup an External DNS record:
Create a public DNS record with your DNS provider or your public DNS server. In my case, I created a da.labcompany.com. This DNS record will be configured later on the Company firewall to point to the DirectAccess server .
Create a public DNS record with your DNS provider or your public DNS server. In my case, I created a da.labcompany.com. This DNS record will be configured later on the Company firewall to point to the DirectAccess server .
3) Configure Firewall Rules for DirectAccess:
The DirectAccess service primarily needs port 443 to be configured on the perimeter firewall. Configure a NAT policy and Firewall access rule for port 443 to point to the internal DirectAccess virtual machine’s IP Address.
The DirectAccess service primarily needs port 443 to be configured on the perimeter firewall. Configure a NAT policy and Firewall access rule for port 443 to point to the internal DirectAccess virtual machine’s IP Address.
4) Prepare for Certificate Requirements and install the Certificate on the DirectAccess server:
The DirectAccess security model depends hugely on certificate services. I started out by trying to deploy Active Directory Certificate services and configuring CRL (Certificate Revocation List) distribution points . It’s an involved process I hope to blog about soon. But for this post, I used a public wildcard SSL certificate acquired from Godaddy. Make sure the certificate Subject name matches the the fqdn of the DNS record in step 2 above “da.labcompany.com”. My wildcard ssl certificate is “*.labcompany.com”. Download the certificate and import into the DirectAccess server personal certificate store using the Certificates mmc console. Using a certificate issued by a public CA like Godaddy is recommended. It spares you the long and involved task of configuring an internal certificate revocation list distribution point for access from the internet.
The DirectAccess security model depends hugely on certificate services. I started out by trying to deploy Active Directory Certificate services and configuring CRL (Certificate Revocation List) distribution points . It’s an involved process I hope to blog about soon. But for this post, I used a public wildcard SSL certificate acquired from Godaddy. Make sure the certificate Subject name matches the the fqdn of the DNS record in step 2 above “da.labcompany.com”. My wildcard ssl certificate is “*.labcompany.com”. Download the certificate and import into the DirectAccess server personal certificate store using the Certificates mmc console. Using a certificate issued by a public CA like Godaddy is recommended. It spares you the long and involved task of configuring an internal certificate revocation list distribution point for access from the internet.
5) Create Active Directory Security Group:
The DirectAccess role service gives the option to enable DirectAccess for all domain joined mobile computers or for a subset of mobile computers defined within an Active Directory group. I created an active directory security group for all the mobile computers that will be licensed for DirectAccess. In the following screenshot, I used PowerShell to create a “DirectAccessComputers” AD group. The first script used the “-WhatIf” parameter to confirm that the syntax is correct:
The DirectAccess role service gives the option to enable DirectAccess for all domain joined mobile computers or for a subset of mobile computers defined within an Active Directory group. I created an active directory security group for all the mobile computers that will be licensed for DirectAccess. In the following screenshot, I used PowerShell to create a “DirectAccessComputers” AD group. The first script used the “-WhatIf” parameter to confirm that the syntax is correct:
Use the following cmdlet to add a single or multiple computers (multiple computer objects should be comma-separated) to the Active Directory security group:
Add-ADGroupMember -Identity DirectAccessComputers -Members "CN=W10LAPTOP,OU=IT,OU=Hardware,DC=labcompany,DC=net"
6) Verify Windows Client Operating System Requirements:
DirectAccess is enabled solely on the Enterprise versions of windows clients OSes. Windows 7 Enterprise and Ultimate, Windows 8.1 Enterprise and Windows 10 Enterprise. In my environment, we are in the middle of a Windows 10 roll out for all clients. For this reason my DirectAccess configuration is targeted towards Windows 10 Enterprise clients. This eliminates the need to configure workstation authentication certificates for Windows 7 Enterprise clients.
DirectAccess is enabled solely on the Enterprise versions of windows clients OSes. Windows 7 Enterprise and Ultimate, Windows 8.1 Enterprise and Windows 10 Enterprise. In my environment, we are in the middle of a Windows 10 roll out for all clients. For this reason my DirectAccess configuration is targeted towards Windows 10 Enterprise clients. This eliminates the need to configure workstation authentication certificates for Windows 7 Enterprise clients.
7) Install and Configure DirectAccess:
Install the DirectAccess role service by starting Server Manager, clicking the Manage tab and selecting the “Add Roles and Features” command. Click next three times on the “Add Roles and Features Wizard” page till you get to the “Select Server Roles page and select the Remote Access check box:
Install the DirectAccess role service by starting Server Manager, clicking the Manage tab and selecting the “Add Roles and Features” command. Click next three times on the “Add Roles and Features Wizard” page till you get to the “Select Server Roles page and select the Remote Access check box:
Click next three times and select the “DirectAccess and VPN(RAS)” check box on the “Select Role Services” page:
Click to add features and continue to click “Install” to install the DirectAccess role service.A restart is not required after the installation.Open the Remote Access Management console under the Tools tab in Server Manager to start the configuration of DirectAccess.
In the Remote Access Management console, select the DirectAccess and VPN role service and click on the “Run the Remote Access Setup Wizard”.
On the “Configure Remote Access” page, select Deploy DirectAccess Only:
a) After the prerequisite check, on the Setup page, click configure on the Step 1 task to configure remote client settings. On the DirectAccess Client Setup page, select to Deploy full DirectAccess for client access and remote management. Click next.
On the Select Groups page, I chose not to “Enable DirectAccess for mobile computers only” since I want to control what devices have DirectAccess enabled. I also chose not to enable “force tunneling” . Use the Add button to add the Active Directory group for computers to be enabled for DirectAccess. This group was created and populated in Step 6 above. Click next:
On the “Network Connectivity Assistant” page, enter a Help desk email address and rename the DirectAccess Connection name if needed.Select the ‘Allow DirectAccess clients to use local name resolution” option.In the table, add a resource that will be used to determine connectivity to the internal network. A default web probe is created automatically if no other resource is configured. You can configure this task with the fqdn of a domain resource that can be reached via ping or port 80 http. I left the table blank to let DirectAccess configure a default web probe on the DirectAccess server. Click finish.
b) Click configure on the Step 2 “Remote Access Server” task. On the “Network Topology” page, type the name of the public fqdn of the DirectAccess server configured in step 2 above (this name matches the subject name of the IP-HTTPS certificate in step 2 above). In my environment, I selected the “Behind an edge device (with a single network adapter)” deployment topology. Click next:
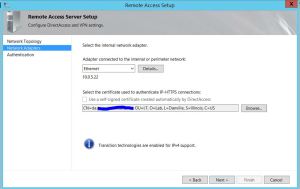
c) On the “Network Adapter” page, confirm the details of the Ethernet adapter in the DirectAccess server. Use the Browse button to select the IP-HTTPS certificate installed in step 4 above. Click next:
d) On the ‘Authentication’ page, select to use “Active Directory Credentials” for user authentication. I don’t need to enable DirectAccess on Windows 7 clients since my clients are running Windows 10 Enterprise. I don’t need to enforce compliance for NAP at this time. Click finish.
e) Click configure on the Infrastructure server task for step 3. On the “Network Location Server” page, I chose to use the Remote Access server as the Network Location server and select the option to use a self signed certificate.The Network Location Server is used by DirectAccess clients to determine if they are inside or outside of the corporate network. Based on NLS reachability, the DirectAccess client will decide if it should attempt to establish DirectAccess connectivity to the tunnel endpoints specified by the DirectAccess configuration. If the DirectAccess client can connect to the NLS, it assumes it is inside the corporate network and does not establish DirectAccess connectivity. If it cannot connect to the NLS, the DirectAccess client assumes it is outside of the corporate network and attempts to establish DirectAccess connectivity. For this reason it is essential that the NLS be exempted from the Name Resolution Policy Table (NRPT) and its hostname only be resolvable on the Internal network. The hostname of the NLS should never be configured in public DNS. In addition, the NLS should not be reachable via the public Internet. Click next:
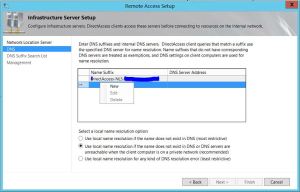
f) On the DNS page, the DirectAccess wizard automatically populates the “Name Resolution Policy Table” (Nrpt) with your internal dns domain suffix and the IPv4 Address of the DirectAccess server. It also creates a default internal DirectAccess-NLS dns record as indicated in the following screenshot:
However, after initial configuration of DirectAccess I noticed that the operations status for DNS was indicated as Critical. After some research, I found a resolution to this error. The DNS server IPv4 address specified in the table is the address assigned to the DirectAccess server’s internal network interface. But this address should be the IPv6 address not the IPv4 address. To resolve this, right click on the current DNS suffix and select Delete to remove the current dns suffix and IPv4 configuration :
Right click on a blank field and select “New” to create a new DNS server entry,
On the “DNS Server Addresses” page, enter the dns suffix name of your internal network and click detect, then click validate. The IPv6 address will be added automatically. Click Apply to continue.This is the IPv6 address of the DNS64 service running on the DirectAccess server, which is how the DNS server should be configured for proper DirectAccess operation.
For the local name resolution option, select the recommended “Use local name resolution if the name does not exist in DNS or the DNS servers are unreachable when the client computer is on a private network” and click next.
g) The “DNS Suffix Search List” page can be left as is with the default dns suffix configuration and click next:
h) On the management page, add the fqdn of any available SCOM 2012R2 or SCCM 2012 R2 machines on your network. DirectAccess can auto detect any management servers in your network and auto-populate this field after the initial configuration.Click finish:
Click finish on the Remote Access Setup page, save a copy of the settings to the desktop for later viewing and click Apply.
The wizard auto creates 2 key GPO policies , DirectAccess Server Settings and DirectAccess Client Settings . Restart the server after applying the settings. In the Remote Access deployment, configuring application servers is an optional task, so I chose to ignore the tasks in this step. The Operations Status page should look as shown in the screen shot after all tasks are completed. Any errors will be reported on this page:
Before successfully testing the DirectAccess deployment, correctly setting the Firewall configuration on the Server and Client is a prerequisite. I created two Firewall Group Policies:
1) “Firewall-Settings-DirectAccess-Server” is linked to the DirectAccess Server OU and security filtering was applied specifically to the DirectAccess Server.
2) “Firewall-Settings-DirectAccess-Clients” is linked to the DirectAccess Clients OU. The security filtering was applied to the ‘DirectAccessComputers’ Active Directory Security group.
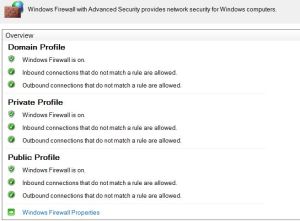
In each of the Group policies, the Domain, Private and Public firewall profiles need to be turned on with inbound and outbound connections set to “Allowed” based on your set rules. The DirectAccess rules have already been auto-created on the server based on the auto generated during DirectAccess configuration. Following are screen shots of the GPO settings:
I would add that Firewall Group Policies need to be configured properly for DirectAccess connections to be successful. Also, the Domain Firewall Group Policies need to be correctly setup to ensure that the “Remote Client Status” console on the DirectAccess server displays the current state of all IPHTTPS connected clients. In my experience, the Firewall group policy object settings are not to be confused with the Firewall settings in the Local machine store of both the clients and Server. The local store settings can be accessed and edited using either :
1)
Netsh advfirewall show and Netsh advfirewall set cmds.
2)
Get-NetFirewallProfile and Set-NetFirewallProfile cmdlets.
While successful DirectAccess connections can be made if the firewall local store settings on both the client and server match each other, “Connected Clients” status will not be displayed in the “Remote Client Status” console. Only after configuring the Firewall Group Policies as explained above was I able to report on IPHTTPS connections. The following PowerShell script will display historical data for ConnectionType DirectAccess for the last one day:
Get-RemoteAccessConnectionStatistics -StartDateTime (Get-Date).AddDays(-2) -EndDateTime (Get-Date) | ?{$_.ConnectionType -eq 'DirectAccess'}|ft ClientIPAddress, UserName, ConnectionDuration, ConnectionType, ConnectionStartTime
You can test the deployment using a Windows 10 Enterprise DirectAccess client. Unplug from the internal network and connect to an external network by wifi or any available means. On the client, the DirectAccess tab shows the status of a successful connection:
The PowerShell cmdlet
Get-DAConnectionStatus shows the status of a successful connection:
The
Get-RemoteAccessConnectionStatistics PowerShell cmdlet displays the statistics of real-time, currently active DirectAccess (DA) and VPN connections and the statistics of DA and VPN historical connections for a specified time duration. Following is a screen shot of the cmdlet result:
I can ping internal network resources successfully. Since DirectAccess primarily works with IPv6, the ping returns the ipv6 addresses of internal network resources. IPv6 must be enabled on the clients for DirectAccess to work. I’ll quickly add that DirectAccess makes use of the IP-HTTPS IPv6 transition technology to enable it work in IPv4 environments :
The
Get-DAClientExperienceConfiguration cmdlet returns the configuration for the DirectAccess client user experience :


No comments:
Post a Comment