Storage Replica is a new feature introduced in Windows Server 2016 that enables storage-agnostic, block-level, synchronous replication between servers for disaster recovery, as well as stretching of a failover cluster for high availability. Synchronous replication enables mirroring of data in physical sites with crash-consistent volumes ensuring zero data loss at the file system level. Asynchronous replication allows site extension beyond metropolitan ranges with the possibility of data loss.
Storage Replica is volume-based and uses SMB V3.1.1. It can use any fixed disk storage, as well as any storage fabric. Storage Replica does not require a cluster and can be managed using Failover Cluster Manager (FCM), PowerShell, Windows Management Instrumentation (WMI), and Azure Site Recovery (planned for the future).
This blog post is divided into two parts, in the first part, I will show you how to implement Windows Volume Replication (Server-to-server), and in the second part, I will show you how to implement Stretch Cluster with Volume Replication.
At the time of writing this article, Storage Replica supports the following scenarios:
• Server-to-server storage replication using Storage Replica
• Storage replication in a stretch cluster using Storage Replica
• Cluster-to-cluster storage replication using Storage Replica
Implement Windows Volume Replication
We will configure Windows Volume Replication (Server-to-server) by implementing the following steps:
• Step 1: Create a replication partnership.
• Step 2: Monitor replication performance.
• Step 3: Reverse failover replication to a replica target.
• Step 4: Remove volume replication.
Step 1: Create a replication partnership
In this step, Windows Volume Replication has been installed on SRV01 and SRV02. It is added as a feature using Server Manager. The feature installation requires no additional input but does require a reboot of the server. Each server has been configured with a volume configured as (D:) As Windows Volume Replication operates at the volume level, the entire contents of (D:) will be subject to replication.
You can automate the feature installation by running the following command from a remote management computer in a Windows PowerShell console to install the required features and roles and restart them:
You can automate the feature installation by running the following command from a remote management computer in a Windows PowerShell console to install the required features and roles and restart them:
$Servers = ‘SRV01′,’SRV02’
$Servers | ForEach { Install-WindowsFeature –ComputerName $_ –Name Storage-Replica,FS-FileServer IncludeManagementTools -restart }
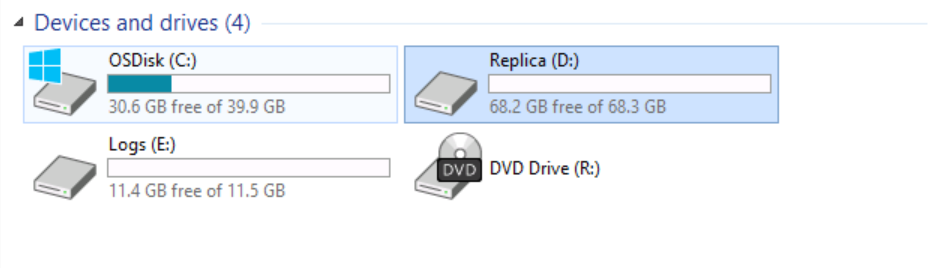
I will switch to SRV01 and explore the existing devices and drives.
As you can see, note the presence of the Volume (D:) Replica.
$Servers | ForEach { Install-WindowsFeature –ComputerName $_ –Name Storage-Replica,FS-FileServer IncludeManagementTools -restart }
I will switch to SRV01 and explore the existing devices and drives.
As you can see, note the presence of the Volume (D:) Replica.
I will switch to SRV02 and explore the existing devices and drives as well.
As you can see, note the presence of the Volume (D:) Replica.

Both servers are configured with identical drives using the same capacity.
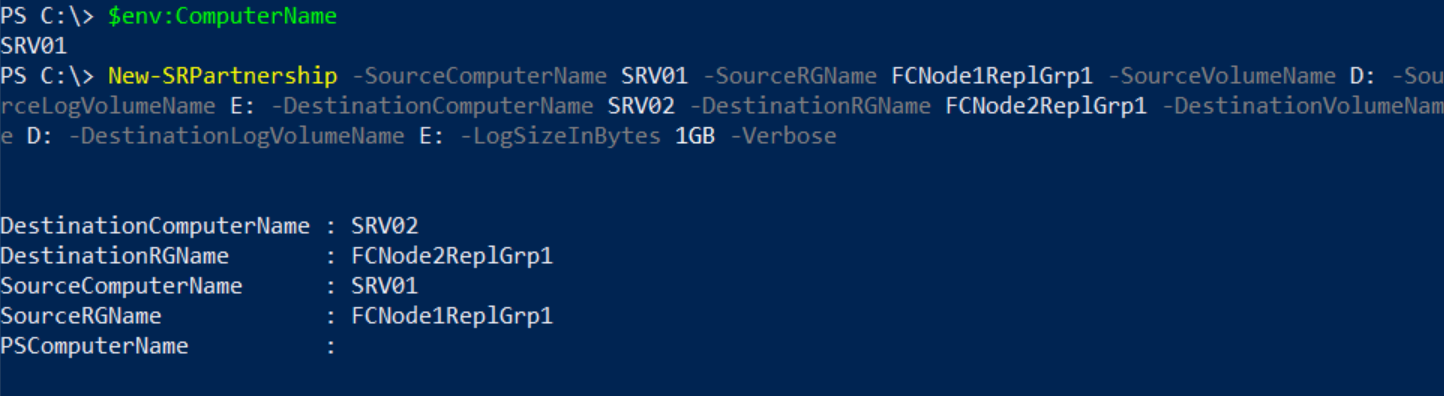
I will launch Windows PowerShell on SRV01 as Administrator and type the following command, and then press ENTER.
New-SRPartnership -SourceComputerName SRV01 -SourceRGName FCNode1ReplGrp1 -SourceVolumeName D: -SourceLogVolumeName E: -DestinationComputerName SRV02 -DestinationRGName FCNode2ReplGrp1 -DestinationVolumeName D: -DestinationLogVolumeName E: -LogSizeInBytes 1GB -Verbose
I will switch now to SRV02 and observe that volume (D:) is no longer available.

In this step we have completed the Partnership replication between SRV01 and SRV02.
Step 2: Monitor replication performance
In this step, I will use built-in performance counters to monitor the performance of volume replication. You will notice that once you establish replication, there is a period of increased CPU and replication activity while the initial sync is performed. In practice, you should allow this sync to complete before moving the replicated volume into production.
I will switch to SRV01, open Windows PowerShell, type: PerfMon.msc, and then press ENTER.
Expand Monitoring Tools, and then click Performance Monitor. In Performance Monitor, click the ADD button (green plus sign).
Under Available counters, click Storage Replica Statistics, and then click Add. Click OK.
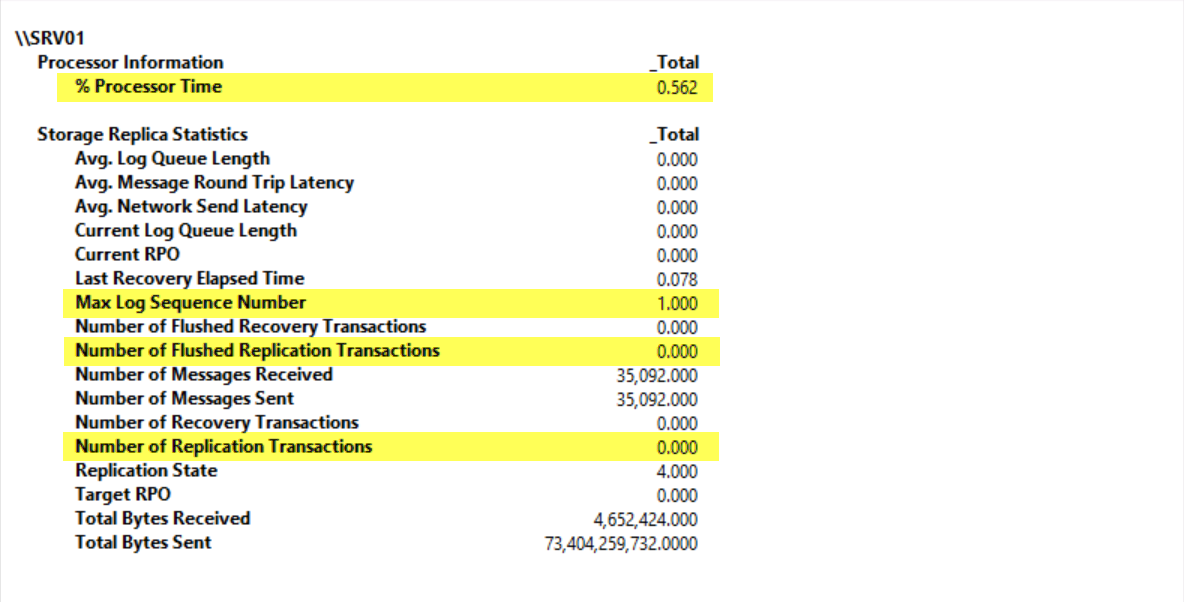
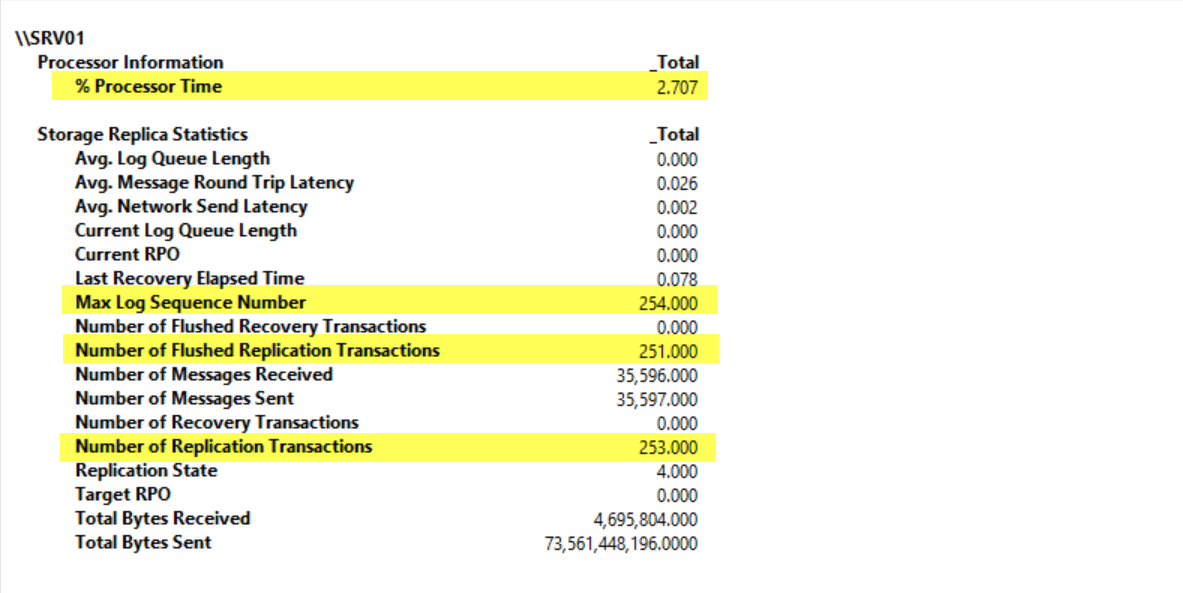
Change the graph type to Report. Note that the statistics indicate the current performance and totals of volume replication.
In Windows PowerShell, type the following command, and then press ENTER:
Copy-Item c:\Windows\System32\Drivers d: -Recurse
Copy-Item c:\Windows\System32\Drivers d: -Recurse
Now switch back to Performance Monitor and notice the increase in statistics as shown in below screenshot. Wait for the statistics to settle down. This is an indication that replication is completed. This process might take a few minutes because the initial sync might still be in progress.
After we observed the replication is completed, we will move to Step 3 and reverse the replication from SRV02 to SRV01.
Step 3: Reverse failover replication to a replica target
In this step, I will reverse the replication and bring the target online for access to data. Changes made on the target will now replicate in reverse to the original source.
I will switch to SRV02, open Windows PowerShell as Administrator.
In Windows PowerShell, type the following command, and then press ENTER:
Set-SRPartnership –NewSourceComputerName SRV02 –SourceRGName FCNode2ReplGrp1 –DestinationComputerName SRV01 –DestinationRGName FCNode1ReplGrp1 –confirm:$false
Note: Windows Server 2016 Technical Preview does not prevent role switching when the initial sync is ongoing, which can lead to data loss if you attempt to switch before allowing initial replication to complete. Do not switch directions until the initial sync is complete.

I will switch now to SRV01 and observe that volume (D:) is no longer available.

The replication is completely reversed from SRV02 to SRV01.
 | StarWind HyperConverged Appliance is a turnkey, entirely software-defined hyperconverged platform purpose-built for intensive virtualization workloads. Bringing the desired performance and reducing downtime, the solution can be deployed by organizations with limited budgets and IT team resources. Also, it requires only one onsite node to deliver HA for your applications that make the solution even more cost-efficient. |
Find out more about  StarWind HyperConverged Appliance StarWind HyperConverged Appliance |
Step 4: Remove volume replication
In this step, we will remove Windows Volume Replication.
Open Windows PowerShell as Administrator on SRV02.
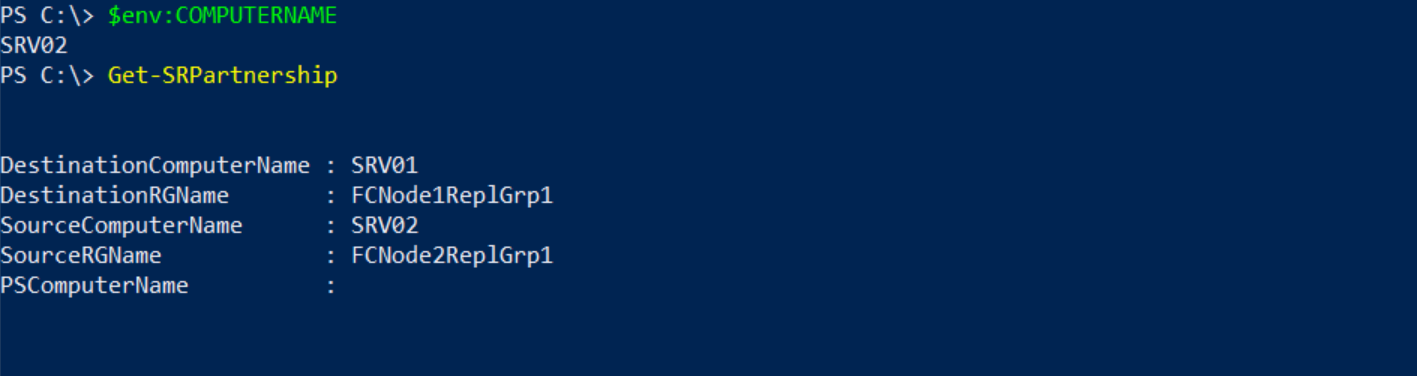
Before we remove the replication, we will query the storage replica group and storage partnership by running the following two cmdlets:
Get-SRGroup
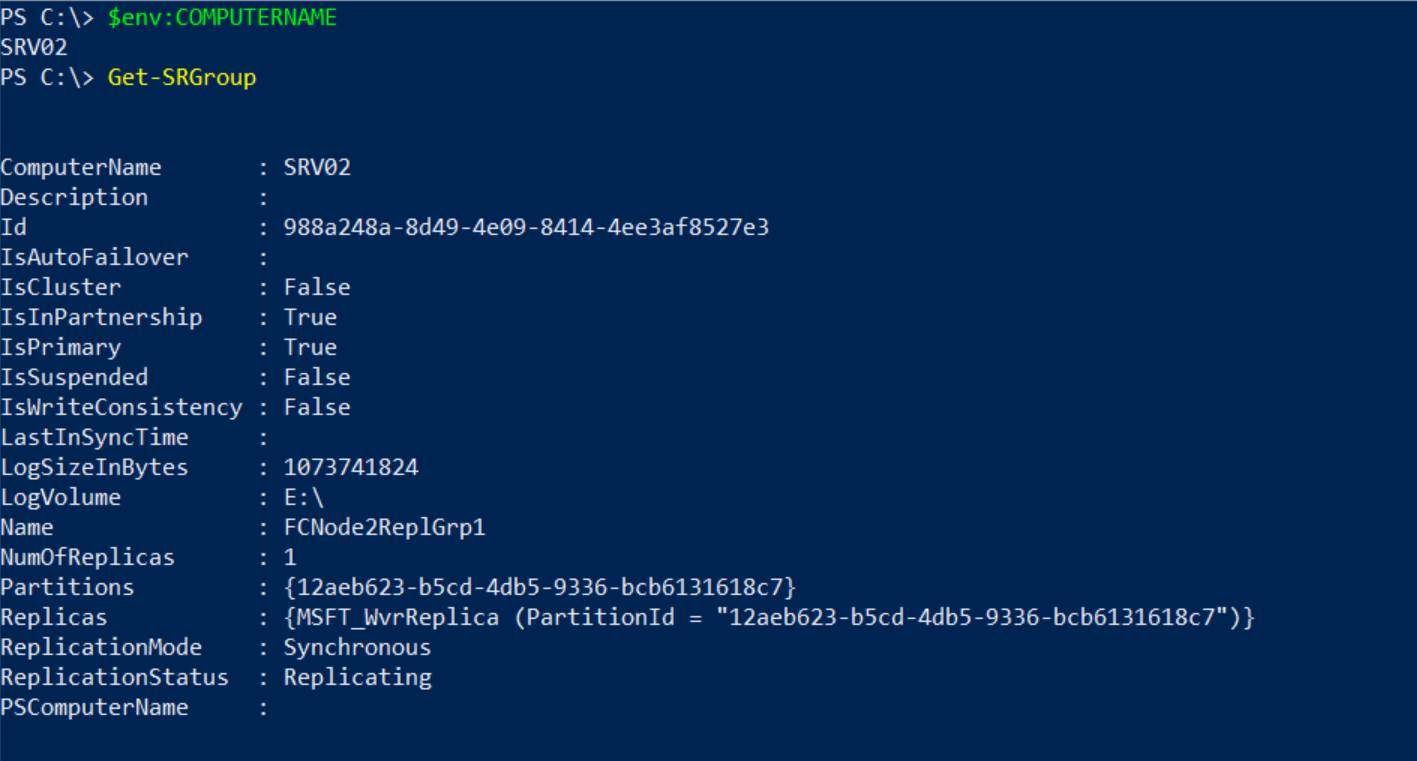
Get-SRPartnerShip
To remove the replication, type the commands listed below and press ENTER after each one.
Get-SRPartnership | Remove-SRPartnership –confirm:$false
Remove-SRGroup –Name FCNode2ReplGrp1

Switch now to SRV01 and open Windows PowerShell as Administrator.
Type the command listed below and press ENTER
Remove-SRGroup –Name FCNode1ReplGrp1

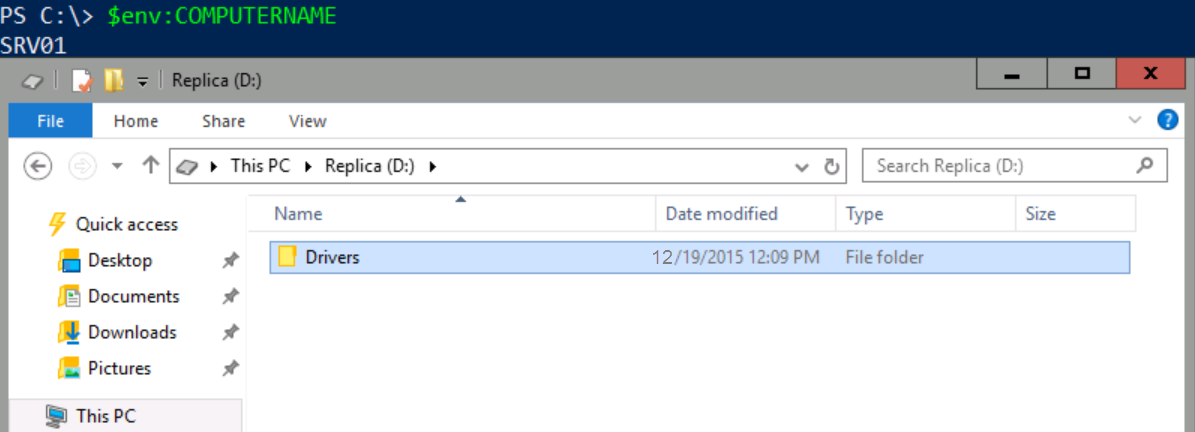
Review the D: drive on SRV01Switch to File Explorer, and then navigate to D:

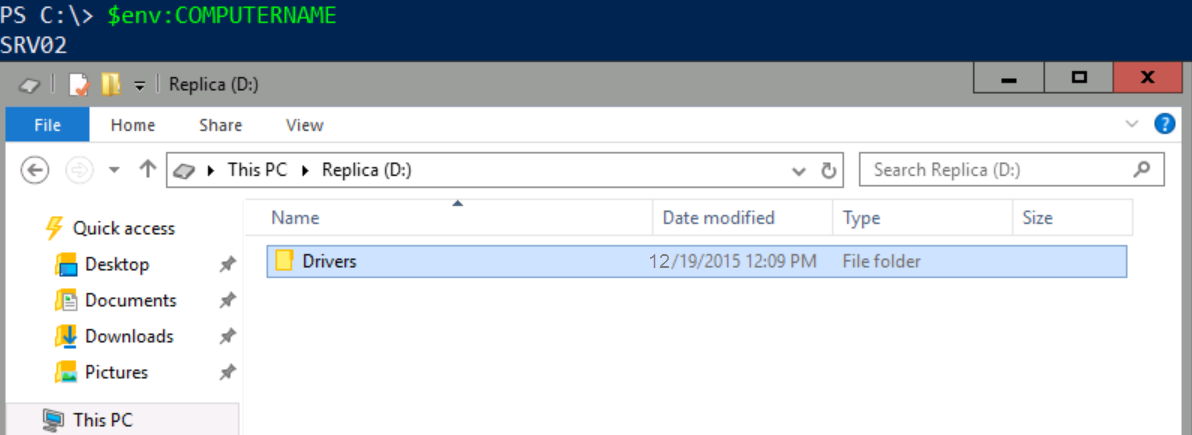
Switch to SRV02 and Review the D: drive
Switch to File Explorer, and then navigate to D:
Switch to File Explorer, and then navigate to D:

This is to confirm that Windows Volume Replication is completely removed from SRV01 and SRV02.
To confirm the Drivers folder that we copied in Step 2 does exist on each server’s (D:) volume, please switch to File Explorer, and then navigate to D:
SRV01
SRV02
Congratulations! In Part 1 we have successfully:
- Created a replication partnership between SRV01 and SRV02.
- Monitored replication performance.
- Reversed failover replication to a replica target.
- Removed volume replication.
No comments:
Post a Comment