VMware vCenter Server pools ESXi host resources to provide a rich feature set delivering high availability and fault tolerance to virtual machines. The vCenter Server is a centralised management application and can be deployed as a virtual appliance or Windows machine. This post walks through a new install of the vCenter Server Appliance v6.5.
About VCSA
The VCSA is a pre-configured virtual appliance; as of v6.5 the operating environment is built on Project Photon OS 1.0. Since the OS has been developed by VMware it benefits from enhanced performance and boot times over the previous Linux based appliance. Furthermore the embedded Postgre database means VMware have full control of the software stack, resulting in significant optimisation for vSphere environments and quicker release of security patches and bug fixes. The VCSA scales up to 2000 hosts and 35,000 virtual machines.
In vSphere 6.0 the VCSA reached feature parity with its Windows counterpart, 6.5 begins to pave the way for VCSA to become the preferred deployment method for vCenter Server. One key addition is the inclusion of Update Manager bundled into the VCSA, as well as vCenter High Availability, Backup and Restore, and other features. The appliance also saves operating system license costs and is quicker and easier to deploy and patch.

Software Considerations
- VCSA 6.5 must be deployed to an ESXi host running v5.5 or above. All hosts you intend to connect to vCenter Server 6.5 should also be running ESXi v5.5 or above.
- You must check compatibility of any third party products and plugins that might be used for backups, anti-virus, monitoring, etc. as these may need upgrading for use with vSphere 6.5.
Architectural Considerations
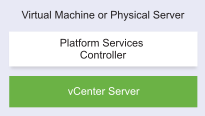
- From vSphere 6 onwards the Platform Services Controller (PSC) was introduced to the vSphere architecture. The PSC contains infrastructure services such as Single Sign On, Certificate Authority, licensing, etc. The PSC is deployed internally with vCenter Server or as an external component.
- When implementing a new vSphere 6.5 environment you should plan your topology in accordance with the VMware vCenter Server and PSC Deployment Types. Larger environments may require an external PSC.
- Most deployments will include the vCenter Server and PSC in one appliance, following the embedded deployment model, which I will use in this guide.
Other Considerations
- The VCSA with embedded PSC requires the following hardware resources (disk can be thin provisioned)
- Tiny (up to 10 hosts, 100 VMs) – 2 CPUs, 10 GB RAM.
- Small (up to 100 hosts, 1000 VMs) – 4 CPUs, 16 GB RAM.
- Medium (up to 400 hosts, 4000 VMs) – 8 CPUs, 24 GB RAM.
- Large (up to 1000 hosts, 10,000 VMs) – 16 CPUs, 32 GB RAM.
- X-Large (up to 2000 hosts, 35,000 VMs) – 24 CPUs, 48 GB RAM – new to v6.5.
- Storage requirements for the smallest environments start at 250 GB and increase depending on your specific database requirements.
- Where the PSC is deployed as a separate appliance this requires 2 CPUs, 4 GB RAM, 60 GB disk.
- Environments with ESXi host(s) with more than 512 LUNs and 2048 paths should be sized large or x-large.
- The ESXi host on which you deploy the VCSA should not be in lockdown or maintenance mode.
- All vSphere components should be configured to use an NTP server. The installation can fail or the vCenter Server Appliance vpxd service may not be able to start if the clocks are unsynchronized.
- FQDN resolution should be in place when deploying vCenter Server.
- Official resources – vSphere 6.5 Documentation Centre, vSphere 6.5 Release Notes.
- Read the Important information before upgrading to vSphere 6.5 KB.
Installation
Download the VMware vCenter Server Appliance 6.5 ISO from VMware downloads.
Unlike the Windows vCenter installer, which hasn’t changed much in v6.5; the VCSA installer has had a complete overhaul. You’ll notice straight away that the GUI is much cleaner, and multiple deployment options (install, upgrade, migrate, restore) are now bundled into one installer.
Mount the ISO on your computer. The VCSA 6.5 installer is compatible with Mac, Linux, and Windows. Browse to the corresponding directory for your operating system, e.g. \vcsa-ui-installer\win32. Right click Installer and select Run as administrator. As we are installing a new instance click Install.

The installation is split into 2 stages, we begin with deploying the appliance. Click Next.

Accept the license agreement and click Next.

Select the deployment model, in this example we will be using an embedded deployment combining the vCenter Server and Platform Services Controller in one appliance, click Next.

Enter the FQDN or IP address of the host, or vCenter upon which you wish to deploy the new VCSA. Enter the credentials of an administrative or root user and click Next. The installer will validate access, if prompted with an untrusted SSL certificate message click Yes to continue. Tip – connect to the vCenter for visibility of any networks using a distributed switch, connecting to the host direct will only pull back networks using a standard switch.

Enter the name of the VCSA and a root password, click Next.

Select the deployment size in line with the number of hosts and virtual machines listed in the other considerations part of this guide, click Next.

Select the datastore where the VCSA will be deployed, select thin provisioning if required, and click Next. Configure the network and NTP settings for the appliance and click Next. If there are any issues with FQDN resolution you will be warned here.

On the summary page click Finish. The appliance will now be deployed.

With the VCSA now deployed we can move on to stage 2, click Continue.

Click Next to being the VCSA setup.

Configure the NTP servers to use, enable SSH access if required, and click Next.

Enter a unique SSO domain name, the default is vsphere.local. The SSO domain name should not be the same as your Active Directory Domain. Configure a password for the SSO administrator and a site name, click Next.

Select or deselect the customer experience improvement program box and click Next.

Review the details on the summary page and click Finish. Click Ok to acknowledge that the VCSA setup cannot be paused or stopped once started.
Post-Installation
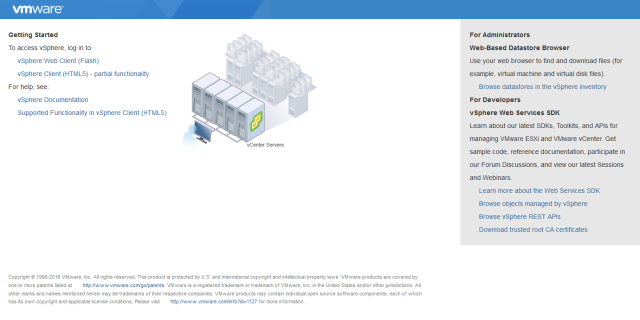
Connect to the vCenter post install using the IP or FQDN of the vCenter. Access vSphere by clicking either the vSphere Web Client (Flash) or the vSphere Client (HTML5). Connect to the vSphere Web Client to manage your system, the thick client (Windows) is no longer supported.
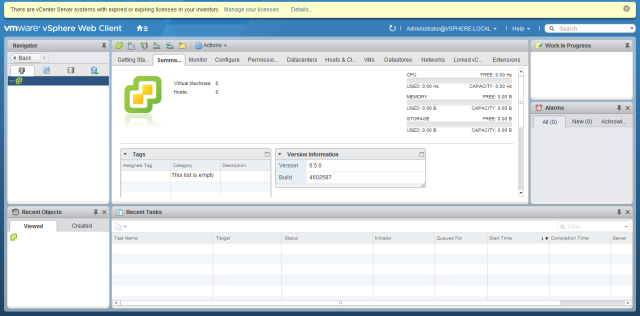
Log in to the vSphere Web Client using the SSO administrator login. Verify the installed version is correct under the Summary tab when selecting the vCenter, you can also go to Help > About.
You must apply a new vCenter license key within 60 days. From the Hosts and Clusters view select the vCenter Server. Click Actions and Assign License. Select a license or use the green plus button to add a new license and click Ok.
You can obtain a 60 day trial license for vCenter Server here. If you have purchased vCenter Server then log into your licensing portal here. If the license key does not appear then check with your VMware account manager.
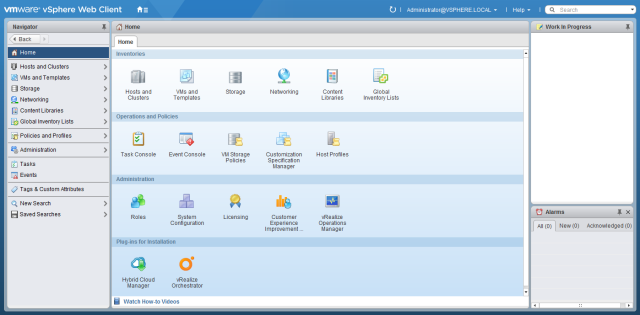
If you are have an Active Directory domain then vCenter can use this as a source for permissions and sign on credentials. First join the vCenter to the domain; from the home page click System Configuration, Nodes, and select the vCenter server. In the Active Directory section of the Manage tab click Join, input your AD details and click Ok. Reboot the appliance either right clicking the vCenter server under Nodes and selecting Reboot.
When the vCenter server comes back online we can add AD as an identity source; from the home page click Administration, under Single Sign-On select Configuration. Ensure the Identity Sources tab is open and click the green plus symbol to add a source. Fill in the Active Directory details for your domain and click Ok.

You can now add permissions to vCenter objects such as datacentres, clusters, folders, individual virtual machines, etc. for Active Directory users and groups by selecting the object and clicking Permissions under the Manage tab
No comments:
Post a Comment