Clear ‘Run’ Command History from Windows 7

MSWin7-ClearRunHistory

To solve this, from the registry manually clear the ‘run’ commands. 
The steps are below.

How to delete Windows 7 ‘Run’ History (using Regedit):

  1. Open the ‘Start Menu’
  2. Type   ‘Regedit’ then press ‘Enter’ MSWin7-ClearRunHistory1
  3. Click ‘Yes’ if prompted
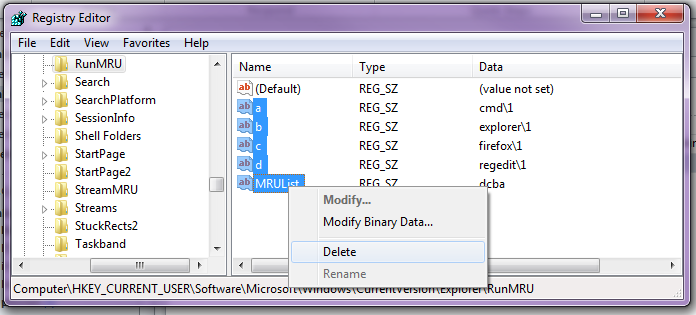
  4. Navigate to‘HKEY_CURRENT_USER\Software\Microsoft\Windows\CurrentVersion\Explorer\RunMRU’MSWin7-ClearRunHistory2
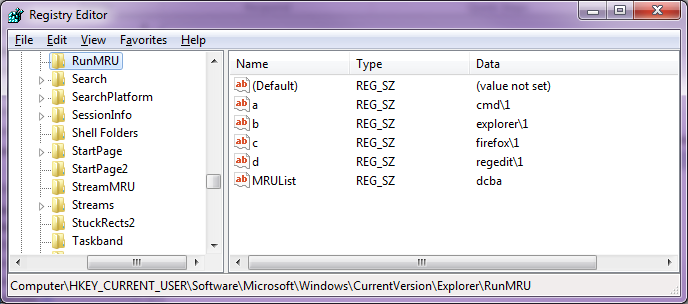
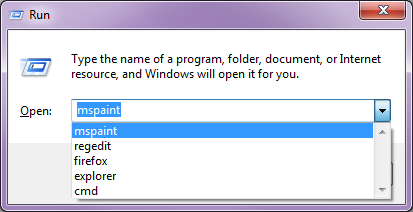
  5. In the right hand window you will see the list of saved run commands.
  6. Delete each of them, only leave the (Default) at the topMSWin7-ClearRunHistory3

Nb:-

Mac OS X 10.5 Leopard Installation Step by Step

Mac OS X 10.5 Leopard Installation Step by Step


    At the time of writing this guide, OS X 10.5 Leopard was the current release by Apple. The newest OS by Apple is OS X 10.10 Yosemite. The installation procedure should be relatively the same as previous versions, although, you will need to first create a Yosemite Recovery Disk using this tool.
Install Mac OS X v10.5 Leopard on a new hard drive.
Image #1

 
Step 1
  Installing Mac OS X 10.5 Leopard 

  • Insert a Mac OS X v10.5 Leopard installation disc into your optical drive.
  • Hold down the “option” key and restart the computer to bring up the boot option menu.
  • To begin the installation, click the install disc icon on the boot option menu.
Image #1


Step 2
 

  • When prompted, select your language and click the arrow button to continue.
Image #1

 
Step 3
 

  • After the installer loads, you will be greeted by a welcome window.
  • Select “Disk Utility” from the Utilities drop down menu.
Image #1


Step 4
 

  • Select your new hard drive from the left column in Disk Utility.
  • The correct partition table type needs to be set for your hard drive.
    • If it's a brand-new hard drive, it may have no partition type listed.
    • For an Intel-based machine, you should have "GUID Partition Table" listed.
    • For a Power-PC-based machine, you should have "Apple Partition Map" listed.
  • If the incorrect partition type is listed, proceed to the next step to delete and re-create the partition. If not, proceed to step 8.
  • Warning: Deleting the partition table will erase the entire contents of the drive.
Image #1


Step 5
 

  • The following two steps are only necessary if your drive's partition is set incorrectly. Erasing a partition will permanently erase all information stored inside.
  • Select the partition on the drive and click the "-" button.
  • When prompted, click the "Remove" button to remove the drive's existing partitions.
  • Once the partitions have been removed, click the "Options..." button.
Image #1


Step 6
 

  • Select the partition scheme required for your machine:
    • Select "GUID Partition Table" for Intel-based machines.
    • Select "Apple Partition Map" for PowerPC-based machines.
  • Click "Ok."
  • Press the "+" button to add a new partition.
  • Press the "Apply" button.
Image #1dit

Step 7 

  • Click on the “Erase” tab.
  • Choose the Volume format (we recommend “Mac OS Extended (Journaled)”).
  • Select a name for the drive.
Image #1


Step 8
 

  • Type in a name for the drive. Apple names their drives "Macintosh HD" from the factory.
  • Click “Erase.”
Image #1


Step 9
 

  • A warning window will pop up and ask if you wish to continue with the erasing process.
  • Click "Erase" on the warning window that has popped up.
Image #1


Step 10
 

  • After erasing is done, quit Disk Utility.
Image #1


Step 11
 

  • After quitting Disk Utility, proceed with the installation by clicking the "Continue" button.
  • A window will open and ask if you agree to the Software License Agreement.
  • Agree to the Software License Agreement by clicking the "Agree" button.
Image #1


Step 12
 

  • Make sure the correct hard drive is selected as the installation destination.
  • Click "Continue" to proceed with the installation.
Image #1


Step 13
 

  • We are now ready to install Mac OS X v10.5 Leopard on the hard drive. Before proceeding to the next step, make sure that all of the installation settings are correct.
  • Click "Install" to commence the installation.
Image #1

 
Step 14
 

  • The installer will check the source DVD disk before starting the installation process.
  • During this step, you will see a "skip" button. It is not necessary to check the disk, and the "skip" button may be used. However, if you have never used your disk before, or haven't used it recently, it is highly recommended you check it.
Image #1

 
Step 15
 

  • Leopard will now install onto the hard drive.
  • The installation process can range anywhere from a half hour to an hour.
Image #1


Step 16
 

  • If you are installing Leopard from a retail disk, please skip this step.
  • If you are installing an OEM version of Leopard, you need to install the iLife applications and other software from the Applications Install Disc.
Image #1


Step 17
 

  • The installation was successful. Click "Restart" to reboot the computer.
  • At this point you are finished with the Mac OS X install.

Mac OS X Leopard should now be freshly installed. Enjoy!