Remove Delta Search Home Page – IE, Firefox, Chrome

Delta Search Home page is a toolbar and set your homepage to www.delta-search.com (www.delta-homes.com), Here we have the proper instruction to remove Delta Home clean completely from registry as well.

Automatic Fixit

Download Adware Remover Tool v3.5 to remove Delta Search Automatically from all of you browsers, This is a Freeware utility specially deigned for Adware Removal. This tool can remove adware from Internet Explorer, Firefox, Mozilla Firefox and their registry as well..
TSA_Fixit

Steps

1. Uninstall  Delta Search from Control Panel

  • Click on Start button and then click on Control Panel and go to Add/Remove Programs(XP) or Program and Features. Now find out the Delta Search entry then Right click on it and then click on uninstall.

2. To Remove delta search in Internet Explorer

  • Open Internet Explorer then go to Tools  menu (press “alt” key once to active menu bar)  and then click on  Internet Option  a  configuration page will be opened, then click on General tab. Now look into under HOME PAGE Edit Box you got www.delta-search.com (www.delta-homes.com), replace it to www.google.com, then click onapply and close.
  • Now Restart Internet explorer

Important Instructions for Internet Explorer

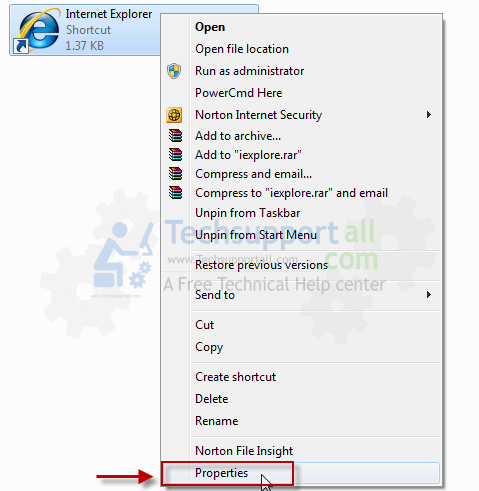
Remove Delta homes infection from Internet Explorer shortcuts.

  • Right click on the shortcut of Internet Explorer / Firefox / Google Chromeand do left click on the properties option. then their properties page you will appear. Delete that following path from target field. (As per below screenshots)
    http://www.delta-homes.com /?utm_source=b&utm_medium=c..etc.”
Shortcut infection clean
Remove qvo6.com search shortcut properties
3. Remove Delta Search infection from startmenu’s shortcuts.
Remove Delta-Homes Start Menu
4. Remove Delta Search infection from taskbar’s Shortcuts.
Remove Delta-Homes taskbar


Remove from registry
  • Click on Start and type Run and then type “REGEDIT” in the run box and then hit enter
  • In the registry editor go to Edit menu and then click on find option, you will get edit box to search any string to registry editor
  • Type in the find edit box “delta-serach.com” and click on Find Next
  • The search result will highlighted that key which have the same string
  • Edit that key and change the “delta-search.com” string to “google.com
  • Use F3 key to find Next, Replace all them to “google.com”
  • Remove below path from registry as well (If you find)
  • http://www.delta-homes.com/?utm_source=b&utm_medium=newgdp&from=newgdp&uid=ST9320325AS_6VDBEXNGXXXX6VDBEXNG&ts=1373040340
  • Then Restart the internet explorer
Reset Internet Explorer
  • Open  Internet explorer and then go the Tools  menu  (Press “alt”  key once to active Menu bar), you can also click on gear icon in IE9/IE10 then go to Internet option.
  • Once you clicked on Internet option you will get an internet option window.
  • Now you have to click on  Advanced tabthen click on Restore Advance Settingbutton once and then click on RESET button
  • Now you will get a new popup for confirmation to get it done reset process, Tick mark on Delete personal setting then click on RESET button
  • Now you will appear a popup to complete all the talks, after completion you have to click on close button.

3. To Remove delta search in Mozilla Firefox

  • Open Mozilla Firefox, Click on Tools menu (press “alt” key once to active menu bar) then go to Options, after that a  configuration page will be openedthen click on General tab and then look on the very first section named as Startup. Under Startup you will see a HOME PAGE Edit Box, under this edit box you will see www.delta-search.com, (www.delta-homes.com), please replace it to www.google.com, then click on apply and close.
  • Restart Firefox Browser
Advance Steps
  • In the Firefox type this command in the address bar “about:config” and then hit enter to open this page
  • After that you will get a page which is asking for permission to open config page that confirm that please use it carefully so please click on button named as “I’ll be carefully, I promise“.
  • Now you will a configuration page with search option on the top, so please type “delta-search” into search bar, you will get the result.
  • Replace all the string from “delta-serach (delta-homes),” to “google
    In the search result do double click on the all entries (related to delta search) one by one, and change them to “www.google.com”
  • You can Right click on found results one by one and choose RESET option.
Reset Firefox
  • Open “Troubleshooting information” page into Firefox.
  • Open  Firefox and then go the Help menu (Press “alt”  key once to active Menu bar)
  • Note:  you can also open this page in this ways, open Firefox then type this command in the address bar “about:support” (without quote) and then hit enter or OK.
  • Go to Help menu then click on “Troubleshooting information”
  • You will get a page “Troubleshooting information”, here you will get “Reset Firefox” option in the right side of the page.
  • Click on Reset Firefox option, It will take time to reset

4. To Remove delta search in Google Chrome

  • Start Google Chrome, click on Settings icon (Located in very top right side of the browser), Under this menu find out and click on Settings after clicking on that you will appear a configuration page.
  • In the same configuration page find a option named as “Open a specific page or set of pages” click on Set Pageshere you will appear the bunch of URL (Set pages), you have to delete all them and enter only one which you want to use as your home page.
  • In the same configuration page find out the option named as ‘Manage search engines’ click on that, then you will get a page as Default search engine settings,here you will get some bunch of search engines, first of all change your default search engine
  • Find out the google search engine and move your mouse pointer to their right side, here you will get 2 options.
  • 1. Make Default
  • 2. Close button “x” to delete the search engine.
  • Make default your google search engine, and delete all other than, one by one
Reset Google Chrome
  • Close all Google Chrome browser
  • Now open this following path
    • Press “window key + R” (Flag sign key + R) , then you will get Run box.
    • Copy and Paste this following command in this Run box then hit Enter or OK
  • Windows XP
    %UserProfile%\Local Settings\Application Data\Google\Chrome\User Data\Default
  • Windows 7, 8, Vista
    %UserProfile%\AppData\Local\Google\Chrome\User Data\Default
  • In the default folder please find a file named as “Preferences“ and now just need torename this file from “Preferences“ to “Preferences_old“
  • Now Start your Google chrome.
That’s it !!!! Done
All steps are done, your issue now must be solved if you properly follow above instructions. i recommend that please Scan your computer once from Malwarebyes.
5. Install the Malwarebytes to remove Delta search automatically, Install it and update it and then Run the scan it will automatically remove the Delta Search Entries
delta search fix
Delta Search more useful Information
Delta Search homepage set and installed into the browser file format developed by Montera Tehnologies, changed your home page to delta-search.net, and has changed your go into default search engine.
Delta search is really a plan that provides a web site Google search (delta-search.org) and also plugin that are staying marketed by way of some other no cost applications, and when set up on your personal computer, they’ll hijack the web browser home-page and exchange your current default internet search engine.

Sagemcom F@st 1704 router configuration

Sagemcom F@st 1704 router configuration


LOGIN TO THE ROUTER
  1. Connect your Router Port 4 to ONT port 1 (this is default port for internet, if settings are not changed in ONT) and connect your computer to Router 2 or 3.
  2. Open Internet Explorer/Firefox type http://192.168.1.1 or http://myrouter
  3. Give username admin and password admin
INTERNET CONNECTION SETUP
  • Go to Advanced Setup > LAN Ports
  • Select (tick on) ENET (1 - 4) option > Click Appy/Save button.


  • go to wan service > remove any existing configuration
  • go to advanced setup>atm interface > remove existing atm configuration
  • Go to Advanced Setup > Layer 2 Interface > Ethernet Interface.
  • Select Port 4 (eth0.5/ENET 4) > Click Next on any default setting appearing on next screen > Click Apply/Save.
  • Go to Advanced Setup > WAN Service
  • Click on Add button.
  • Select the ET0.5/ENET 4 > Next > Select PPPoE option > Next
  • Give username, password.
  • Click Next > Next > Next > Apply/Save.

  • Reboot your router.
WIRELESS CONNECTION SETUP
  • Click on Wireless option
  • Select Enable Wireless Option > Give any SSID > Click Apply/Save button.

  •  Go to Security option of Wireless tab > Disable the Enable WSC option. Select WPA2 with TKIP/AES for better security > Give wireless password > Click Apply/Save button

Official Android 4.1.2 VJMS3 Jelly Bean Firmware on Samsung Galaxy S2 GT-I9100

  1. Firstlydownload the official firmware file from here and save it to your PC
  2. Secondly,Download ODIN 3.07 from here on your PC and save the same to PC. 
  3. Now, extract the downloaded firmware zip file to your PC, preferable on the desktop and make sure that you will obtain a .tar.md5 file and some files in some cases.
  4. Next, extract Odin zip file and make sure you’ll get Odin3 v3.07.exe plus other additional files.
  5. Now, turn off the smartphone and completely (wait for confirm the shut-down task the vibration approximately 6 seconds).
  6. Boot the S2 device into Download Mode. (For doing that press and keep holding the Volume Down + Home + Power buttons simultaneous until an Android icon like a robot is displayed and in this moment press the Volume UP button, the Download Mode will appear.
  7. Now, open the ODIN app by launching the ODIN v3.07.exe file that you have already extracted above.
  8. While the smartphone is connected in Download Mode, connect it to PC using the USB cable.
  9. Now, look on the ODIN interface and when the smartphone is recognized successfully, a notification message will say “Added!” and additionally the ID: COM together with a port number box will be colored yellow
  10. Note: In case the ODIN doesn’t display the added message, change the USB port to the PC and reinstall the suitable USB drivers once again on the PC.
  11. Now, chose and load the necessary files for install the new firmware as below:
    • From ODIN app select the PDA checkbox and then browse and load the ‘.tar.md5′ file
    • Now, select the Phone checkbox and then browse and load the file that contain the modem word in its name.
    • Click on the CSC checkbox and select the file that named ‘CSC
    • From the ODIN app click the PIT checkbox and load the ‘.pit’file.
    Note: Ignore the steps b, c and d if there is no such file.
  12. Important: In ODIN app, make sure that the Auto Reboot and F. Reset Time  options are enabled by selecting the checkboxes, but the Re-Partition checkbox must be unselected, select the Re-Partition checkbox only id a .pit file was loaded into ODIN in the above corresponded step.
  13. When all the steps are correctly followed, press START button from ODIN to start the installation firmware process.
  14. Now wait until the firmware flashing process is done and the smartphone will reboot automatically.
  15. The flashing process is completely done when a PASS message with a green background will be displayed in ODIN interface (Left-most box at the very top of the ODIN app).
  16. Now you can disconnect the USB cable from the PC
That’s it; you successfully learned how manually update the S2 GT-I9100 with the latest stock Android 4.1.2 I9100VJMS3 Jelly Bean OTA firmware.
Verify the firmware version that is running of the phone by navigating to: Settings > About Phone:
Troubleshooting – In case the smartphone is stuck or is entering on a boot loop at the boot sequence after the last reboot you have to do :
  • Boot the smartphone into Recovery Mode by pressing and keeping hold the Volume UP + Home + Power buttons simultaneous.
  • Now, from the Recovery Mode perform a Wipe data/Factory Reset as well as Wipe Cache Partition.
  • When the wipe process is done, return on the Recovery Mode main menu and from there choose the reboot system option.
 Note 1: For navigating between Recovery Mode options use Volume Keys and for selecting an option in recovery use Power Key.
Note 2:  When a wipe task is applied all the device’s internal memory data will be erased, not the data on the SD card memory.

How to Remove Ransomware

Ransomware is malicious software that restricts access to a computer until a ransom is paid. It displays a fake warning message and asks you pay a fee to unblock the computer. It will frequently disguise itself as the police or FBI. Ransomware can be difficult to remove; however, it is not impossible. This guide provides two methods for removing ransomware.


Contents

Method 1 - Start in Windows Safe Mode
Method 2 - Use HitmanPro Kickstart


Method 1 - Start in Windows Safe Mode

Certain types of ransomware won't run in safe mode. To start in safe mode, restart your computer and press and hold the F8 key while your computer starts up. You must press F8 before Windows begins to load. You will see a black screen with several options. Use the arrow keys to select Safe Mode with Networking and press the Enter key.


Method 2 - Use HitmanPro Kickstart

Note: You will need a USB flash drive to use this method.

On another computer, download and open HitmanPro: Download here (32-bit), (64-bit) - Homepage

When HitmanPro opens, click the kick icon at the bottom of the screen. 

Now, insert the USB flash drive into a USB port on the computer. Then follow the on-screen instructions to install Kickstart. Once the installation is complete, remove the flash drive and insert it into the infected computer. Then follow these steps to boot the computer from the flash drive:


1. Restart or turn on the infected computer (make sure the USB drive is plugged in).

2. Go to the boot menu of the computer. To access the boot menu, you need to press a specific key while the computer starts up. Different computers have different ways of accessing the boot menu. The boot menu keys are listed below.
  • Dell: F12 
  • HP: ESC (boot device options)
  • Other: F12
Note:
  • You must press the key before Windows begins to load. 
  • If your computer doesn’t have a one-time boot menu, you will have to change the boot order in the BIOS. 
3. You will see a boot menu that is similar to the one below. From there, look for one of the following options: USB Device, Removable Devices, USB brand name (e.g. SanDisk, Kingston). Use the arrow keys to select the appropriate option and then press the enter key. 


4. Follow the on-screen instructions. It may take several seconds for HitmanPro to open. When HitmanPro opens, click the Next button. Select the box that says No, I want to perform a one-time scan, and then click Next. Once the scan is complete, click Next. Click Activate free license, and then click Next to remove the ransomware. Restart the computer and remove the USB flash drive. 


  Common Ransomware Threats

Many computer users encounter the following threats:

- FBI MoneyPak ransomware (Citadel Reveton)
- EUROPOL virus
- U.S. Cyber Security ransomware
- West Yorkshire Police Ukash
- Internet Complaint Center (locks computer)