Hyper-V Server is the standalone Type 1 Hypervisor available for free from Microsoft.
It is aptly suitable for the Enterprise, SMB, SOHO, Managed Services Provider, or even techie home users wishing to capitalize on a virtualized environment. It is not specifically used for just virtualizing servers.
Here is an end-to-end guide for using Windows 10 Hyper-V Manager to manage Hyper-V Server 2016 in a workgroup. While the focus of this article is using Hyper-V 2016, the same steps can be applied to Hyper-V Server 2012 R2.
NOTE: Windows 10 Professional or Enterprise edition will be needed. Windows 10 Home edition cannot be used as it does not contain the Hyper-V Manager option.
These steps have been used successfully to manage multiple installations of Hyper-V. If you’ve followed some other Web instructions and your configuration is not working or is flaky, then do a fresh install of Hyper-V Server before following these steps.
Tested with Hyper-V Server 2012R2, 2016, and Windows 10 Pro Build 1607 (Anniversary Edition), Build 1703 (Creator’s Edition), and Build 1709 (Fall Creator’s Edition).
Assumptions:
- The Hyper-V server and the Windows 10 computer are on the same LAN and in the same IP subnet and in the same VLAN – if such exists.
- The server and workstation are in the same DNS Domain.
So, start with a simple configuration. You can move things around after you’ve got it working.
Note: If DNS is not yet set up, but sure to add the Hyper-V hostname to the hosts' file on the Windows 10 computer
Let's begin the process:
NOTE: references to “domain” in the subsequent steps of this article refer to DNS domain, not Active Directory Domain.
Remember, Hyper-V is being setup in a workgroup, i.e., not associated with any Active Directory domain.
For this article, my DNS domain is “fshome.local”. My Hyper-v server will be “hyperv2”
If starting with a fresh install of Hyper-V Server 2016, here’s the screen after the install:

Configure in the following order and the necessary reboots will be at the end of the process…
7) Remote Desktop – enabled. Select the choice of authentication as applicable to you
3) Add Local Administrator
NOTE: the local administrator username/password is significant as it will be used later in the management process…
NOTE: the local administrator username/password is significant as it will be used later in the management process…
4) Configure Remote Management – leave Enabled
Configure Server Response to Ping – Yes
Configure Server Response to Ping – Yes
5) Windows Update Settings – set to your preference
8) Network Settings
9) Date and Time
10) Telemetry Settings — set to your preference
1) Domain/Workgroup — leave it as WORKGROUP or change to your Workgroup name
2) Computer Name — will require server reboot
The computer name can be just a hostname, e.g., hyperv2. It does not need to be FQDN, e.g., hyperv2.fshome.local
The computer name can be just a hostname, e.g., hyperv2. It does not need to be FQDN, e.g., hyperv2.fshome.local
6) Download and Install Updates – will require server reboot
We’re now done with the fresh install configuration.
Part 1: Hyper-V Server Configuration
After the Hyper-V Server’s post installation setup and rebooting here is what it looks like:

Now select the command prompt window – it’s hidden behind the blue window.
Step 1: disable the Hyper-V built-in firewall. You’re behind your firewall/router so doing this is OK, don’t worry. Enter the following:
netsh advfirewall set allprofiles state off
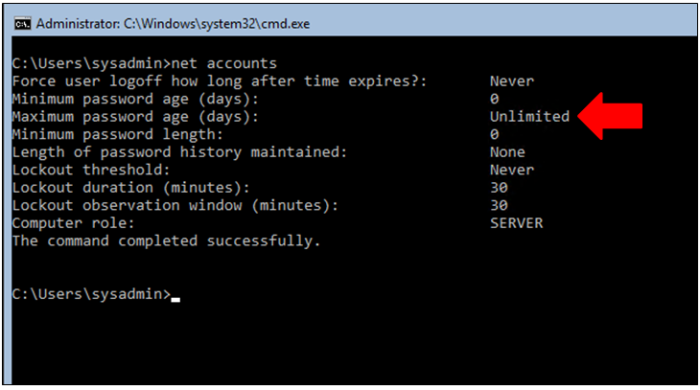
Step 2: disable the password age out. By default, the user’s password is valid for 42 days. You don’t want to get locked out of your Hyper-V server if using RDP. So enter:
net accounts /maxpwage:unlimited
Verify the new value is set
net accounts
Step 3: allow PowerShell Remoting.
At the C:\ command prompt type PowerShell. Once PowerShell is running, enter the following:
enable-psremoting
That is it. The three steps are ALL that is required on the Hyper-V server side.
*NOTE: Step 3 is not needed on Hyper-V Server 2016. It is enabled by default (Option # 4 in the Hyper-V server configuration screen).

Part 2: Windows 10 Configuration
Let’s now move over to to the Windows 10 computer.
Verify we can reach the Hyper-V server by pinging it by its hostname.
ping hyperv2
If ping is not successful, you’ll need to troubleshoot and fix before moving on.
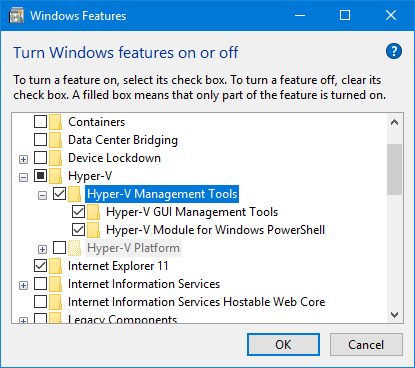
Step 4: Install the Hyper-V Manager
After the Hyper-V manager install has completed, start PowerShell with “Run As Administrator“.
Step 5: set the network connection profile – we have to change to PRIVATE
Set-NetConnectionProfile -NetworkCategory private
Step 6: Verify the net-connection profile new settings
Get-NetConnectionProfile

Step 7: setup remote management.
Set-WSManQuickConfig

Step 8: enable a trusted host. In this case, the trusted host will be the Hyper-V server
Set-Item WSMan:\localhost\Client\TrustedHosts -Value “hyperv2.fshome.local”
Or, if there are multiple trusted hosts in the same DNS domain you can do it this way by using the * as the hostname wildcard
Set-Item WSMan:\localhost\Client\TrustedHosts -Value *.fshome.local
Or, if there are multiple hosts in any domain, then use the * modifier globally as shown
Set-Item WSMan:\localhost\Client\TrustedHosts -Value *
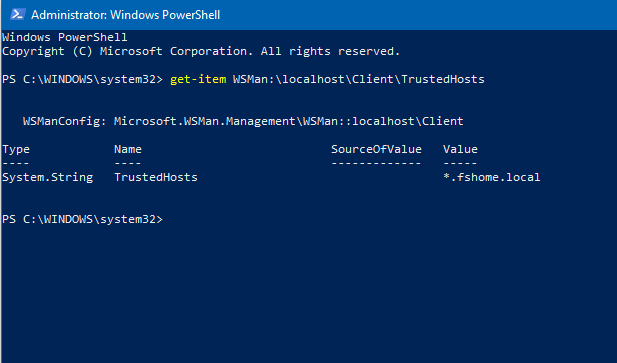
Step 9: Now let’s check to make sure the trusted host is correct
Get-Item WSMan:\localhost\Client\TrustedHosts
Step 10: Add the alternate user credentials (aka, the Local Administrator) configured in Step 3 of the fresh install of Hyper-V.
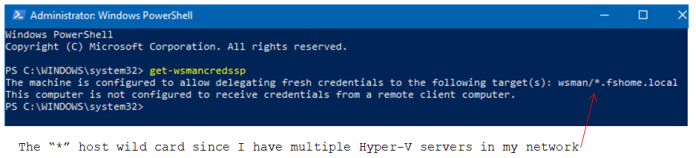
In my network, I have multiple Hyper-V servers, and the Trusted Hosts is set as “*.fshome.local”, so the user is added for each Hyper-V server in my network like so:
cmdkey /add:hyperv /user:sysadmin /pass:PaSsWoRd
cmdkey /add:hyperv2 /user:sysadmin /pass:PaSsWoRd
cmdkey /add:hyperv3 /user:sysadmin /pass:PaSsWoRd
If there were a different user and password for each Hyper-V server, we would adjust the above to reflect that. In my case, the user and password are the same across all my Hyper-V servers to keep things sane.
*Note: let’s say you did not have DNS setup, nor your …\drivers\etc\hosts file, then this is how you’d setup cmdkey using IP addressing
cmdkey /add:192.168.1.111 /user:sysadmin /pass:PaSsWoRd
And, every step in this article where there is a reference to the Hyper-V server name you would replace with the IP address.
And, when you go to add the Hyper-V server in the Hyper-V Manager, you’d also add it by IP address
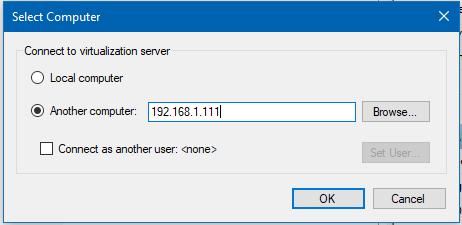
Step 11: Allow the user credentials (configured in the above cmdkey) on this computer (Windows 10) to be sent to the remote computer (the Hyper-V server):
(note: the entries are all on one line even though WordPress shows multiple lines)
Enable-WSManCredSSP -Role client -DelegateComputer “hyperv.fshome.local”
Now the command will only allow one computer, hyperv.fshome.local. So, to allow the user credentials to be sent to another remote computer we add the other computer’s name:
Enable-WSManCredSSP -Role client -DelegateComputer “hyperv2.fshome.local”
Or, we can configure multiple computers at one time
Enable-WSManCredSSP -Role “Client” -DelegateComputer “hyperv.fshome.local”, “hyperv2.fshome.local”, “hyperv3.fshome.local”
Or, to allow the user's credentials on this computer to be sent to any Hyper-V host in the same DNS domain, we can just use the hostname wildcard:
Enable-WSManCredSSP -Role client -DelegateComputer “*.fshome.local”
Or, to allow the users' credentials on this computer to be sent to any Hyper-V host in any DNS domain, we can just use the host and domain wildcard:
Enable-WSManCredSSP -Role client -DelegateComputer “*”
Tip: for Managed Service Providers deploying Hyper-V, the above method is useful if you carry one laptop that is used on-site for all your customers – each being their unique DNS domains. Of course, you’d want to set one universal local admin user/password across all your customers for sake of making this useful.
Step 12: Now let’s verify the WSManCredSSP configuration
Get-WSManCredSSP
Now, if there was a mistake that was made, or a need to reconfigure, or to start over from scratch, or just to experiment, whatever, the WSManCredSSP configuration can be cleared by doing the following and restarting from Step 11
Disable-WSManCredSSP -Role Client
Step 13: allow COM Security anonymous login remote access. While still in PowerShell, type the following:
dcomcnfg
 double-click on the Computers folder
 right-click on the My Computer icon
 click on COM Security
 in the Access Permissions section of the window, click Edit Limits…
 Select ANONYMOUS LOGON
Check the box for Remote Access
Click OK
 Select ANONYMOUS LOGON
 Check the box for Remote Access
 Click OK
Close the dcomcnfg window.
That is it. The Window 10 configuration steps are complete. You are done!
At this point, you should be able to launch the Windows 10 Hyper-V Manager and successfully connect and add the Hyper-V server(s) to the manager.
Troubleshooting:
It used to work, but now doesn’t…
If you manually change the IP address on the Window 10 workstation, e.g., from DHCP to static, or the reverse, be sure to rerun Step 5 and Step 6.
Still cannot get connected, just throws errors…
- Make sure you can ping the Hyper-V server.
- Ensure DNS is setup properly
- Use Notepad to add a host entry for the Hyper-V server(s) on the workstation in the c:\windows\system32\drivers\etc\hosts e.g.,
192.168.1.111 hyperv2.fshome.local hyperv2
Be sure to start Notepad with Run as Administrator when you do this - Ensure the Local Administrator matches what is set for cmdkey.
- If you’ve deviated from the instructions and have used an IP address instead of a hostname, then be sure that IP is used in the cmdkey values when running the command.
- Disable your anti-virus software.
- Go back over the steps in the article – verbatim. Start from a fresh install if necessary of both Hyper-V and Windows 10. Leave Windows 10 plain vanilla – don’t add any third party applications for the moment.
Ramblings:Setting up Windows 10 to manage Hyper-V Server is no cakewalk (compared to VMWare ESXi). However, Hyper-V has a lot to its merit. Here are some of my reasons for using:
- Plug an NTFS formatted USB stick or Ext USB HDD into the Hyper-V host and it will be recognized. With that, you can use the command prompt copy command to backup VMs to it, or for portability between Hyper-V hosts
- Ability to run net use command to map to a server share. With that, you can backup VMs to external shares or pull down your stored ISO images from another server for installation
- Ability to use \\ (whack-whack) to connect to the Hyper-V server volumes, e.g, \\hyperv2\c$, from any Windows workstation
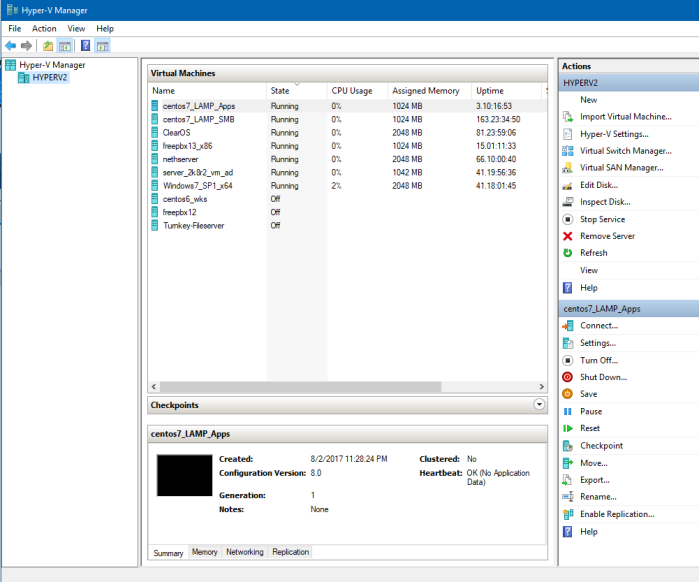
- The interface on Hyper-V manager displays all the VM’s on the host, the CPU, memory utilization, and system uptime of each VM, all on one nice dashboard
- One click to send CTRL+ALT+DEL to Windows VMs. No need to traverse menu and sub-menu
- Snappier screen response when using the local console window to access a VM. (ESXi is now web-based access)
- In a Managed Services Provider environment, it integrates seamlessly with the Microsoft ecosystem usually prevalent in those environments
- And finally, best of all, there is no need for any license key or activation!
You should now be able to successfully, repeatable, and reliably use Windows 10 to manage Hyper-V Server installations.
Once you have one or more workstations setup for management, rolling out Hyper-V deployments will only require the three steps on the Hyper-V servers to get the ball going.


