How to Configure VMware High Availability (HA) Cluster


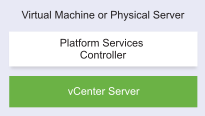
VMware High Availability (HA) components

VMware vSphere High Availability (HA) is composed from three main components, which each of them plays different role.
  • FDM – Fault Domain Manager is responsible for communication between hosts which are part of the cluster, informing other members about available resource, and VMs state. FDM manages the restart of VMs in case host fails.
  • Hostd Agent – responsible for communication between hostd and vCenter. If this agent has a problem, then HA stops functionning. Restart possible from DCUI – Under Troubleshooting Options >Enter > F11 >restart the services OR through the CLI…     ./sbin/services.sh restart
  • vCenter Server – is used to deploy and configure FDM agents inside the cluster. Manages the election of server elected master. If the whole vCenter server (or just the service) fails, the HA still continues to work.
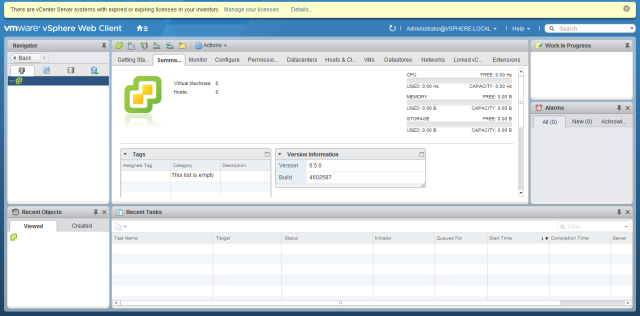
Basic two hosts HA cluster running in my lab.
VMware vSphere HA cluster - Master and Slave concept
To be able to create cluster with ESXi hosts, a vCenter is needed. The most basic package, vSphere Essentials cannot be used since the limited licensing does not allow you to create HA cluster as only vSphere Essentials Plus allows you to do that. The essentials package basicaly allows you manage three hosts from central location which is – vCenter server for essentials.
The Essentials Plus allows you not only create HA cluster, but provides also vMotion, Enhanced vMotion, and also many other products which are part of the Essentials Plus bundle:
  • vSphere Data Protection (backup product)
  • vSphere Replication (VR)  can replicate VMs to another host for DR scenarios – supports VSS) .
  • vShield Endpoint ( AV, Security)
Essentials Plus is an entry level package for small business which needs to consolidate (virtualize) like 20-30 physical servers, and make the VMs be high available. Any hardware failure of the physical hosts enables the automatic restart of VMs on another host in the cluster.

VMware vSphere High Availability Cluster Requirements

There are many requirements for VMware HA. First one of thm is to have the right VMware vSphere license, as I mentioned above. Here are other requirements:
  • vSphere Essentials Plus or higher.
  • Shared Storage – you’ll need some kind of shared storage. I say some kind, since you can use dedicated storage device (NAS, SAN) or also you can use other (software based) products which emulate the shared storage, like VMware VSAN, or any NAS or SAN hardware device.
  • CPU compatibility between the hosts – the ideal cluster is a cluster with exactly same hardware and memory size. Small 3 host cluster allowing to run 20-30 VMs will satisfy most of SMBs. But you can use VMware EVC to adjust cluster settings for CPU compatibility.
Once you install vCenter Server, configure a network of each of your ESXi hosts, you can start creating your cluster. Each of your hosts should have redundancy assured by using at least two physical NICs for each network:
  • management network
  • VM network
  • vMotion network
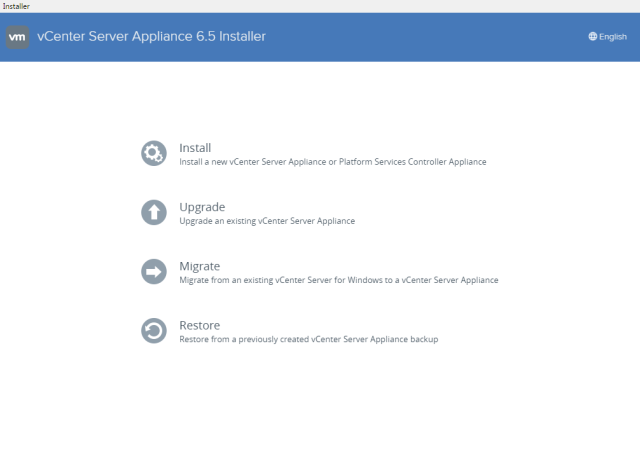
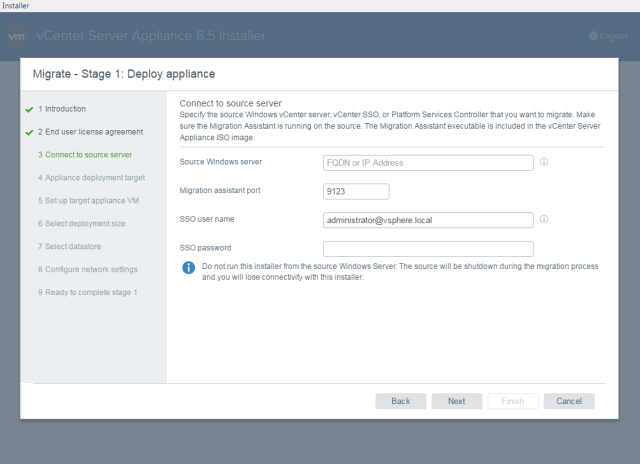
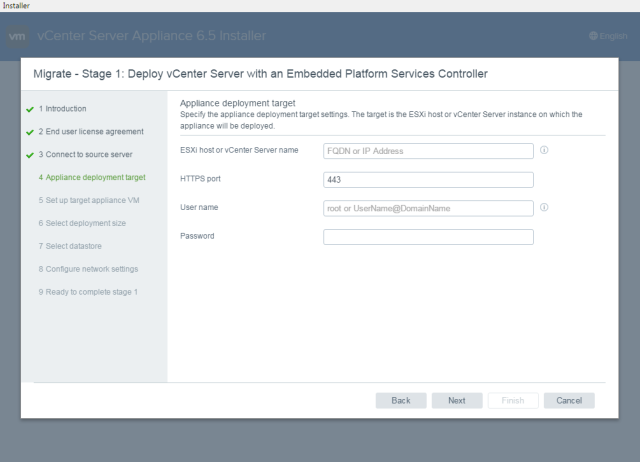
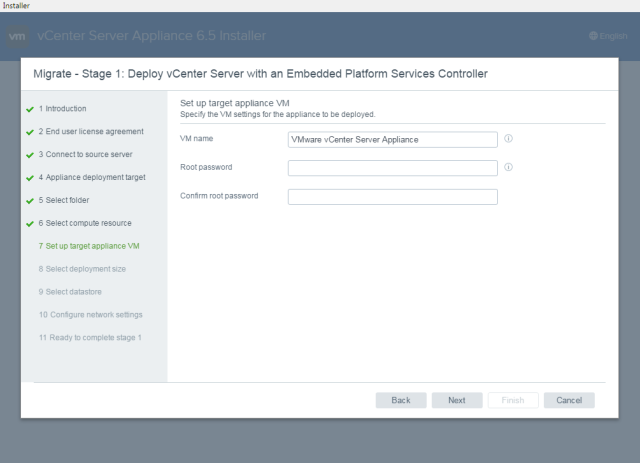
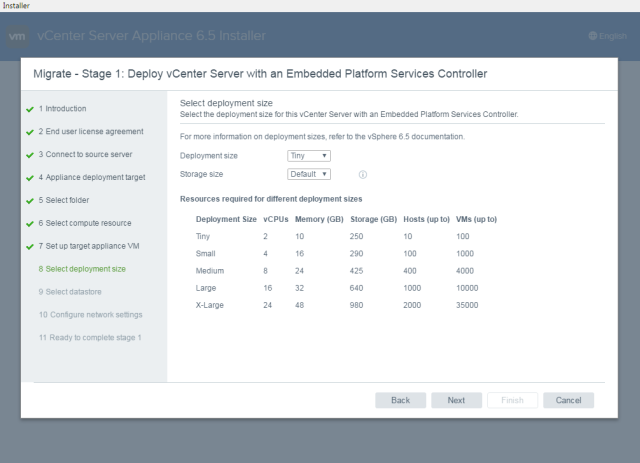
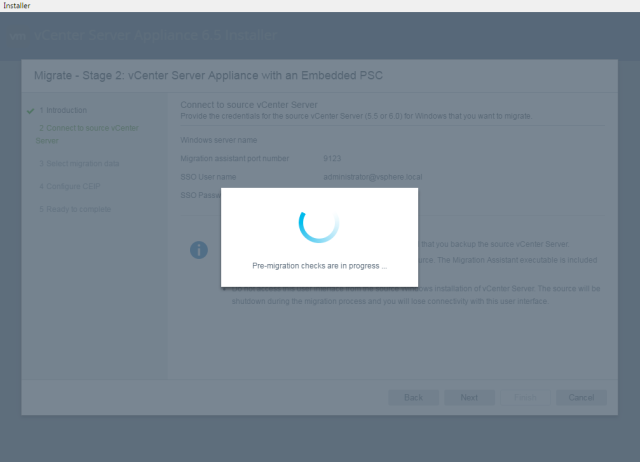
To make this article shorter, I’m skipping the network configuration now. The installation of the vCenter server on Windows Server OS is another piece which is not covered in my article as you can simply use easy install or you can deploy vCenter Server Appliance (vCSA) – read my detailed article:
  • How to deploy VMware VCSA 6.5 (VMware vCenter Server Appliance)
The vCSA has the advantage that its all-in-one prepackaged product, part of the bundle, and so no need to install the individual components one by one.
Another requirement for creating VMware HA cluster is solid DNS architecture with forward and reverse zones created and working. If not already done, create on your DNS server the necessary records now.

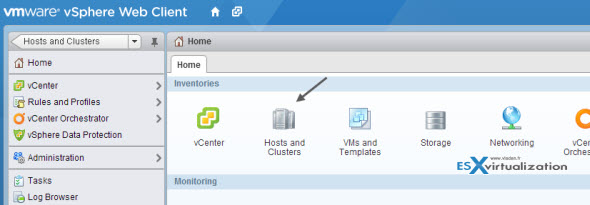
Let’s create datacenter and cluster now.

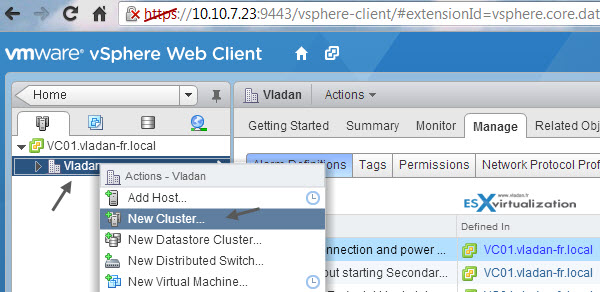
To do so, fire up vSphere Client and go to Hosts and clusters
create-ha-cluster
Then, position yourself on the Manage Tab > right click the vCenter server > New datacenter
How to create VMware HA cluster
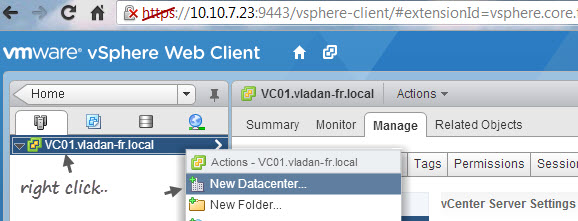
Once done, you should see new icon appear. I called my Datacenter vladan. -:). Then again, right click the datacenter you just create and create new cluster.
How to create VMware HA cluster
While going through the assistant you’re asked, if you want to Turn On DRS and Turn On HA. If you’re on the Essentials Plus licensing, you’ll get a pop-up saying that Essentials Plus isnt’s available, or something like this. As the DRS is available only in Enterprise and Enterprise Plus.
How to create VMware vSphere High Availability Cluster
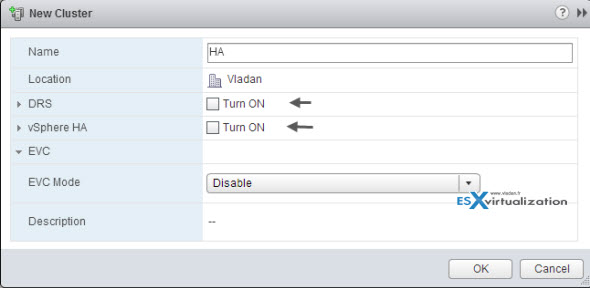
If you don’t want to activate those options now, you can leave unchecked, and continue the assistant.
You can do exactly the same steps by using the vSphere Windows Client, as a configuration of VMware vSphere (HA) cluster is still the base element of VMware, and the new vSphere Web Client only brings new functions like vSphere Enhanced vMotion or deployment and management of vSphere Replication.
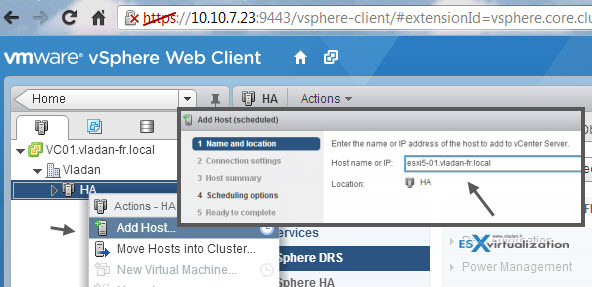
So we have Datacenter, we have a cluster. Now we need to add our ESXi hosts to our cluster. To do so, just follow those steps, right-click (I like right clicking) the HA cluster we just created > Add Host
As you can see, my host’s FQDN (fully qualified domain name) is esxi5-01.vladan-fr.local 
How to create VMware vSphere High Availability (HA) cluster
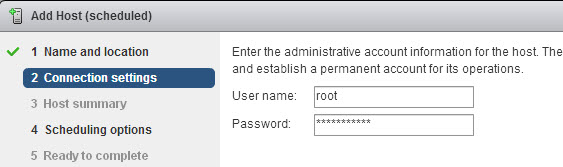
You’re prompted for a root password on that host.
How to create VMware vSphere High Availability (HA) cluster
And also, you’ll receive a security prompt before validating the assistant…
How to Create VMware vSphere High Availability (HA) cluster
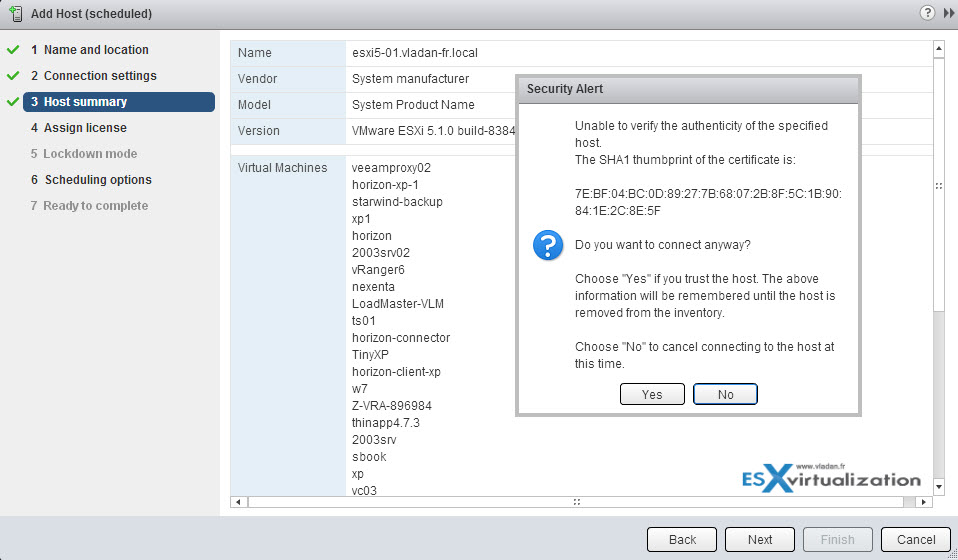
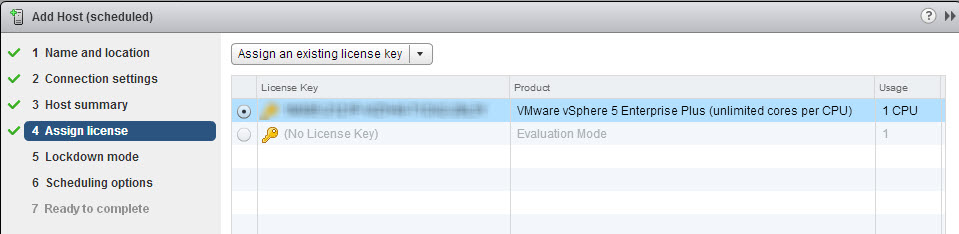
The last point is to attach a license. In my case, the license has already been entered in vCenter server, so I can assign that license to that host. When you first installing your hosts and vCenter server, you have 60 days for entering your license, and here through this assistant you wan use the Evaluation Mode license. But after 60 days, the VMs will get disconnected from vCenter and the HA won’t function.
How to Create VMware vSphere High Availability (HA) cluster
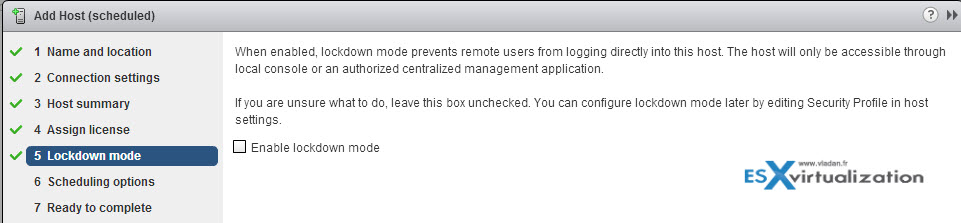
Optionally, to reinforce your company’s security, you can prevent login directly to the host and check Enable lockdown mode. Users will be forced to login only through vCenter….
How to Create VMware vSphere High Availability (HA) cluster
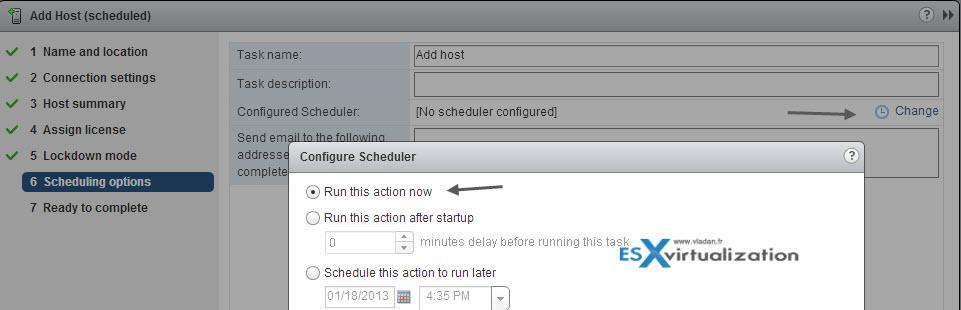
Finally, you can schedule the task. This might be useful in certain scenarios where you’re adding new hosts into the existing cluster where there are already some hosts.
That is it. Last page of the assistant ask you about scheduling the task. Click the change > and select the Run this action now radio button.
How to Create VMware vSphere High Availability (HA) cluster
This assistant had seven pages. At any moment you can click on the right top corner, where are the two small black triangles. By clicking that it will interrupt the assistant and sends it with a cool animation to the Works in Progress window on the right hand side. You just added the host to your cluster. Do the same for the other host(s), knowing that minimum two hosts are necessary to form a HA cluster.
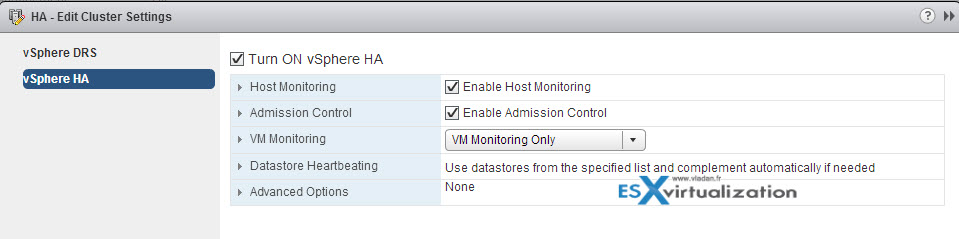
By clicking the propriety of the cluster you can configure the Host Monitoring, enable Admission Control and also use VM monitoring. I’m going to return back to this article, and complete the explications for those options.
How to configure VMware vSphere High Availability (HA) cluster
This article does not mean to have all details about HA and clustering, and there are many books and websites which goes much deeper. For the sake of simplicity, this article is here to help people which are new to VMware, new to clustering, new to this terminology. vSphere 5.1 brought new vSphere Web client, and so the screenshosts done through the new vSphere Web client are different.
The time necessary to configure vSphere cluster depends on many things, but it an be done quite fast when all prerequisites are met and all components and hosts are already installed and configured.

Repair-Volume

Performs repairs on a volume.

SYNTAX

ByDriveLetter (Default)

Repair-Volume [-DriveLetter] <Char[]> [-OfflineScanAndFix] [-SpotFix] [-Scan] [-CimSession >]
 [-ThrottleLimit ] [-AsJob] [-WhatIf] [-Confirm] []

ById

Repair-Volume -ObjectId <String[]> [-OfflineScanAndFix] [-SpotFix] [-Scan] [-CimSession >]
 [-ThrottleLimit ] [-AsJob] [-WhatIf] [-Confirm] []

ByPaths

Repair-Volume -Path <String[]> [-OfflineScanAndFix] [-SpotFix] [-Scan] [-CimSession >]
 [-ThrottleLimit ] [-AsJob] [-WhatIf] [-Confirm] []

ByLabel

Repair-Volume -FileSystemLabel <String[]> [-OfflineScanAndFix] [-SpotFix] [-Scan] [-CimSession >]
 [-ThrottleLimit ] [-AsJob] [-WhatIf] [-Confirm] []

InputObject (cdxml)

Repair-Volume -InputObject <CimInstance[]> [-OfflineScanAndFix] [-SpotFix] [-Scan] [-CimSession >]
 [-ThrottleLimit ] [-AsJob] [-WhatIf] [-Confirm] []

DESCRIPTION

The Repair-Volume cmdlet performs repairs on a volume. The following repair actions are available:
OfflineScanAndFix: Takes the volume offline to scan the volume and fix any errors found (equivalent to chkdsk /f).
Scan: Scans the volume without attempting to repair it; all detected corruptions are added to the $corrupt system file (equivalent to chkdsk /scan).
SpotFix: Takes the volume briefly offline and then fixes only issues that are logged in the $corrupt file (equivalent to chkdsk /spotfix).

EXAMPLES

EXAMPLE 1

PS C:\>Repair-Volume -DriveLetter H -Scan
This example scans drive H and reports errors only.

EXAMPLE 2

PS C:\>Repair-Volume -DriveLetter H -OfflineScanAndFix
This example takes drive H offline, and fixes all issues.

EXAMPLE 3

PS C:\>Repair-Volume -DriveLetter H -SpotFix
This example uses the spot verifier functionality to quickly fix drive H.

PARAMETERS

-AsJob

Runs the cmdlet as a background job. Use this parameter to run commands that take a long time to complete.

-CimSession

Runs the cmdlet in a remote session or on a remote computer. Enter a computer name or a session object, such as the output of a New-CimSession or Get-CimSession cmdlet. The default is the current session on the local computer.

-Confirm

Prompts you for confirmation before running the cmdlet.

-DriveLetter

Specifies a letter used to identify a drive or volume in the system.

-FileSystemLabel

Specifies the volume to scan based on the file system label (the volume name).

-InputObject

Specifies the input object that is used in a pipeline command.

-ObjectId

Specifies an ID representing the object. The ID is not globally unique.

-OfflineScanAndFix

Performs and offline scan and fix of any errors found in the file system.

-Path

Contains valid path information.

-Scan

Scans the volume.

-SpotFix

Takes the volume offline and fixes any issues that are logged in the $corrupt file.

-ThrottleLimit

Specifies the maximum number of concurrent operations that can be established to run the cmdlet. If this parameter is omitted or a value of 0 is entered, then Windows PowerShell® calculates an optimum throttle limit for the cmdlet based on the number of CIM cmdlets that are running on the computer. The throttle limit applies only to the current cmdlet, not to the session or to the computer.

-WhatIf

Shows what would happen if the cmdlet runs. The cmdlet is not run.


MIGRATING WINDOWS VCENTER SERVER TO VCSA 6.5


This post gives a walkthrough on migrating from a Windows based vCenter Server (VCS) to the Photon OS based vCenter Server Appliance (VCSA). This guide is specific to migrating and upgrading from vCenter Server 5.5 or 6.0 to VCSA 6.5. 
About VCSA
The VCSA is a pre-configured virtual appliance; as of v6.5 the operating environment is built on Project Photon OS 1.0. Since the OS has been developed by VMware it benefits from enhanced performance and boot times over the previous Linux based appliance. Furthermore the embedded Postgre database means VMware have full control of the software stack, resulting in significant optimisation for vSphere environments and quicker release of security patches and bug fixes. The VCSA scales up to 2000 hosts and 35,000 virtual machines.
In vSphere 6.0 the VCSA reached feature parity with its Windows counterpart, 6.5 begins to pave the way for VCSA to become the preferred deployment method for vCenter Server. One key addition is the inclusion of Update Manager bundled into the VCSA, as well as vCenter High Availability, Backup and Restore, and other features. The appliance also saves operating system license costs and is quicker and easier to deploy and patch.
Migrating to VCSA involves the deployment of a new appliance and migration of all configuration (including distributed switches) and historical data using the upgrade installer. The VCSA uses a temporary IP address during migration before switching to the IP and host name of the VCS, the Windows box is then powered off. Last year there was a fling for migrating to VCSA which had limited capability and support. If you have used or read about the fling then re-review any limitations as a lot of this has been lifted now that VMware have released the migration tool as an official product. Furthermore in vSphere 6.5 the migration tool is not built into the single installation package alongside install, upgrade, and restore.
vcs

Software Considerations

  • The Windows VCS must be v5.5 or v6.0 (any build / patch) to migrate to VCSA 6.5. If the VCS is v5.0 or 5.1 upgrade to 5.5 first and then migrate. Both physical and virtual vCenter Server installations are compatible.
  • Any database, internal or external, supported by VCS 5.5 can be migrated to the embedded Postgre database within the target VCSA.
  • The ESXi host where VCSA will be deployed must be v5.5 or above, as must all other hosts in the vCenter.
  • The Windows server is powered off once the VCSA is brought online, this means any other components, VMware or third party, need to be migrated off the Windows server in advance or they will no longer work (don’t forget to move and update any scripts that may live on the Windows server).
  • If you are using Update Manager the VCSA now includes an embedded Update Manager instance from v6.5.
  • You must check compatibility of any third party products and plugins that might be used for backups, anti-virus, monitoring, etc. as these may also need upgrading for use with vSphere 6.5.

Hardware Considerations

  • The VCSA with embedded PSC requires the following hardware resources (disk can be thin provisioned)
    • Tiny (up to 10 hosts, 100 VMs) – 2 CPUs, 10 GB RAM.
    • Small (up to 100 hosts, 1000 VMs) – 4 CPUs, 16 GB RAM.
    • Medium (up to 400 hosts, 4000 VMs) – 8 CPUs, 24 GB RAM.
    • Large (up to 1000 hosts, 10,000 VMs) – 16 CPUs, 32 GB RAM.
    • X-Large (up to 2000 hosts, 35,000 VMs) – 24 CPUs, 48 GB RAM – new to v6.5.
  • Storage requirements for the smallest environments start at 250 GB and increase depending on your specific database requirements. 
  • Where the PSC is deployed as a separate appliance this requires 2 CPUs, 4 GB RAM, 60 GB disk.
  • Environments with ESXi host(s) with more than 512 LUNs and 2048 paths should be sized large or x-large.
  • To help with selecting the appropriate storage size for the appliance calculate the size of your existing VCS database here.

Architectural Considerations

  • From vSphere 6 onwards the Platform Services Controller (PSC) was introduced to the vSphere architecture. The PSC contains infrastructure services such as Single Sign On, Certificate Authority, licensing, etc. The PSC is deployed internally with vCenter Server or as an external component.
  • You can read more about the PSC in this kb.
  • When implementing a new vSphere 6.5 environment you should plan your topology in accordance with the VMware vCenter Server and PSC Deployment Types. Larger environments may require an external PSC.
  • The migration tool supports different deployment topologies but does not, and can not, make changes to the topology and SSO domain configuration.
  • If SSO was installed on the same machine as vCenter Server then services are migrated to vCenter Server Appliance 6.5 with embedded Platform Services Controller.
  • If SSO was installed on a different machine from vCenter Server then the Windows VCS server will be migrated to the vCenter Server Appliance 6.5 with external Platform Services Contoller, and the Windows SSO server will be migrated to the Platform Services Controller 6.5 Appliance.
  • In this post we will be migrating a Windows vCenter using the embedded deployment model.
embedded

Other Considerations

  • Variables such as FQDN resolution, database permissions and access to the licensing portal should all be in place since we are upgrading an existing vCenter solution.
  • All vSphere components should be configured to use an NTP server. The installation can fail or the vCenter Server Appliance vpxd service may not be able to start if the clocks are unsynchronized.
  • The ESXi host on which you deploy the VCSA should not be in lockdown or maintenance mode.
  • You will need the SSO administrator login details and if the Windows VCS service runs as a service account then the account must have replace a process level token permission.
  • Local Windows users that have vSphere permissions are not migrated since they are specific to the Windows server, all SSO users and permissions are migrated.
  • If there are any firewalls between vSphere components then review the list of required ports here., e.g. data migration from the VCS to the VCSA uses SSH so port 22 must be open.
  • The upgrade can be easily rolled back by following this KB.
  • Migration of vCenter using DHCP, or services with custom ports, is not supported. The settings of only one physical network adapter are migrated.
  • Downtime varies depending on the amount of data you are migrating, but can be calculated using this KB.
  • Ensure you have a good backup of the vCenter Server and the database.
  • Official resources – vSphere 6.5 Documentation CentrevSphere 6.5 Release Notes
  • Read the Important information before upgrading to vSphere 6.5 KB.

Process

Before we begin if your existing Windows vCenter is virtual it may be beneficial to rename the inventory name in vSphere to include -old or equivalent. While the hostname and IP are migrated the vSphere inventory name cannot be a duplicate. The old server is powered down but not deleted so that we have a back out.
Download the VMware vCenter Server Appliance 6.5 ISO from VMware downloads. Unlike the Windows vCenter installer, which hasn’t changed much in v6.5; the VCSA installer has had a complete overhaul. You’ll notice straight away that the GUI is much cleaner, and multiple deployment options (install, upgrade, migrate, restore) are now bundled into one installer.
Mount the ISO on your computer. The VCSA 6.5 installer is compatible with Mac, Linux, and Windows. Copy the migration-assistant folder to the Windows vCenter Server (and SSO server if separate). If SSO is running on a different Windows server then you must run the Migration Assistant on the SSO server first and migrate following the instructions below, then complete the same process on the Windows vCenter Server.
Start the VMware-Migration-Assistant and enter the SSO Administrator credentials to start running pre-checks.
migration1
If all checks complete successfully the Migration Assistant will finish at ‘waiting for migration to start’.
On a different machine from your Windows vCenter and SSO server(s) open the vcsa-ui-installer folder file located on the root of the ISO. Browse to the corresponding directory for your operating system, e.g. \vcsa-ui-installer\win32. Right click Installer and select Run as administrator. The vCenter Server Appliance Installer will open, click Migrate.
migrate1
The migration is split into 2 stages; stage 1 deploys the new appliance with temporary network settings, there is no outage to the Windows vCenter. Stage 2 migrates data and network settings over to the new appliance and shuts down the Windows server. We begin with deploying the appliance. Click Next.
migrate2
Accept the license terms and click Next.
migrate3
Enter the details of the vCenter Server to migrate, then click Next.
migrate4
Enter the FQDN or IP address of the host, or vCenter upon which you wish to deploy the new VCSA. Enter the credentials of an administrative or root user and click Next. The installer will validate access, if prompted with an untrusted SSL certificate message click Yes to continue. Tip – connect to the vCenter for visibility of any networks using a distributed switch, connecting to the host direct will only pull back networks using a standard switch.
migrate5
Enter the virtual appliance name, this is the name that appears in the vSphere inventory as mentioned earlier. The host name of the vCenter Server will automatically be migrated. Click Next.
migrate6
Select the appropriate deployment size for your environment and click Next.
migrate7
Select the datastore to locate the virtual appliance and click Next. Configure the temporary network settings for the appliance. These will only be used during migration of the data, once complete the temporary settings are discarded and the VCSA assumes the identity, including IP settings, of the Windows vCenter Server. Click Next.
migrate8
Review the settings on the summary page and click Finish. The VCSA will now be deployed.
migrate9
Once complete click Continue to being the second stage of the migration.
migrate7
Click Next to begin the migration wizard.
migrate10
The source vCenter details are imported from stage 1.
migrate11
Select the data to migrate and click Next.
migrate12
Select whether or not to join the VMware Customer Experience Improvement Program and click Next.
migrate13
Review the summary page and click Finish. Data will now be migrated to the VCSA, once complete the Windows vCenter Server will be powered off and the network settings transferred to the VCSA. If you urgently need to power back on the Windows server to retrieve files or such like, then do so with the vNICs disconnected, otherwise you will cause an IP/host name conflict on the network.

Post-Installation

Connect to the vCenter post install using the IP or FQDN of the vCenter. Access vSphere by clicking either the vSphere Web Client (Flash) or the vSphere Client (HTML5). Connect to the vSphere Web Client to manage your system, the thick client (Windows) is no longer supported.
vsphereweb
Log in to the vSphere Web Client using the SSO administrator login. Verify the installed version is correct under the Summary tab when selecting the vCenter, you can also go to Help > About.
vsphereclient
You must apply a new vCenter license key within 60 days. From the Hosts and Clusters view select the vCenter Server. Click Actions and Assign License. Select a license or use the green plus button to add a new license and click Ok.
client
You can obtain a 60 day trial license for vCenter Server here. If you have purchased vCenter Server then log into your licensing portal here. If the license key does not appear then check with your VMware account manager.