RetroUI for Windows 8 Menu and 'SuperSize' Start screen


[Image: 25pr67s.jpg]

Software developer Thinix has released a number of versions of its Windows 8 Start menu program RetroUI over the past several months. Now the company has launched a major new update for RetroUI, which brings its version number up to 3.0.

This new version includes something that a number of people might like; a true 'retro" Windows 7 style Start menu for the Windows 8 desktop, with features like integrated search, right click context menus and a way to drag and drop items in the menu.

[Image: 2ivo4l2.jpg]


Other new features in RetroUI 3.0 include the ability for the Start Menu to adjust its color to a user's Windows 8 color choice. Metro apps can now have their starting size set as a percentage of the desktop and Metro apps can now "snap" to fill half the screen for those users with large monitors.

The program is available for download now for $4.95 for use on one PC or a version for $9.95 that can be used by up to three PCs. You can also get a seven day free trial version and there are other versions made for business and educational use.

Source: Thinix 

Source: Neowin

Easy ways to keep your computer safe and secure on the Internet


Introduction
Let's face it, the Internet is not a very safe place. There are hackers trying to access your computer, worms trying to infect you, malicious Trojans disguised as helpful programs, and spyware that reports your activities back to their makers. In many cases those who become infected unknowingly become a breeding ground for unwanted programs and criminal activity. It does not have to be this way. With proper education and smart computing the Internet can be a safe, useful, and fun place to visit without having to worry about what is lurking around the corner.
This tutorial was created to provide tips and techniques for smart and safe computing. When using these techniques you will not only protect yourself and your data from hackers and viruses, but also keep your computer running more smoothly and reliably. The advice in this tutorial applies to all computer users and all operating systems, but we have tried to point out specific steps for various operating systems as it becomes necessary.

What you need to know to keep your computer safe on the Internet

Tip 1: Always install Operating System updates
The most important steps for any computer user is to always install updates, especially security updates, when they become available for your operating system. When operating systems are developed, bugs, or programming errors, are unfortunately created that could cause security vulnerabilities or make your computer act unexpectedly. Though the developers spend many hours trying to prevent these bugs, they are ultimately human, and bugs occur. It does not matter what operating system we are talking about, bugs are always introduced. Due to this, companies will routinely release updates and patches to fix any security vulnerabilities or errors as they are discovered.
In order for your computer to operate smoothly and safely it is imperative that all users install updates, especially security updates, as they are released. By not installing these updates you leave your computer at risk from remote users hacking into them or viruses exploiting these bugs to gain access to your computer. Thankfully, all modern operating system provide easy methods for installing new updates. In fact, most of these methods do all the work for you and just require you to click a prompt to allow the updates to install. Therefore, there really is no reason not to install them.


Tip 2: Keep your installed applications up-to-date
A common method that computer infections use to infect your computer are security vulnerabilities in your installed programs. Common programs that are targeted due to their large install base are web browsers, Microsoft Office, Adobe Reader, Adobe Flash, Adobe Shockwave, and Oracle Java. In order to make your computer as secure as possible, you need to make sure these programs are updated when new security fixes are released. The problem is that many people just ignore alerts about new updates, even though these updates fix security problems that could allow hackers into your computer.
If you are prompted by a known application that you commonly use stating that there is a new update, just click the button to allow it to be updated. This is especially true for web browsers, which are commonly targeted by malicious code on web sites. If there is a new version of your web browser available, you should upgrade it so that any security vulnerabilities are fixed.
If you use Windows, there is a great program called Secunia PSI that automatically scans your computer for applications and automatically updates them for you.
Tip 3: Do not use the same password at every site
It has now become common to hear about a company who was hacked and the hacker was able to access the company members email addresses and passwords. If you use the same password at every site, and one of those sites was hacked, the hacker now has your account information everywhere that you have an account. They can now login to your email, see what other accounts you have, banks that you use, etc and gather even more private information about you.
It is very important to use a different password at every site where you have an account. Unfortunately, we all know it's not realistic and even possible to remember a different password for every account you may own. To help with that you can use a password management program like Keepass to help you store your account information for each site you login to. Keepass also contains plugins that allow you to automatically login to sites you visit using the information stored in its database.
If you would rather not store your passwords in another program, then creating a standard password format is better than using the same password at each site. For example, for each site you visit you can create a password in the format !55. So if you were registering an account at Bleepingcomputer and you were born in 1975, you could use the password 1975bleepingcomputer!55. Then at CNN you could have an account 1975cnn!55. As you can see you are now using a different and strong password at each site, but you have an easy to remember format that you can use to determine the password.
 
Tip 4: Install and be sure to update your anti-virus software
It is very important that your computer has antivirus software running on your machine. By having an antivirus program running, files and emails will be scanned as you use them, download them, or open them. If a virus is found in one of the items you are about to use, the antivirus program will stop you from being able to run that program and infect yourself.

Is it also important to note that there is no point in running an antivirus program if you do not make sure it has all the latest updates available to it. If you do not update the software, it will not know about any new viruses, trojans, worms, etc that have been released into the wild since you installed the program. If a new infection appears in your computer, the outdated antivirus program will not know that it is bad, and not alert you when you run it and your computer becomes infected. It is imperative that you update your Antivirus software at least once a week (Even more if you wish) so that you are protected from all the latest threats.
It is also suggested that you install a free anti-malware scanner in addition to your normal anti-virus program. These free anti-malware scanners do not offer real-time protection unless you upgrade to the commercial version, but offer excellent detections when scanning with them periodically. Two recommended Windows anti-malware programs are MalwareBytes Anti-Malware and SUPERAntiSpyware.
Tip 5: Use a firewall
The importance of using a Firewall on your computer or on your network cannot be stressed enough. Just because you have all the latest security updates, you are still susceptible to unreported, unpatched, or unknown vulnerabilities that a hacker may know about. Sometimes hackers discover new security holes in a software or operating system long before the software company does and many people get hacked before a security patch is released. By using a firewall the majority of these security holes will not be accessible as the firewall will block the attempt.

Tip 6: Backup your data!
Backing up your data is not necessarily a way of keeping your computer safe, but it is a way of keeping your data safe. As you use your computer there may come a time that you cannot find a document or your hard drive fails. Having a regular backup of your data available saves you from the anguish of losing those hours of work or precious baby photos.
Both Windows and MacOS have free built in backup software so please be sure to use them to protect your data. In Windows, you can use Windows Backup program and Macs have the Time Machine program.

Tip 7: Enable the display of file extensions
It is important to enable file extensions so you can see the complete file name. A file extension, or file name extension, is the letters immediately shown after the last period in a file name. Many viruses that are sent via email as attachments contain two periods. For example, picture.jpg.exe. Since Windows is by default configured to not display extensions, Windows will strip off the .exe and instead the file will appear as picture.jpg. To you this looks like harmless image file. Once you click on it, though, instead of an image opening, it actually runs the virus and you become infected. Though a Mac hides file extensions by default as well, this is less of a problem on that operating system.

Tip 8: Do not open attachments from people you do not know
Don't open an attachment from someone you do not know. Simple as that. If someone you do not know sends you something, just delete it. If you receive an attachment from someone you know well, then you should still never open attachments that end with the following extensions: .exe.pif, .com, or .bat. For more information about file extensions, please see step 3.
Attachments are a common way that computer infections spread from computer to computer. As described in the previous tip, malware writers exploit default settings on operating systems to make attachments harmless looking so that you will then open them.
If you really want to see the file, first scan it by saving it to a folder on your drive and then scanning it using a site like Virustotal. You can also email the person directly and ask if they actually sent you that file.

Tip 9: Ignore emails that state you won a contest or a stranger asking for assistance with their inheritance
A common online scam are emails from strangers that state that you won a contest or that they need help transferring money or receiving an inheritance. These are all scams where they are trying to get your personal information in order to perform identify theft or want to use you as part of a money laundering scheme. When you receive these emails just delete them.
 
Tip 10: Watch out for online and phone support scams
Phone support scams are becoming more common and involve receiving a phone call from someone pretending to be from Google, Microsoft, or another large company. They state that they have detected you are having computer problems and are offering free remote diagnostics to see what is wrong. After they take control of your computer and pretend to look at various things, they state that your computer has a lot of problems and then try to sell you a support contact or software. Microsoft, Google, and other large companies willNEVER call you out of the blue and do this. If you do receive a call like this say "No thanks" and hang up.
Just like phone support scams, online support scams are common as well. These scams come in the form of online advertisements that display misleading messages stating that your computer is having an issue. Just like the phone support scams, these are just advertisements from people who are trying to sell you software or services. Just ignore any advertisements and messages you see like this.

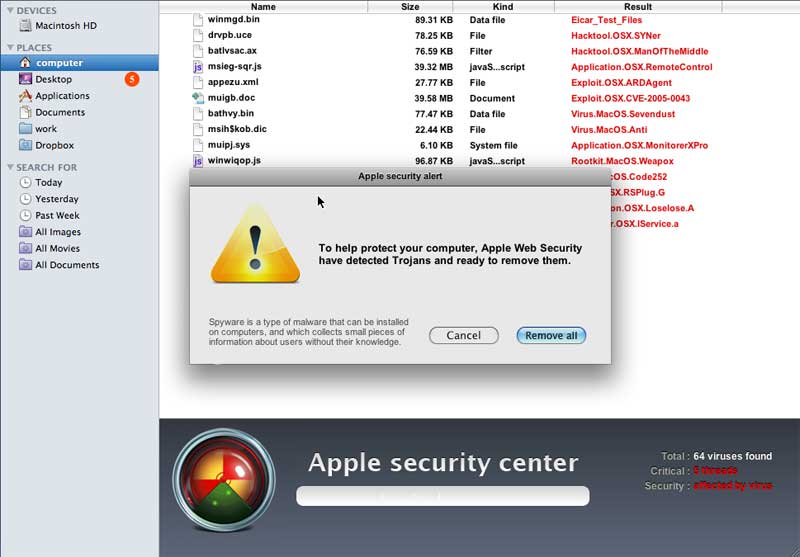
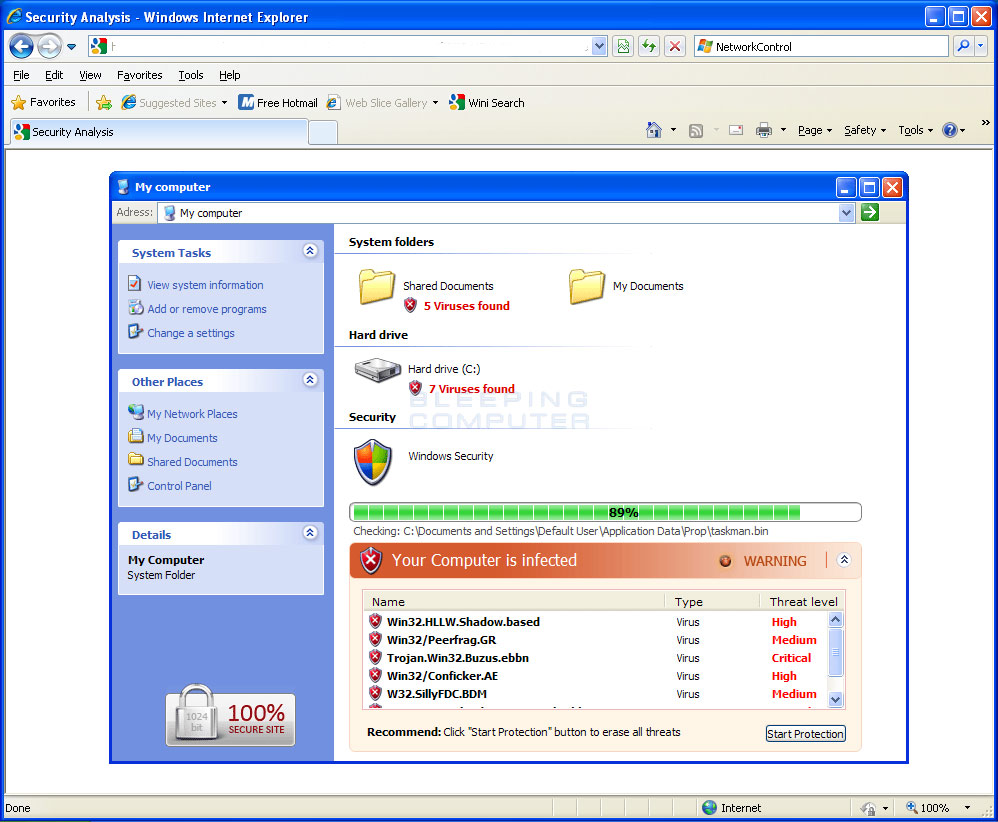
Tip 11: Ignore web pop ups that state your computer is infected or has a problem
When browsing the web, it is not uncommon to be shown an advertisement that pretends to be an online anti-virus program. These advertisements will pretend to scan your computer and then state you are infected. It will then prompt you to install a piece of software.
Examples of these types of advertisements can be seen below:
 
Fake Mac & Windows Online Scanners
Click on each image to enlarge
If you see these types of advertisements, just close your browser to close the message. If you are having issues closing your browser, then you can use the Alt+F4 keys in Windows or the Apple Key+Q in MacOS to force the program to close. If the browser refuses to close.
Tip 12: Ignore and close web pop ups that pretend to be a Windows alert
Another tactic some software vendors use is to display web pop ups that pretend to be an alert from your operating system. These alerts look just like a Windows or Mac window, but are instead a web popup trying to get you to click on the ad.
If you see these types of advertisements, just close your browser to close the message. If you are having issues closing your browser, then you can use the Alt+F4 keys in Windows or the Apple Key+Q in MacOS to force the program to close. If the browser refuses to close.

Tip 13: Some types of web sites are more dangerous than others
Some types of sites are more prone to distribute malware or use deceptive techniques to have you click on ads. With this said, do not visit porn sites! I know some of you may not be happy about this, but the reality is that many sites in this category happily try to infect machines who visit them.
Other sites that you can commonly become infected from are Warez and Crackz sites. Not only is pirated software illegal, but the sites that distribute them are a breeding ground for malware.

Tip 14: Be vigilant when using Peer-To-Peer Software
Using a program like Bittorrent for legitimate applications is perfectly fine. On the other hand, if you use P2P applications for copyrighted movies or software there is a good chance that they may contain Trojans as well. It is very common for malware developers to distribute malware on P2P networks that pretends to be a program required to view a movie or play a game. Therefore, it is strongly suggested that you do not use Peer-to-Peer software for illegal activities as you will probably get what you pay for.

Tip 15: When installing a piece of software, watch out for "bundled" tool bars and programs that you may not want
A common practice used by free programs is to bundle others programs with them. This allows the developer to offer a program for free, but still earn revenue by bundling tool bars and other software in them. When installing a program, please read through all the prompts and instructions carefully. If you come to a screen where the program is asking if you wish to install another companies tool bar or program, then please do some research as to whether or not you think these programs will be useful to you. If you do not wish to install these bundled programs, then uncheck the option to install them.
On a general note, having too many browser tool bars can negatively affect the functionality of your web browser. As most browsers have built-in search fields that you can customize, there is typically no need to install separate search tool bars unless they contain specific functionality that you would find useful.

Tip 16: When installing a piece of software, read the End User License Agreement (EULA) so you know what your getting into
When you install a piece of software be sure to read the end user license agreement, or EULA, before allowing it to install. By law, an EULA must contain information on how this program will interact with your computer and use your private information. If you find that a particular program is using your personal data or tracking your computer use, then you can use that information to determine if you really want to continue installing the software.

How to show hidden files


Introduction
By default Windows hides certain files from being seen with Windows Explorer or My Computer. This is done to protect these files, which are usually system files, from accidentally being modified or deleted by the user. Unfortunately viruses, spyware, and hijackers often hide there files in this way making it hard to find them and then delete them.
By following the steps below for each version of Windows you will be able to change the operating systems behavior so that you can see hidden and protected files. In this way you will be able to delete or replaces files for troubleshooting purposes.

Windows XP and Windows 2003
To enable the viewing of Hidden files follow these steps:
  1. Close all programs so that you are at your desktop.
  2. Double-click on the My Computer icon.
  3. Select the Tools menu and click Folder Options.
  4. After the new window appears select the View tab.
  5. Put a checkmark in the checkbox labeled Display the contents of system folders.
  6. Under the Hidden files and folders section select the radio button labeled Show hidden files and folders.
  7. Remove the checkmark from the checkbox labeled Hide file extensions for known file types.
  8. Remove the checkmark from the checkbox labeled Hide protected operating system files.
  9. Press the Apply button and then the OK button and shutdown My Computer.
  10. Now your computer is configured to show all hidden files.
Windows Vista
To enable the viewing of Hidden files follow these steps:
  1. Close all programs so that you are at your desktop.
  2. Click on the Start button. This is the small round button with the Windows flag in the lower left corner.
  3. Click on the Control Panel menu option.
  4. When the control panel opens you can either be in Classic View or Control Panel Home view:

    If you are in the Classic View do the following:
    1. Double-click on the Folder Options icon.
    2. Click on the View tab.
    3. Go to step 5.

    If you are in the Control Panel Home view do the following:
    1. Click on the Appearance and Personalization link .
    2. Click on Show Hidden Files or Folders.
    3. Go to step 5.
       
  5. Under the Hidden files and folders section select the radio button labeled Show hidden files and folders.
  6. Remove the checkmark from the checkbox labeled Hide extensions for known file types.
  7. Remove the checkmark from the checkbox labeled Hide protected operating system files.
  8. Press the Apply button and then the OK button.
  9. Now Windows Vista is configured to show all hidden files.
Windows 7
To enable the viewing of Hidden files follow these steps. Please note a guide with images that shows the same steps can be found here:

  1. Close all programs so that you are at your desktop.
  2. Click on the Start button. This is the small round button with the Windows flag in the lower left corner.
  3. Click on the Control Panel menu option.
  4. When the control panel opens click on the Appearance and Personalization link.
  5. Under the Folder Options category, click on Show Hidden Files or Folders.
  6. Under the Hidden files and folders section select the radio button labeled Show hidden files, folders, or drives.
  7. Remove the checkmark from the checkbox labeled Hide extensions for known file types.
  8. Remove the checkmark from the checkbox labeled Hide protected operating system files (Recommended).
  9. Press the Apply button and then the OK button..
  10. Now Windows 7 is configured to show all hidden files.
Windows 8
To enable the viewing of Hidden files follow these steps. Please note a guide with images that shows the same steps can be found here:

  1. From the Windows 8 Start Screen, click on the Control Panel app.
  2. When the Control Panel opens scroll down to the bottom and click on the More Settings option.
  3. The traditional Windows 8 Control Panel will now open. When it is open, click on the Appearance and Personalization link.
  4. Under the Folder Options category, click on Show Hidden Files or Folders.
  5. Under the Hidden files and folders section select the radio button labeled Show hidden files, folders, or drives.
  6. Remove the checkmark from the checkbox labeled Hide extensions for known file types.
  7. Remove the checkmark from the checkbox labeled Hide protected operating system files (Recommended).
  8. Press the Apply button and then the OK button..
  9. Now Windows 8 is configured to show all hidden files.
Please note that you will now see icons that were not previously visible. One of the most common concerns is that you will see a file called desktop.ini throughout your computer. These are legitimate hidden files and can be ignored.
Conclusion
Now that you know how to see all hidden files on your computer, malicious programs such as viruses, spyware, and hijackers will no longer be able to hide their presence from you or people helping you.

Dialers, Trojans, Viruses, and Worms

 Dialers, Trojans, Viruses, and Worms 


If you use a computer, read the newspaper, or watch the news, you will know about computer viruses or other malware. These are those malicious programs that once they infect your machine will start causing havoc on your computer. What many people do not know is that there are many different types of infections that are categorized in the general category of Malware.
Malware - Malware is programming or files that are developed for the purpose of doing harm. Thus, malware includes computer viruses, worms, Trojan horses, spyware, hijackers, and certain type of adware.
This article will focus on those malware that are considered viruses, trojans, worms, and viruses, though this information can be used to remove the other types of malware as well. We will not go into specific details about any one particular infection, but rather provide a broad overview of how these infections can be removed. For the most part these instructions should allow you to remove a good deal of infections, but there are some that need special steps to be removed and these won't be covered under this tutorial.
Before we continue it is important to understand the generic malware terms that you will be reading about.
Adware - A program that generates pop-ups on your computer or displays advertisements. It is important to note that not all adware programs are necessarily considered malware. There are many legitimate programs that are given for free that display ads in their programs in order to generate revenue. As long as this information is provided up front then they are generally not considered malware.
Backdoor - A program that allows a remote user to execute commands and tasks on your computer without your permission. These types of programs are typically used to launch attacks on other computers, distribute copyrighted software or media, or hack other computers.
Dialler - A program that typically dials a premium rate number that has per minute charges over and above the typical call charge. These calls are with the intent of gaining access to pornographic material.
Hijackers - A program that attempts to hijack certain Internet functions like redirecting your start page to the hijacker's own start page, redirecting search queries to a undesired search engine, or replace search results from popular search engines with their own information.
Spyware - A program that monitors your activity or information on your computer and sends that information to a remote computer without your knowledge.
Trojan - A program that has been designed to appear innocent but has been intentionally designed to cause some malicious activity or to provide a backdoor to your system.
Virus - A program that when run, has the ability to self-replicate by infecting other programs and files on your computer. These programs can have many effects ranging from wiping your hard drive, displaying a joke in a small box, or doing nothing at all except to replicate itself. These types of infections tend to be localized to your computer and not have the ability to spread to another computer on their own. The word virus has incorrectly become a general term that encompasses trojans, worms, and viruses.
Worm - A program that when run, has the ability to spread to other computers on its own using either mass-mailing techniques to email addresses found on your computer or by using the Internet to infect a remote computer using known security holes.

How these infections start
Just like any program, in order for the program to work, it must be started. Malware programs are no different in this respect and must be started in some fashion in order to do what they were designed to do. For the most part these infections run by creating a configuration entry in the Windows Registry in order to make these programs start when your computer starts.
Unfortunately, though, in the Windows operating system there are many different ways to make a program start which can make it difficult for the average computer user to find manually. Luckily for us, though, there are programs that allow us to cut through this confusion and see the various programs that are automatically starting when windows boots. The program we recommend for this, because its free and detailed, is Autoruns from Sysinternals.

When you run this program it will list all the various programs that start when your computer is booted into Windows. For the most part, the majority of these programs are safe and should be left alone unless you know what you are doing or know you do not need them to run at startup.
At this point, you should download Autoruns and try it out. Just run the Autoruns.exe and look at all the programs that start automatically. Don't uncheck or delete anything at this point. Just examine the information to see an overview of the amount of programs that are starting automatically. When you feel comfortable with what you are seeing, move on to the next section.

Use an anti-virus and anti-malware program to remove the infections
Make sure you are using an anti-virus program and that the anti-virus program is updated to use the latest definitions. If you do not currently have an anti-virus installed, you can select one from the following list and use it to scan and clean your computer. The list below includes both free and commercial anti-virus programs, but even the commercial ones typically have a trial period in which you can scan and clean your computer before you have to pay for it.
It is also advised that you install and scan your computer with MalwareBytes' Anti-Malware and SUPERAntiSpyware. Both of these are excellent programs and have a good track record at finding newer infections that the more traditional anti-virus programs miss. Guides on how to install and use these programs can be found below.
How to use ' Anti-Malware to scan and remove malware from your computer
After performing these instructions if you still are infected, you can use the instructions below to manually remove the infection.

How to remove these infections manually
We have finally arrived at the section you came here for. You are most likely reading this tutorial because you are infected with some sort of malware and want to remove it. With this knowledge that you are infected, it is also assumed that you examined the programs running on your computer and found one that does not look right. You did further research by checking that program against our Startup Database or by searching in Google and have learned that it is an infection and you now want to remove it.
If you have identified the particular program that is part of the malware, and you want to remove it, please follow these steps.
  1. Download and extract the Autoruns program by Sysinternals to C:\Autoruns
     
  2. Reboot into Safe Mode so that the malware is not started when you are doing these steps. Many malware monitor the keys that allow them to start and if they notice they have been removed, will automatically replace that startup key. For this reason booting into safe mode allows us to get past that defense in most cases.
     
  3. Navigate to the C:\Autoruns folder you created in Step 1 and double-click on autoruns.exe.
     
  4. When the program starts, click on the Options menu and enable the following options by clicking on them. This will place a checkmark next to each of these options.
    1. Include empty locations
       
    2. Verify Code Signatures
       
    3. Hide Signed Microsoft Entries
       
  5. Then press the F5 key on your keyboard to refresh the startups list using these new settings.
     
  6. The program shows information about your startup entries in 8 different tabs. For the most part, the filename you are looking for will be found under the Logon or the Services tabs, but you should check all the other tabs to make sure they are not loading elsewhere as well. Click on each tab and look through the list for the filename that you want to remove. The filename will be found under the Image Path column. There may be more than one entry associated with the same file as it is common for malware to create multiple startup entries. It is important to note that many malware programs disguise themselves by using the same filenames as valid Microsoft files. it is therefore important to know exactly which file, and the folder they are in, that you want to remove.
     
  7. Once you find the entry that is associated with the malware, you want to delete that entry so it will not start again on the next reboot. To do that right click on the entry and select delete. This startup entry will now be removed from the Registry.
     
  8. Now that we made it so it will not start on boot up, you should delete the file using My Computer or Windows Explorer. If you can not see the file, it may be hidden. To allow you to see hidden files you can follow the steps for your operating system found in this tutorial:

    How to see hidden files in Windows
     
  9. When you are finished removing the malware entries from the Registry and deleting the files, reboot into normal mode as you will now be clean from the infection.
How to protect yourself in the future
In order to protect yourself from this happening again it is important that take proper care and precautions when using your computer. Make sure you have updated antivirus and spyware removal software running, all the latest updates to your operating system, a firewall, and only open attachments or click on pop-ups that you know are safe. These precautions can be a tutorial unto itself, and luckily, we have one created already:
Easy ways to keep your computer safe and secure on the Internet

Conclusion
Now that you know how to remove a generic malware from your computer, it should help you stay relatively clean from infection. Unfortunately there are a lot of malware that makes it very difficult to remove and these steps will not help you with those particular infections.

TROJAN REMOVAL


hacked

If you do detect spyware activity on your machine, remain calm (which is easier said than done.) It is not possible to determine quickly what type of spyware you have found so treat anything as dangerous because if you are dealing with a hacker backdoor trojan, it is necessary that your next actions do not alert the intruder that they have been detected as they may attempt to delete any trails that will lead back to them, and in doing so may cause harm to your computer.

Don't hang around online

If your internet connection is live then close out immediately and if you are running broadband then temporarily turn off the DSL router to avoid remote reconnection. ( Unless you really know what you are doing then we advise against attempting to determine the intruders IP address or monitor their actions before disconnecting. ) 


Trojan and Spyware Removal


There are 3 different methods which we will outline here, and you will most probably use a combination of one, two or all of them.

No one way is the right or wrong way, these are just different options to achieve the same end result. It really depends on some extent on your level of expertise and what you feel comfortable with. 


Manual Trojan Removal Hints and Techniques


Using a virus and malware scanner is essential but it does not mean that these programs will be able to remove a trojan infection when one occurs. This article aims to give you a general overview on how a trojan infects you as well as hints and techniques on manually removing a trojan infection.

Trojans need to be able to start up

This may sound obvious but a lot of people don't realise that trojans cannot continually infect your computer without somehow finding a way to re-start when the computer re boots.

To re-start after a computer has been rebooted a trojan will often use the various start up methods legitimate software use to re-start. This gives us an advantage over the trojan, if we know where to look we can stop the trojan from re-starting and basically stop the infection.

The registry is the first place to look; many simple trojans will use the registry to start up.

To view your registry with windows XP go to start then run and type regeditthen hit ok.
To view your registry with windows vista go to the start search dialog box and type in regedit


Once you have the registry editor open you can try navigating to the following paths
HKEY_LOCAL_MACHINE\Software\Microsoft\Windows\CurrentVersion\RunServices

HKEY_LOCAL_MACHINE\Software\Microsoft\Windows\CurrentVersion\RunServicesOnce

HKEY_LOCAL_MACHINE\Software\Microsoft\Windows\CurrentVersion\Run

HKEY_LOCAL_MACHINE\Software\Microsoft\Windows\CurrentVersion\RunOnce

HKEY_CURRENT_USER\Software\Microsoft\Windows\CurrentVersion\Run

HKEY_CURRENT_USER\Software\Microsoft\Windows\CurrentVersion\RunOnce

HKEY_CURRENT_USER\Software\Microsoft\Windows\CurrentVersion\RunServices

These registry paths are the most common paths that a trojan can start up on. The picture below is a hypothetical trojan infection.

Please note that a trojan will never be as easy to spot as this and will almost always use names that sound like they are part of windows or important files to trick the user.

The windows built in start up tools

Windows 98, Windows XP and Windows ME and Vista all come with a tool called MSConfig.

This tool is a hidden tool and you will not see it in your program accessories or a link to it on your desktop but it is easy to get it running. Simply go to start, then run and type msconfig then hit ok 


Now msconfig will appear. It has different appearances depending on what operating system you are using. Windows 98 and ME will not have the same options that XP has but don’t worry they can all do the same sort of job.

At the top of the MSConfig program you will see an array of tabs. To begin with you will want to look at the tab that is entitled startup. What you see under this tab is all the software that uses the registry to autostart when windows reboots. This is where you can disable software from autostarting. 

Before you go and disable software it is important to find out exactly what it does first. There are only a few essential core programs that need to start with Windows but you may also want your antivirus software and other programs you use frequently to start. 

If a Trojan has written itself to the registry to autostart you can use msconfig in some circumstances to stop it restarting. 

Once you have disabled the Trojan from restarting then you will need to reboot your computer. Once your computer has been rebooted you should now be able to delete the Trojan files. This doesn’t always work as trojans have become very sophisticated and sometimes use a process to continually write the entry back to the registry every few seconds. 

If you come across a Trojan that will not let you remove its registry entries you will need to use a program like unlocker to stop it running. Then you can delete it and disable the start up entries using msconfig. You can download unlocker for free here:
ccollomb.free.fr/unlocker/

Services in Windows XP

Windows XP differs from windows 98 and ME in that it can also use services to autostart programs. In msconfig again you can access the services by clicking on the services tab at the top. You will be presented with the following:


I have drawn a box and an arrow around hide all Microsoft services field. It is important to tick this as it hides the important services that are required for your operating system to function correctly. What you are left with is programs from other manufacturers who also want there software to autostart using the services feature. You should be able to disable any services you don't want autostarting. Some services are harder to disable then others. I have found that with some Symantec ones I have had to kill the process (using the unlocker program previously mentioned) and rename the .exe file then reboot before I can disable the service.

INI File start up entries
Msconfig also features win.ini, system.ini and boot.ini. These are also areas that software can start up. Extreme caution should be taken with editing these files. Boot.ini should be left well alone unless you know exactly what you are doing. If you make a mistake with that file windows will fail to load.

Win.ini is ok to edit in msconfig if you are sure of what you are doing. Win.ini will show you the file paths so you can check to see what the program is before you disable it from starting. Some trojans will use win.ini or system.ini to start and you can effectively disable them with msconfig.

Remember if you are not sure then either ask someone who knows, do some thorough searching online or leave it alone.

Deleting the trojan 
Once the trojan has been disabled from starting up, you should be able to simply reboot and delete the executable files (the .exe files) and it should remove the trojan.

Remember to always use a firewall and a good virus scanner.


We suggest you print these instructions out to refer to, because you may not be able to check back to it once you are in the middle of the removal process.


Scanner Assisted Trojan Removal

  1. Detected Intruders Quarantined.
    After following the analyzing instructions and running a full system scan , you should have any infected files that were detected in a quarantine folder.

  2. Create a Mirror File.
    Good Scanners will allow you to create a mirror copy of the infected file. This is important because it allows you to work on cleansing the affected files and you can then see if this alters the operation of any programs they were linked to, without the risk of doing any permanent damage. If the affected program does not function correctly you should discard the changes.

  3. Note the file location of the infected file
    The pathway for the located trojan virus, spyware, or adware will be displayed in the quarantine folder. You should note which programs these files are associated with because these are the programs that you will need to check to see that they still operate correctly once the infection has been removed but before you delete the mirror files. If you have files that you are not sure of what program they are part of there are various ways to get more information on the file that you are looking at google search. Note that some trojans and spyware have names that are similar or identical to legitimate files in order to mask their true nature. You can proceed with care to the clean and repair stage without doing irreversible damage so long as you have created the mirror or duplicate file first.
  4. Run the Clean Infection function
    We will presume that you are using a program that has a Infection removal and repair function. After making sure that you are not connected to the internet and there are no other processes running, run the infection removal function. NOTE: Some of the free versions of the Virus Trojan scanners will have detection only capabilities. If this is the case you will have to purchase the program to use its removal capabilities OR download a freeware version that does have malware removal capabilities enabled. 

  5. Test your Application
    Check that the program from which the parasite malware has been removed, is working correctly. Create a new file with this application, make modifications, save, close and reopen. Don't move on until you are sure that it is functioning correctly. Test all programs that were infected. If an application does not behave as it should then discard the changes and restart the process with a new mirror file. If after the second or third attempt you are still unsuccessful then it may be safer to delete the infected program and reinstall it. ( Now... where are those discs ? )

  6. Second Scan
    Best practice if at all possible but use a different scanner ( like a medical second opinion ) because not every scanner will detect all malware. If you are using a paid version as your primary protection there are a number of good software scanners that have a free version for on-demand scans, such as Mamutu, Trend Micro's Housecall, Malwarebytes Anti-Malware, and others.

    If anything else is found, repeat from 3.

  7. Delete Mirror Files
    Follow the instructions in the control panel of your software application to remove the now unnecessary backup data.

  8. Reactivate Firewall and active scanning

Using the command prompt


Using the command prompt is quite simple. Simply type in the command you wish to perform and then press Enter on your keyboard. If you have entered the command properly then it will be executed and the output from the command will be displayed directly within the command prompt. A powerful feature of the System Recovery Console Command Prompt is that not only can you run run console programs, but you can also run certain Windows programs such as Notepad or an antivirus program. Unfortunately, not all Windows programs will be able to run in this environment, so you will need to test them to determine which ones will operate correctly.
To help get you started with using the Command Prompt I have listed a series of console commands that work in this environment. To get help information for each of these programs you can type the program name followed by /h and press the enter key. For example, to see the help information for the copy command you would type copy /h and then press the enter key. As more programs and commands are found they will be added to the lists below. Each of the console commands must be typed into the console in order to execute them.

Console Command
Description
attribChange permissions on files.
BootrecYou can use the Bootrec.exe tool in the Windows Recovery Environment (Windows RE) to troubleshoot and repair the master boot record (MBR), boot sector,and Boot Configuration Data (BCD) store
bcdeditDisplays and allows you to change how Windows boots up. This command is useful for people who are having trouble with the Windows Boot Manager
cdChanges the current directory
chkdskChecks a hard disk for errors and attempts to repair them.
copyCopy a file from one location to another.
delDeletes a file
dirLists the files and folders in the current directory
diskpartLoad the Windows disk management program. From this program you can create, delete, shrink, and expand your existing partitions as well as get information about partitions and hard drives
icaclsChange file and folder permissions and display or modify access control lists (ACLs)
mkdirCreates a new folder
moreDisplays the content of a file one page at a time
moveMoves a file or a folder
regPerform Windows Registry operations.
renRename a file or folder
rdRemove an empty folder
typeDisplay the contents of a file
xcopyCopy a folder or files to another location

Windows Program Name
Description/Notes
Notepad.exeOpens up the Windows Notepad so you can view and edit text files. You can also use the file browser when click the File -> Open menus to copy, move, rename, and delete files.
Regedit.exeThe Windows Registry Editor.
rstrui.exeThe System Restore console where you can restore your computer back to earlier restore points.

When you are finished using the Command Prompt you can exit it by typing exit and then pressing the Enter key on your keyboard. The command prompt will close

Run a scan with Combofix


Before we start:
Please be aware that removing malware is a potentially hazardous undertaking. I will take care not to knowingly suggest courses of action that might damage your computer. However it is impossible for me to foresee all interactions that may happen between the software on your computer and those we'll use to clear you of infection, and I cannot guarantee the safety of your system. It is possible that we might encounter situations where the only recourse is to re-format and re-install your operating system, or to necessitate you taking your computer to a repair shop. 

Because of this, I advise you to backup any personal files and folders before you start. 


Please run the following utility so that I can get a log of your system...
Run a scan with Combofix


Please read and follow very carefully the below instructions

Download ComboFix from one of the following locations: 

COMBOFIX DOWNLOAD LINK #1 (This link will automatically download Combofix on your computer)
COMBOFIX DOWNLOAD LINK #2 (This link will automatically download Combofix on your computer)
----------------------------------------------------------------
VERY IMPORTANT !!! Save ComboFix.exe to your Desktop 

  • Close any open browsers.
  • Close/disable all anti virus and anti malware programs so they do not interfere with the running of ComboFix.
    Very Important! Temporarily disable your anti-virusscript blocking and any anti-malware real-time protection before performing a scan. They can interfere with ComboFix or remove some of its embedded files which may cause "unpredictable results".
  • WARNING: Combofix will disconnect your machine from the Internet as soon as it starts.Please do not attempt to re-connect your machine back to the Internet until Combofix has completely finished.
    If there is no internet connection after running Combofix, then restart your computer to restore back your connection.
-----------------------------------------------------------------

How to run the Combofix scan : 
  1. Double click on ComboFix.exe & follow the prompts.
  2. Accept the disclaimer and allow to update if it asks
  3. When finished, it shall produce a log for you.
  4. Please include the C:\ComboFix.txt in your next reply.


Additional notes:
  1. Do not mouse-click Combofix's window while it is running. That may cause it to stall.
  2. Do not "re-run" Combofix. If you have a problem, reply back for further instructions.
  3. If after the reboot you get errors about programms being marked for deletion then reboot, that will cure it.

Remove malware when traditional tools fail

Remove malware when traditional tools fail
We have written a Malware Removal Guide for Windows which is able to remove more than 99% of today’s infections, however sometimes a PC is so severe compromised that you won’t be able to boot into Windows or install any removal tools to disinfect your system.
If that’s the case then we can use a Kaspersky Rescue Disk to remove even the most stubborn malware infections.

Removal Instructions for stubborn malware


What you'll need to perform this removal guide :
  1. A computer with Internet access.
  2. 1 blank DVD or CD
  3. 1 DVD/CD Burner
  4. Software which can create a bootable CD -  http://www.imgburn.com/index.php?act=download
  5. A copy of the latest Kaspersky Rescue Disc from here -  http://rescuedisk.kaspersky-labs.com/rescuedisk/updatable/
  6. About 1 -2  hours depending on how much data you have on C:

STEP 1: Download and create a bootable Kaspersky Rescue Disk CD


  1. Download the Kaspersky Rescue Disk ISOimage from below.
    download kaspersky rescue disk
  2. Download ImgBurn, a software that will help us create this bootable disk.
    download ImgBurn
  3. You can now insert your blank DVD/CD in your burner.
  4. Install ImgBurn by following the prompts and then start this program.
  5. Click on the Write image file to disc button.
    Create bootable CD step1
  6. Under 'Source' click on the Browse for file button, then browse to the location where you previously saved the Kaspersky Rescue Disk ISO file.(kav_rescue_10.iso)
    Create bootable CD step2
  7. Click on the big Write button.
    Create bootable CD step3
  8. The disc creation process will now start and it will take around 5-10 minutes to complete.

STEP 2:Configure the computer to boot from CD-ROM


  1. Use the Delete or F2 keys, to load the BIOS menu.Information how to enter the BIOS menu is displayed on the screen at the start of the OS boot:
    Boot into Bios
  2. In your PC BIOS settings select the Boot menu and set CD/DVD-ROM as a primary boot device.
    Boot into BIOS Step2
  3. Insert your Kaspersky Rescue Disk and restart your computer.

STEP 3:Boot your computer from Kaspersky Rescue Disk


  1. Your computer will now boot from the Kaspersky Rescue Disk,and you'll be asked to press any key to proceed with this process
    Kaspersky Rescue Disk 1
  2. In the start up wizard window that will open, select your language using the cursor moving keys. Press the ENTER key on the keyboard.
    Kaspersky Rescue Disk 2
  3. On the next screen, select Kaspersky Rescue Disk. Graphic Mode then press ENTER.
    Kaspersky Rescue Disk 3
  4. The End User License Agreement of Kaspersky Rescue Disk will be displayed on the screen. Read carefully the agreement then press the C button on your keyboard.
    Kaspersky Rescue Disk 4
  5. Once the actions described above have been performed, the Kasprsky operating system will start.

STEP 5:Scan your system with Kaspersky Rescue Disk


  1. Click on the Start buttonlocated in the left bottom corner of the screen and select the Kaspersky Rescue Disk then click on My Update Center and press Start update.
    Kaspersky Bootable Cd scan 1
  2. When the update process has completed, the light at the top of the window will turn green, and the databases release date will be updated.
    Kaspersky Bootable Cd scan 2
  3. Click on the Objects Scan tab, then click Start Objects Scanto begin the scan.
    Kaspersky Bootable Cd scan 3
  4. If any malicious items are found, the default settings are to prompt you for action with a red popup window on the bottom right. Quarantine is the recommended action in most cases but we strongly recommend that you try first to Cure the files as forms of malware may infect some critical system files.
    Kaspersky Bootable Cd scan 5
  5. When all detected items have been processed and removed, the light in the window will turn green and the scan will show as completed.
    Kaspersky Bootable Cd scan 7
  6. When done you can close the Kaspersky Rescue Disk window and use the Start Menu to Restart the computer.

Malware Removal Guide

Malware is short for "malicious software." Malware is any kind of unwanted software that is installed without your adequate consent. Spyware, rootkits, and trojan horses are examples of malicious software that are often grouped together and referred to as malware.

It’s not always easy to tell if your computer was compromised or not,because these days cybercriminals are going to great lengths to hide their code and conceal what their programs are doing on an infected computer.
It’s very difficult to provide a list of characteristic symptoms of a infected computer because the same symptoms can also be caused by hardware incompatibilities or system instability,however here are just a few examples that may suggest that your PC has been compromised :
  • You may receive the error "Internet Explorer could not display the page" when attempting to access certain websites
  • Your web browser (e.g., Microsoft Internet Explorer, Mozilla Firefox, Google Chrome) freezes, hangs or is unresponsive
  • Your web browser's default homepage is changed
  • Access to security related websites is blocked
  • You get redirected to web pages other than the one you intended to go to
  • You receive numerous web-browser popup messages
  • Strange or unexpected toolbars appear at the top of your web browser
  • Your computer runs slower than usual
  • Your computer freezes, hangs or is unresponsive
  • There are new icons on your desktop that you do not recognize
  • Your computer restarts by itself (but not a restart caused by Windows Updates)
  • You see unusual error messages (e.g., messages saying there are missing or corrupt files folders)
  • You are unable to access the Control Panel, Task Manager, Registry Editor or Command Prompt.
If you are experiencing any of the above symptoms then we strongly advise you follow our removal guide as the below instructions can be used to remove more than 99% of the Windows malware.

Malware Removal Guide for Windows


STEP 1 : Start your computer in Safe Mode with Networking


  1. Remove all floppy disks, CDs, and DVDs from your computer, and then restart your computer.
  2. Press and hold the F8 key as your computer restarts.Please keep in mind that you need to press the F8 key before the Windows  start-up logo appears.
  3. On the Advanced Boot Options screen, use the arrow keys to highlight Safe Mode with Networking , and then press ENTER.
    [Image: Safemode.jpg]
  4. Log on to your computer with a user account that has administrator rights

STEP 2: Check for malicious proxy server


Some forms of malware may add a proxy server which prevents the user from accessing the internet,follow the below instructions to check and remove any proxy server.
  1. Start Internet Explorer [Image: IE-logo.png] and if you are using Internet Explorer 9 ,click on the gear icon   [Image: IE gear icon] (Tools for Internet Explorer 8 users) ,then select Internet Options.
    [Image: Internet-options-IE.png]
  2. Go to the tab Connections.At the bottom, click on LAN settings.
    [Image: Remove-proxy-server2.png]
  3. Uncheck the option Use a proxy server for your LAN. This should remove the malicious proxy server and allow you to use the internet again.
    [Image: Remove-proxy-server3.png]
If you are a Firefox users, go to Firefox(upper left corner) → Options → Advanced tab → Network → Settings → Select No Proxy

STEP 3: Repair Executable (.exe) File Association


Rootkits and trojans can change your Windows registry settings so that when you try to run a executable file , it will instead launch the infection rather than the desired program.
  1. Download the exe-fix.bat file to fix the malicious registry changes.
    Download exe-fix.bat (Size: 5.47 KB)
  2. Once the download is complete, double-click the exe-fix.bat or right-click it and select Run as administrator.

STEP 4: Perform a system scan with Kaspersky TDSSKiller to remove any malicious rootkit


Today's threats will come bundled with rootkits which can cause browser redirects and other malicious behavior.To check if there are any rootkits on your system , we need to run a scan with Kaspersky TDSSKiller.
  1. Download the latest official version of Kaspersky TDSSKiller.
    [Image: kaspersky-tdss-killer-download.gif]
  2. Before you can run Kaspersky TDSSKiller, you first need to rename it so that
    you can get it to run. To do this, right-click on the TDSSKiller.exe icon and select Rename.
    Edit the name of the file from TDSSKiller.exe to iexplore.exe, and then double-click on it to launch.
    [Image: Kaspersky-TDSSKiller-icon.png]
  3. Kaspersky TDSSKiller will now start and display the welcome screen as shown below.In order to start a system scan , press the 'Start Scan' button.
    [Image: start-scan-kaspersky.png]
  4. Kaspersky TDSSKiller will now scan your computer for an malicous files.
    [Image:  tdsskiller-while-scanning.png]
  5. When the scan has finished it will display a result screen stating whether or not the infection was found on your computer. If it was found it will display a screen similar to the one below.
    [Image scan-results.png]
  6. To remove the infection simply click on the Continue button and TDSSKiller will attempt to clean the infection.
    A reboot might require to completely remove the malware from your system. In this scenario, always confirm the reboot action to be on the safe side.
Note: IF you have rebooted your computer,please start again in 'Safe Mode with Networking' before proceeding to the next step.You can find details on how to start in 'Safe Mode with Networking' in Step 1.

STEP 5: Run RKill to terminate any malicious process running on your computer.


RKill is a program that will attempt to terminate any malicious processes that are running on your system ,so that we can perform the next step without interruptions and clean your computer of infections.
As RKill only terminates a program's running process, and does not delete any files, after running it you should not reboot your computer as any malware processes that are configured to start automatically will just be started again.
  1. While your computer is in Safe Mode with Networking ,please download the latest official version of RKill.
    [Image: download-rkill.png
  2. Double-click on the RKill iconin order to automatically attempt to stop any processes.
    [Image: run-rkill-1.png]
  3. RKill will now start working in the background, please be patient while the program looks for various malware programs and tries to terminate them.
    [Image: run-rkill-2.png]
    IF you receive a message that RKill is an infection, that is a fake warning given by the rogue. As a possible solution we advise you to leave the warning on the screen and then try to run RKill again.Run RKill until the fake program is not visible but not more than ten times.
    IF you continue having problems running RKill, you can download the other renamed versions of RKill from here.
  4. When Rkill has completed its task, it will generate a log. You can then proceed with the rest of the guide.
    [Image: rKill-log.png]
WARNING: Do not reboot your computer after running RKill as the malware process will start again , preventing you from properly performing the next step.

STEP 6: Perform a full system scan with Malwarebytes Anti-Malware FREE


  1. Please download the latest official version of Malwarebytes Anti-Malware FREE.
    download Malwarebytes
  2. Install Malwarebytes' Anti-Malware by double clicking on mbam-setup.
    [Image: malwarebytes-installer.png]
  3. When the installation begins, keep following the prompts in order to continue with the installation process. Do not make any changes to default settings and when the program has finished installing, make sure you leave both the Update Malwarebytes' Anti-Malware and Launch Malwarebytes' Anti-Malware checked. Then click on the Finishbutton. If Malwarebytes' prompts you to reboot, please do not do so.
    [Image: install-malwarebytes.png]
  4. Malwarebytes Anti-Malware will now start and you'll be prompted to start a trial period , please select 'Decline' as we just want to use the on-demand scanner.
    [Image: decline-trial-malwarebytes.png]
  5. On the Scanner tab,please select Perform full scan and then click on the Scan button to start scanning your computer for any possible infections.
    [Image: malwarebytes-full-system-scan.png]
  6. Malwarebytes' Anti-Malware will now start scanning your computer malicious files as shown below.
    [Image: malwarebytes-scanning.png]
  7. When the scan is finished a message box will appear, click OK to continue.
    [Image: malwarebytes-scan-finish.png]
  8. You will now be presented with a screen showing you the malware infections that Malwarebytes' Anti-Malware has detected.Please note that the infections found may be different than what is shown in the image.Make sure that everything is Checked (ticked) and click on the Remove Selected button.
    [Image: malwarebytes-scan-results.png]
  9. Malwarebytes' Anti-Malware will now start removing the malicious files.If during the removal process Malwarebytes will display a message stating that it needs to reboot, please allow this request.
    [Image: malwarebytes-reboot-prompt.png]

STEP 7: Double check your system for any left over infections with HitmanPro


  1. This step can be performed in Normal Mode ,so please download the latest official version of HitmanPro.
    [Image: Download Hitman Pro]
  2. Double click on the previously downloaded file to start the HitmanPro installation.
    [Image: hitmanpro-icon.png]
    NOTE : If you have problems starting HitmanPro, use the "Force Breach" mode. Hold down the left CTRL-key when you start HitmanPro and all non-essential processes are terminated, including the malware process. (How to start HitmanPro in Force Breach mode - Video)
  3. Click on Next to install HitmanPro on your system.
    [Image: installing-hitmanpro.png]
  4. The setup screen is displayed, from which you can decide whether you wish to install HitmanPro on your machine or just perform a one-time scan, select a option then click on Next to start a system scan.
    [Image: hitmanpro-setup-options.png]
  5. HitmanPro will start scanning your system for malicious files. Depending on the the size of your hard drive, and the performance of your computer, this step will take several minutes.
    [Image: hitmanpro-scanning.png]
  6. Once the scan is complete,a screen displaying all the malicious files that the program found will be shown as seen in the image below.After reviewing each malicious object click Next.
    [Image: hitmanpro-scan-results.png]
  7. Click Activate free license to start the free 30 days trial and remove the malicious files.
    [Image: hitmanpro-activation.png]
  8. HitmanPro will now start removing the infected objects, and in some instances, may suggest a reboot in order to completely remove the malware from your system. In this scenario, always confirm the reboot action to be on the safe side.

As an additional step we strongly recommend that you download and perform a system with the following free on-demand scanners :


  1. ESET Online Scanner
  2. Emsisoft Emergency Kit
  3. Microsoft Safety Scanner

STEP 8: Unhide your files and folders


Some forms of malware can modify your file system in such a way that all files and folders become hidden, to restore the default settings , you'll need to run the below program.
  1. Please download Tweaking.com-UnhideNonSystemFiles.exe to unhide your files and folders.
    [Image: download-unhide.png]
  2. Double click on Tweaking.com-UnhideNonSystemFiles.exe and when the utility starts click on the 'Start' button to unhide your files.
    [Image: unhide-icon.png]

STEP 9 : Remove the residual damage after malware removal


Browser redirects, broken file associations and errors can be the result of residual damage, in order to remove this unwanted behavior we will need to run Windows Repair All in One.
  1. Download Windows Repair All In One installer on your computer.
    [Image: download-waio.png].
  2. Double-click tweaking.com_windows_repair_aio_setup.exe and install the program by following the prompts.
    [Image: install-wraio.png]
  3. Once the program has started, click the Start Repairs tab on the far right.
    [Image: start-repairs.png]
  4. Click Advance Mode so there is a bullet in it and then click the Start button (bottom right)
    [Image: advance-mode.png]
    Note: When asked if you would like to create a restore point. It is recommended just in-case something does not go as planned.
  5. On the next screen click Start button (bottom right) to start reverting your system to the original Windows settings
    [Image: repair-your-pc.png]
    After finishing it's task Windows Repair All In One will automatically restart your system.